Heavy gauge framing is the use of structural, load‑bearing cold‑formed steel studs, deep and slotted tracks, and bracing engineered to resist gravity, wind, and seismic forces in mid‑rise and commercial walls. In Vaughan, ON at 370 New Enterprise Way, Dass Metal Products applies this approach to reduce callbacks by controlling deflection, drift, and fastener failure over the building’s life.
By Navjot Dass • Last updated: April 30, 2026
Quick Summary
Heavy gauge framing delivers stiffer, straighter, longer‑lasting walls for mid‑rise and commercial structures. Using heavier steel studs with deep track, slotted deflection track, bridging, and tested clips cuts cracking, racking, and rework. Dass Metal pairs CSSBI‑certified manufacturing with engineering support to align gauges, spans, and connectors to your project’s loads and schedule.
Here’s what you’ll learn in this complete guide—and how to apply it on your next job:
- What heavy gauge framing is and where it outperforms light gauge and wood
- Why stiffer walls lower lifetime maintenance and tenant disruption
- How to size studs, choose deep vs slotted deflection track, and detail bridging
- Approaches for drift, thermal, and acoustic control in real jobsite conditions
- Best practices our engineering team uses across Ontario, Canada, and the U.S.
What Is Heavy Gauge Framing?
Heavy gauge framing refers to load‑bearing cold‑formed steel walls built with thicker, structural studs, deep and slotted tracks, and mechanical bracing to resist gravity, wind, and seismic demands. It is used for taller spans, higher loads, and drift control in mid‑rise, schools, healthcare, mixed‑use, and industrial buildings.
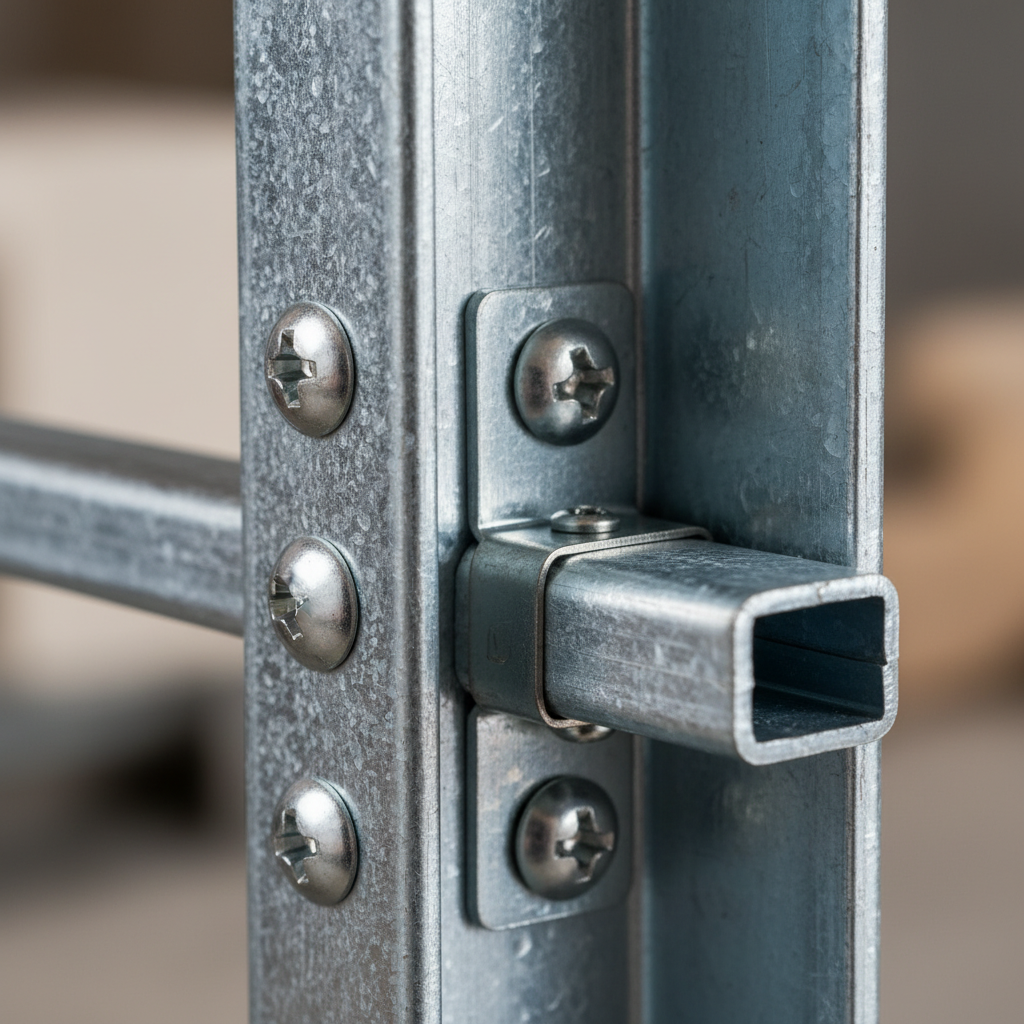
In practice, “heavy gauge” points to structural stud thicknesses and profiles matched to engineering loads—not a marketing label. At Dass Metal Products, we support this with a full system: load‑bearing studs, deep track options for base/head detailing, slotted deflection track for drift, bridging/carrying channel, and code‑compliant clips and connectors.
Core components you’ll specify
- Load‑bearing structural studs: Sized by span and load, they set the wall’s stiffness and strength.
- Deep track (base/head): Taller legs increase engagement with studs and accommodate drift screws.
- Slotted deflection track: Allows vertical building movement without transferring loads to non‑structural elements.
- Bridging / carrying channel: Controls stud rotation and lateral buckling; works with factory‑tested clips.
- Clips and anchors: Transfer forces cleanly into structure; tested connectors minimize fastener shear and pull‑out failures.
We differentiate between heavy gauge structural walls and non‑load‑bearing infill. For background on lighter assemblies, see our primer on light gauge steel framing.
Why Heavy Gauge Framing Matters
Heavier steel, deeper tracks, and continuous bridging reduce cracking, racking, and long‑term movement. The result is fewer callbacks, tighter air and water barriers, and smoother finishes—benefits owners feel as lower maintenance and steadier tenant satisfaction over the building’s life.
Builders and facility teams care about what happens after turnover. We’ve seen that walls that are a few percentage points stiffer on paper often translate to materially less drywall repair, joint re‑taping, and door binding in service. In real weather, repeated wind events and seasonal movement punish undersized walls.
- Serviceability first: Drift and deflection limits aren’t “nice‑to‑haves”—they protect finishes and envelope seals.
- Finish quality: Flatter, stiffer substrates mean straighter tile, casework, glazing interfaces, and acoustic seals.
- Lifecycle reliability: Better detailing at the head (slotted track) and continuous bridging curbs nuisance repairs.
Compared to wood or minimal steel, heavy gauge framing keeps plumbness and joint integrity through wind cycles and occupancy changes. Teams also benefit from standardized connectors that remove guesswork and speed inspections. For a systems overview, our metal framing systems guide lays out the building blocks.
How Heavy Gauge Framing Works
Engineers set stud thickness, spacing, and track selection to resist load combinations. Installers lock in performance by using deep track, slotted deflection head conditions, bridging at prescribed intervals, and tested clips and screws. Done well, the wall remains straight and serviceable for decades.
Here’s the high‑level workflow we use with contractors across Ontario, Canada, and U.S. jobs.
Design and coordination flow
- Define loads and spans: Story height, tributary loads, wind exposure, and deflection limits drive member selection.
- Select studs and spacing: Structural gauges and spacing balance stiffness, weight, and schedule.
- Choose track strategy: Deep track at base/head for engagement; slotted track at head where vertical deflection is expected.
- Lay out bridging: Bridging/carrying channel locations and clip types constrain rotation and buckling.
- Detail connections: Use listed clip/screw patterns to transfer forces with clean inspection paths.
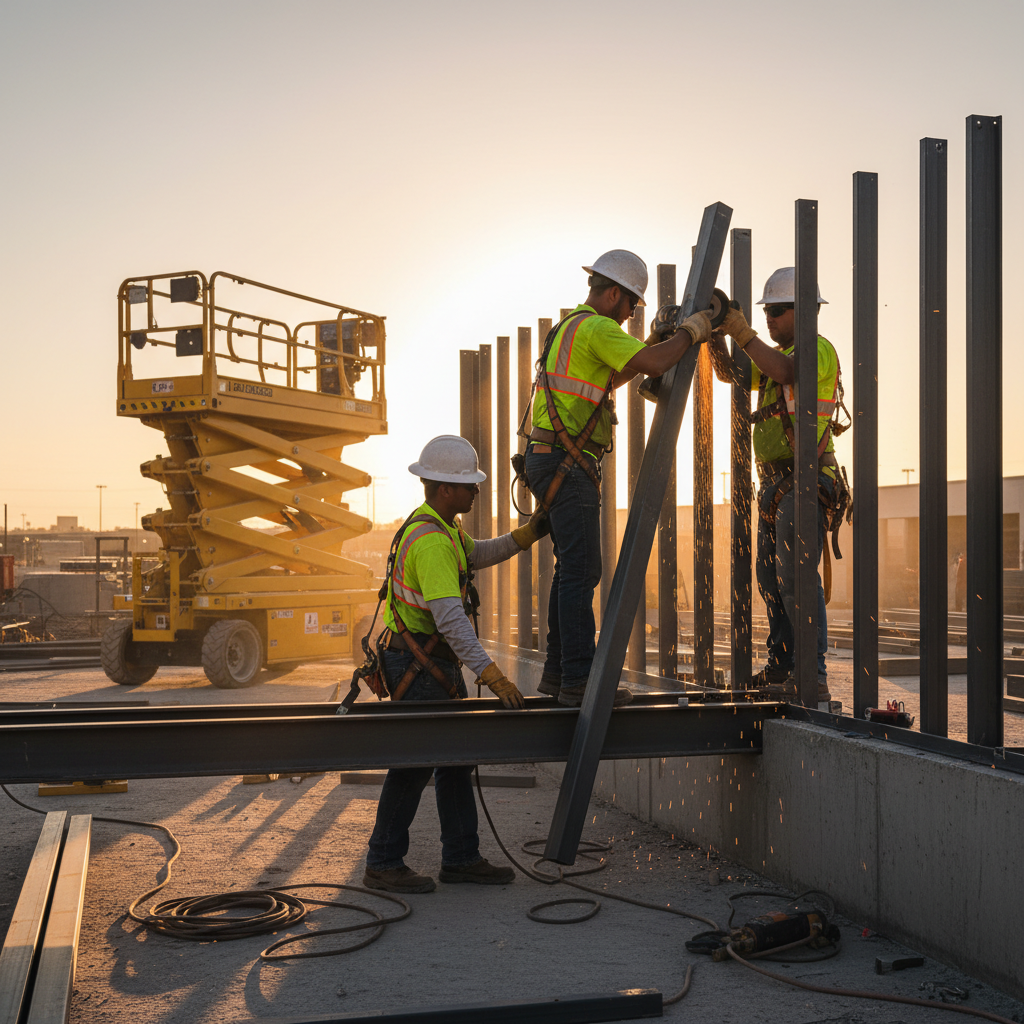
Installation checkpoints that matter
- Plumb and line: Snap lines, check plumb every lift; correct early to avoid cumulative bow.
- Seat studs fully: Bottomed studs in deep track reduce play and spread load into track legs.
- Respect slotted movement: Don’t over‑tighten deflection screws; movement is a feature, not a flaw.
- Continuous bridging: Install at specified heights; avoid skipped spans that trigger stud twist.
- Fastener verification: Confirm screw length/grade; the wrong screw can undermine a good design.
If you’re comparing approaches, our steel frame bracing overview shows how bridging integrates with windbrace and clip choices to control lateral behavior.
Types, Methods, and Approaches
Heavy gauge systems vary by role: primary load‑bearing walls, exterior infill resisting cladding loads, shaftwall cores, and tall interior partitions. Across types, deep track, slotted deflection head details, and bridging/clip strategies are the constants that protect finishes and performance.
Common heavy gauge use cases
- Load‑bearing studs (heavy gauge): Primary walls carrying gravity and wind. See our load‑bearing system for profile options.
- Exterior infill studs: Non‑bearing but designed for cladding, window, and wind loads; slotted head conditions absorb frame drift.
- Shaftwall / CH studs: Elevator and mechanical cores where fire and shaft pressures set requirements.
- Tall interior partitions: Gyms, theaters, and lobbies where spans demand heavier gauges and continuous bridging.
Track and head‑of‑wall choices
- Deep track: Improves stud engagement, tolerates construction variance, and supports drift hardware.
- Slotted deflection track: Decouples vertical movement; reduces cracking at the ceiling line.
- Hybrid details: Deep at base for robustness, slotted at head for movement capability.
Bridging and restraint
- Bridging/carrying channel: Spaced per design to limit lateral buckling; installed with tested clips.
- Windbrace and diagonal ties: Stiffen long runs and align with openings; see our framing systems guide for selection tips.
For foundational concepts across gauges, our cold‑formed metal framing guide pairs well with this section.
Best Practices We Recommend
Size members for both strength and serviceability, detail the head for movement, and lock rotation with bridging. Verify fasteners and clips against submittals. Finally, document inspections by lift—small field checks early prevent large quality issues later.
Specification habits that save rework
- Design to a deflection limit, not just strength: Tighter L/xxx criteria reduce finish issues.
- Standardize head‑of‑wall details: Slotted track with prescribed screw patterns simplifies inspections.
- Bridge continuously: Prescribe elevations/spacing; require tested clip systems for repeatability.
- Call out screw types: Prevent “bin swapping” with explicit size/grade in notes and submittals.
- Submittal clarity: Require cut sheets and load tables that match the exact profiles supplied.
Field execution cues
- Plumb every lift: A 1/8‑inch deviation per lift becomes visible at top‑out.
- Protect movement slots: Keep mud and debris out of slotted tracks to preserve deflection capacity.
- Torque discipline: Over‑driven screws strip and reduce capacity; coach crews on setting tools correctly.
- Bridge before board: Install and inspect bridging before sheathing to avoid hidden issues.
Want a quick check against common miss‑steps? Our checklist in Interior Wall Framing: Mistakes to Avoid is a handy companion on site.
Tools and Resources (Datasheets, Tables, Standards)
Successful heavy gauge framing rests on the right references: current load tables, clear product data sheets, and standard details. Keep submittals aligned to supplied profiles, and make load/span assumptions visible so everyone—from estimator to inspector—works from the same playbook.
- Product data and load tables: Include exact profile names, thickness, and capacities for the supplied studs, deep track, and slotted track.
- Standard details: Head‑of‑wall, base, openings, and bridging layouts with clip callouts and screw patterns.
- Material safety (MSDS): Handling and cutting guidance to keep shops and jobsites compliant.
For a consolidated reference, bookmark our structural metal stud framing guide, which links to specs, submittal language, and common head‑of‑wall details used by our customers across North America.
Step‑by‑Step: Designing and Installing a Heavy Gauge Wall
Define loads and spans, select stud gauge and spacing, choose deep versus slotted deflection track at the head, set bridging elevations, and verify clips and screws. Install with strict plumb control and protect movement slots. Document inspections at each lift before sheathing.
Design steps
- Establish story height, openings, and cladding loads.
- Pick stud gauge and spacing to meet both strength and deflection targets.
- Choose deep track at base; select deep or slotted track at head based on vertical movement needs.
- Lay out bridging/carrying channel and specify clip type and screw count.
- Finalize connectors to structure and coordinate fire/acoustic details.
Installation steps
- Snap lines and set base deep track, confirming anchors and tolerances.
- Plumb and seat studs fully; fasten per submittal patterns.
- Install bridging at specified elevations; inspect before concealment.
- Set slotted deflection track at head; use the correct screw and torque.
- Board, seal, and coordinate finishes with movement joints.
| Decision | Option | Use When | Benefit |
|---|---|---|---|
| Head condition | Slotted deflection track | Building vertical movement expected | Prevents ceiling/joint cracking |
| Head/Base track | Deep track | Need extra engagement and tolerance | Stiffer, reduces play at connections |
| Stud stiffness | Heavier gauge or tighter spacing | Stricter L/xxx deflection targets | Flatter finishes, fewer callbacks |
| Bracing | Bridging channel + clips | Tall spans or wind exposure | Controls rotation and buckling |
Case Studies and Practical Examples
On recent Ontario and U.S. jobs, heavier studs, deep track, and continuous bridging cut rework tied to cracking at ceilings and door binds. Standardized clips and screw patterns sped inspections and kept schedules on track—even with weather swings and occupancy changes.
Example 1: Mid‑rise mixed‑use exterior infill
- Challenge: Tall window bays and frequent wind events caused joint cracking during punch lists.
- Solution: Switched to slotted deflection track at the head plus a heavier stud gauge at original spacing.
- Outcome: Punch‑list cracking eliminated; glazing alignment improved.
Example 2: School gym partition (tall interior)
- Challenge: Long, open spans produced perceptible wall vibration and surface waviness.
- Solution: Added a line of bridging channel with tested clips; tightened screw patterns.
- Outcome: Noticeable stiffness increase and smoother finish for acoustic panels.
Example 3: Healthcare corridor (serviceability)
- Challenge: Door frames bound seasonally; ceiling joints reflected slab movement.
- Solution: Deep track at base and head; slotted deflection screws; verified torque.
- Outcome: Doors operated cleanly across seasons; joint repairs dropped.
For the structural backdrop to these examples, see our overview on when steel studs beat wood in commercial work.
Local considerations for 370 New Enterprise Way
In Vaughan’s climate, heavy gauge framing benefits from deep track engagement, protected movement slots, and disciplined fastener selection. Seasonal temperature swings and wind exposure make drift control, bridging continuity, and standardized clip patterns essential for long‑term finish quality.
- Seasonal swings: Protect slotted deflection tracks from mud and compound; temperature swings increase slab movement, so keep slots functional.
- Wind exposure: Specify bridging intervals conservatively for exposed elevations; verify clip systems match submittals.
- Cross‑border schedules: Leverage Dass Metal’s Canada/U.S. delivery to stage deep track, studs, and clips ahead of weather windows.
Frequently Asked Questions
Heavy gauge framing questions often focus on when to choose structural studs, how to handle movement at the head, and what bridging pattern to use. The short answers: size for deflection as well as strength, use slotted head details where drift exists, and follow tested bridging/clip spacing.
When should I choose heavy gauge studs over light gauge?
Use heavy gauge when walls are load‑bearing, spans are tall, deflection limits are tight, or exterior infill must manage wind and cladding loads. If serviceability (L/xxx) is driving your design or you expect head‑of‑wall movement, heavier studs and slotted tracks protect finishes.
What’s the role of slotted deflection track?
It decouples the wall from vertical structural movement so the partition doesn’t carry unintended loads. Correct screws and torque are crucial—over‑tightening defeats the slot’s movement capability and can reintroduce cracking at ceilings and door heads.
How do I control stud rotation and buckling?
Use bridging/carrying channel at specified elevations with tested clips. Continuous lines restrain the weak axis and keep the wall planar. Skipped or misaligned bridging invites twist, wavy finishes, and reduced capacity under wind suction and pressure.
Do heavier studs always mean better performance?
Not automatically. Balance gauge with spacing, track choice, and bridging. In many cases, slotted head details and proper bracing deliver bigger serviceability gains than simply increasing thickness. Aim for a coordinated system rather than a single upgrade.
What inspections should I document for heavy gauge walls?
Record plumb/line checks each lift, stud seating in deep track, bridging elevation and clip type, head‑of‑wall screw patterns, and fastener specs. Photograph before concealment. A simple one‑page checklist prevents missed details and smooths turnover.
How Dass Metal Supports Your Project
We manufacture CSSBI‑certified studs, deep and slotted track, and bridging components; provide engineering‑backed tables and details; and deliver across Canada and the U.S. Our team helps you pick gauges, head details, and clip systems that meet schedule and performance targets.
As a Canadian manufacturer in Vaughan, ON, we combine local production with dependable cross‑border logistics. Our engineers have supported builders for 40+ years, tailoring profiles and delivery to project realities. If you’re weighing options, start with our load‑bearing stud framing system and the consolidated structural framing guide.
Talk to an engineer: Share your story height, openings, and target deflection. We’ll map gauges, spacing, deep vs slotted head details, and bridging so your crews build once and move on.
Key Takeaways
Choose heavy gauge framing when spans grow, loads rise, or finish quality is mission‑critical. Pair heavier studs with deep and slotted tracks plus continuous bridging. Verify screws and clips, and document inspections per lift to lock in lifecycle reliability and fewer callbacks.
- Heavy gauge framing boosts stiffness and reduces lifecycle repairs.
- Deep track and slotted head‑of‑wall details protect finishes from movement.
- Continuous bridging with tested clips controls rotation and buckling.
- Discipline on fasteners and inspections pays back in schedule and turnover.
- Dass Metal backs selections with data, details, and North American delivery.
