Channel stud is a cold-formed steel section with a U- or C-shaped profile used to frame walls, ceilings, and shaftwall systems. It delivers high stiffness-to-weight, consistent screw engagement, and predictable, code-aligned performance. In 370 New Enterprise Way, Dass Metal Products engineers and supplies channel-based profiles for projects across Canada and the United States.
By Navjot Dass — Dass Metal Products
Last updated: 2026-05-08
Build faster with channel studs: what you’ll learn and how to apply it
This guide breaks down channel studs—what they are, where they’re used, and how to install them right the first time. You’ll see profiles, gauges, spans, fastening patterns, and field tips that cut rework. Use it as a reference on real jobs, from interior partitions to shaftwall and acoustic ceilings.
At a glance
- Plain-English definition, with quick diagrams-in-words for common profiles
- Where channel studs outperform standard C-studs—and where they don’t
- Step-by-step installation for partitions, ceilings, and shaftwall systems
- Field checks: gauge, flange width, screw pattern, and deflection detailing
- Actionable spec and submittal checklist (gauges, coatings, clips, UL/ASTM references)
Summary
Channel studs are precision cold-formed steel members that speed layout, carry predictable loads, and simplify screw attachment. The right gauge, flange, and bracing deliver straighter walls, quieter ceilings, and reliable shaftwall assemblies—especially when paired with manufacturer-tested clips and tracks matched to project movement.
Here’s the short version before we dive deep. Channel studs come in several families—carrying/bridging channel, furring channel, resilient channel, and shaftwall CH/H-stud systems. Typical thickness ranges from light-gauge members for non-load-bearing partitions to heavy-gauge components in shaft enclosures. Correct track, fastener pattern, and lateral bracing are non-negotiable.
Local considerations for 370 New Enterprise Way
- Seasonal humidity swings in the Vaughan area can move framing; include deflection detailing and slotted track on top-of-wall connections where required.
- Winter handling: store galvanized components off the ground and under cover to avoid ice contamination before screw fastening and taping.
- Busy project cycles around spring and late summer: coordinate lead times early so gauges, lengths, and clips arrive staged for your critical path.
What is a channel stud?
A channel stud is a cold-formed steel member with a U- or C-shaped web and flanges used to frame walls, ceilings, and shafts. It offers high stiffness-to-weight, precise screw seating, and tight tolerances that keep assemblies straight, square, and compliant with modern drywall and shaftwall systems.
Think of a channel stud as a shaped steel strip engineered for predictable strength and screw-friendly flanges. Common dimensional ranges include nominal widths of 1-1/2 in., 2-1/2 in., 3-5/8 in., 6 in., and 8 in., with gauges spanning light (commonly 25–20 ga) to heavy (18–16 ga) for demanding applications. The geometry limits twist, reduces oil-canning, and makes edge fastening repeatable.
Dass Metal Products manufactures channel-based profiles alongside standard studs and tracks, providing light-gauge interior solutions and heavy-gauge components for shaft enclosures. For broader fundamentals on light sections, our light‑gauge steel studs guide and cold‑formed metal framing guide explain terms, gauges, and common spans in plain language.
Why channel studs matter
Channel studs matter because their geometry speeds layout, improves screw bite, and controls deflection and acoustics in ways flat stock can’t. Used correctly, they reduce rework, keep finish surfaces flatter, and deliver consistent performance in partitions, ceilings, and shaftwall systems.
On fast-track interiors, every minute saved on layout and fastener placement adds up. A channel profile centers drivers, resists crushing at the flange, and provides predictable edge distances for drywall crews. In shaftwall and fire-rated assemblies, dedicated CH and H-stud components interface with liner panels and mineral wool for tested performance. For acoustic ceilings and demising walls, resilient and furring channels break vibration paths and align drywall planes to within tight tolerances.
In our experience supporting contractors in 370 New Enterprise Way and across North America, most callbacks trace to three things: wrong gauge, missing lateral bracing, or top-of-wall connections without required movement. Our metal framing systems guide shows how profiles and clips work together to address those risks.
How channel studs work (loads, bracing, and movement)
Channel studs carry axial and lateral loads through their web while flanges provide screw engagement and stiffness. Proper track selection, lateral bracing, and deflection detailing allow the assembly to support finishes, limit vibration, and accommodate building movement without cracking finishes.
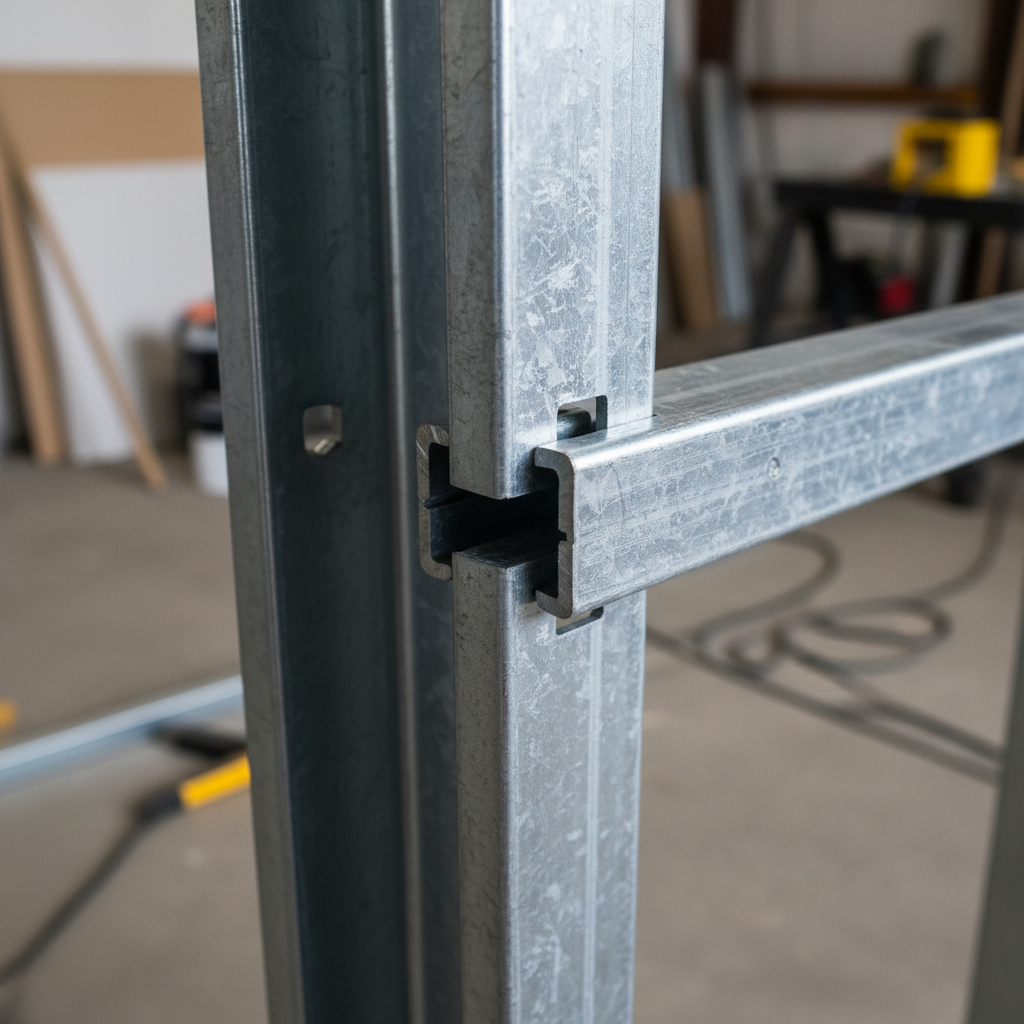
Mechanically, the web takes compression and minor bending; the flanges stabilize the web and provide a flat landing for screws. Light-gauge members (e.g., 25–20 ga) are common for non‑load‑bearing partitions up to typical ceiling heights, while heavier gauges (e.g., 18–16 ga) appear in shaft and high-wind interior applications. Lateral bracing—often via carrying/bridging channel with clips—prevents stud buckling and keeps stud spacing true at 16 in. or 24 in. on center.
At the head of the wall, slotted deflection track or deflection clips allow vertical building movement without transferring load into the partition. At the base, standard or deep track helps capture stud ends and transfers incidental loads uniformly. These small details protect finish quality by reducing screw pops and joint cracks through seasonal cycles.
Types of channel studs and where to use them
Channel-based members include carrying (bridging) channel, furring channel, resilient channel, and shaftwall CH/H-studs. Each serves a distinct purpose—stabilizing studs, creating drywall planes, decoupling sound, or building tested shaft enclosures. Match type, gauge, and spacing to the assembly’s rated performance.
Carrying/bridging channel
- Purpose: Lateral bracing across vertical studs; supports ceiling grids in some systems.
- Typical sizes: 1-1/2 in. and 2 in. profiles, often at 48 in. o.c. across studs.
- Installed with: Bridging clips or wire ties; check manufacturer-tested clip capacities.
- When to choose: Taller partitions, door-framed walls, or anywhere stud buckling risk increases.
Furring channel (hat channel)
- Purpose: Creates a true plane for drywall or cladding; equalizes irregular substrates.
- Typical sizes: 7/8 in. or 1-1/2 in. depth; aligned 16 in. or 24 in. o.c.
- Installed with: Furring channel clips or direct fastening to supports.
- When to choose: Over masonry, concrete, or uneven framing; where flush finishes matter.
Resilient channel
- Purpose: Decouples drywall from studs to reduce sound transmission (STC improvement).
- Typical sizes: Single- or double-leg profiles; horizontal orientation at 24 in. o.c. (verify assembly).
- Installed with: Fine-thread screws to the resilient leg; drywall to the channel only.
- When to choose: Demising walls, theaters, multi‑family, clinics—anywhere noise control is vital.
Shaftwall CH and H-stud systems
- Purpose: Builds rated elevator/shaft enclosures using liner panels, mineral wool, and face panels.
- Typical sizes: Project-specified CH studs and H-studs; verify with tested system literature.
- Installed with: Matching tracks, clips, and liner panel engagement per tested details.
- When to choose: Fire- and smoke-rated vertical enclosures with limited access from one side.
Comparison at a glance
| Member | Primary use | Common depth | Typical spacing | Notes |
|---|---|---|---|---|
| Carrying/bridging channel | Stud bracing, ceiling support | 1-1/2 in.; 2 in. | 48 in. o.c. across studs | Use tested clips for capacity |
| Furring channel | Plane creation for finishes | 7/8 in.; 1-1/2 in. | 16–24 in. o.c. | Ideal over masonry/concrete |
| Resilient channel | Acoustic decoupling | Single or double-leg | 24 in. o.c. (verify) | Fasten drywall to channel only |
| Shaftwall CH/H-stud | Rated enclosures | Project-specific | Per tested assembly | Match tracks/liners exactly |
Installation: step-by-step methods that prevent rework
Accurate layout, matched tracks, and disciplined screw patterns are the heart of channel-stud installations. Use the right gauge and bracing, maintain clean edge distances, and include movement detailing at the head of the wall. These steps prevent waviness, screw pops, and cracked joints later.
1) Plan and stage
- Confirm gauge, flange width, and lengths against submittals before offloading.
- Stage tracks, clips, and screws by zone; keep furring and resilient channels separated.
- Mark control lines on floors/ceilings; pull measurements from known control points.
2) Install tracks and primary studs
- Anchor bottom track per spec; vacuum debris to ensure tight fit.
- Use slotted deflection track at the head where required; verify slot orientation.
- Set studs at 16 in. or 24 in. o.c.; keep 1/4 in. clearance at the head for movement when detailed.
3) Add bracing or channels
- Install carrying/bridging channel at prescribed elevations; typically around mid‑height and/or 4 ft increments.
- Use manufacturer‑tested bridging clips; tighten screws to recommended torque to avoid spin-out.
- For furring or resilient systems, maintain exact on‑center spacing and run levels often.
4) Sheath and inspect
- Fasten gypsum to channels/studs with edge distance maintained; avoid over‑driving.
- Confirm screw patterns (e.g., 8 in. o.c. edges; 12 in. o.c. field unless assembly states otherwise).
- Check lines: no more than typical 1/8 in. per 10 ft variation in finished plane.
5) Document
- Record gauge, spacing, channels, and clip models in daily reports.
- Photograph head-of-wall deflection details before cover-up.
- Maintain submittal binders with the exact assemblies used for turnover.
For a deeper walkthrough of sizes and member selection, reference our steel stud size reference. For system-level context, see the using steel studs overview including practical field checks.

Best practices for channel-stud assemblies
Select the correct gauge, keep channels straight and level, and never mix untested components. Use the exact fastener patterns and deflection details from the tested assembly, and verify bracing is tight. These basics eliminate most post‑punch issues.
- Right gauge, right place: Use light gauge for standard non‑load‑bearing partitions; increase gauge for height, openings, and shaftwall.
- Match track to movement: Slotted deflection track at the head where required; standard or deep track at the base for capture.
- Bracing is structural: Carrying/bridging channels at the intervals shown in submittals; never omit to “save time.”
- Respect tested assemblies: Shaftwall and acoustic systems rely on specific combinations of studs, channels, liners, wool, and screws.
- Keep the plane true: Laser or string often; correct deviations before sheathing.
- Protect coatings: Handle galvanized members with clean gloves; store off the ground and covered.
Need a refresher on whole‑system thinking? Our interior wall framing mistakes explainer highlights the avoidable errors we still see on busy jobs.
Tools, submittals, and resources
Win the job in submittals: include gauges, dimensions, tracks, clips, screw schedules, and movement details. In the field, rely on layout lasers, magnetic levels, impact drivers with depth stops, and pliers/shears rated for your gauge. Keep product literature handy for the inspector.
Submittal checklist (copy/paste)
- Member types and gauges (e.g., furring channel 7/8 in.; carrying channel 1-1/2 in.).
- Track types (standard, deep, slotted deflection) with thickness and leg height.
- Clip references (bridging, deflection side clip, webslide clip) with data sheets.
- Fastener types and patterns for studs, channels, and drywall.
- Acoustic components if used (resilient channel model, mineral wool, sealant lines).
- Tested assembly identifiers for shaftwall and acoustic partitions.
Field tool essentials
- Laser and plumb/level; chalk and permanent markers for durable layout lines.
- Impact drivers with depth stops; fine‑thread screws for steel-to-steel and drywall.
- Metal shears or chop saw with metal blade; PPE including cut‑resistant gloves and eye protection.
- Crimpers or clinchers when specified; torque‑controlled drivers for clip fastening.
For background context on member families and where each excels, you can also consult our in‑depth library on steel stud framing sizes in Canada, a practical construction guide to structural metal stud framing, and a primer on light‑gauge steel stud framing in Canada.
Need a fast, clean submittal? Our engineering team can prepare profile confirmations, track selections, and clip schedules matched to your drawings. Share your height, spacing, and any acoustic or shaft requirements at Dass Metal Products.
Case studies and real‑world examples
Small layout choices create big differences. These brief field examples show how selecting the right channel type, gauge, and clip transformed speed and finish quality—on tenant interiors, educational spaces, and elevator shafts serviced from one side.
Tenant improvement: demising walls with resilient channel
A multi‑suite office refresh used 3-5/8 in. studs at 24 in. o.c., then added single‑leg resilient channel at 24 in. o.c. over mineral wool. Result: easier screw placement and measurably quieter spaces after taping. The team maintained driver depth and fastened drywall to the channel only, preserving the acoustic break.
Education space: long corridor partitions
On a school corridor, carrying channel at mid‑height (and near door heads) kept tall studs from wandering. Crew leads reported faster board hang and fewer plane corrections. Door frames landed square because bridging restrained the jamb studs during traffic and material staging.
Shaftwall: one‑sided enclosure
For an elevator core, CH/H‑stud components interfaced with liner panels and mineral wool before the face board. Matching tracks and specified clip sets kept the assembly aligned to the tested details. The GC captured photos of head‑of‑wall deflection conditions for closeout with zero rework requests.
Frequently Asked Questions
Here are concise answers to the questions we hear most about channel studs—from spacing and gauges to when to choose resilient or furring channel. Each answer is field‑tested and easy to apply on active interiors.
What’s the difference between furring channel and resilient channel?
Furring channel creates a flat plane for finishes and is fastened firmly to the substrate. Resilient channel intentionally decouples drywall from the framing to reduce sound transmission. Don’t substitute one for the other; resilient channel screws go into the channel, not the studs.
How far apart should channel studs or channels be spaced?
Typical stud spacing is 16 in. or 24 in. on center, depending on height and board type. Furring and resilient channels are commonly 16–24 in. o.c. (often 24 in. for resilient), but follow the tested assembly or project specifications for exact values.
When do I need slotted deflection track with channel studs?
Use slotted deflection track at the head of walls where the structure can move independently of the partition. It allows vertical movement while protecting finishes from cracking. Many high‑rise interiors, long corridors, and areas near mechanical equipment require it.
Can I mix different brands of channels and clips?
Avoid mixing components that haven’t been tested together. Acoustic and shaftwall systems rely on specific combinations to achieve ratings. Use the manufacturer’s tested clips and follow their screw patterns and spacing for reliable performance and smooth inspections.
Conclusion and next steps
Channel studs speed interiors when you match gauge, spacing, and channels to the assembly—and respect movement and bracing details. Use this guide as your submittal and field checklist to reduce rework and keep finishes flat, quiet, and compliant.
- Choose the right channel type for the goal: bracing, plane creation, sound control, or shafts.
- Lock in gauges and tested clips during submittals; don’t improvise in the field.
- Install with clean screw patterns and movement detailing to protect finishes.
Key takeaways
- Channel stud geometry saves time and improves finish quality when installed to spec.
- Carrying, furring, resilient, and shaftwall channels each serve a distinct role.
- Bracing, deflection, and screw patterns are the three details that prevent most rework.
Related reading in our framing cluster
Explore more framing insights to round out your channel‑stud knowledge—from light‑gauge fundamentals to system‑level decision making. These articles expand on sizes, mistakes to avoid, and time‑saving methods you can apply this week.
For foundational context, see our light‑gauge steel studs guide and the cold‑formed metal framing guide. If you’re scoping an office fit‑out, skim the interior wall framing mistakes piece to protect your punchlist.
Ready to formalize a submittal or request a quick takeoff? Book a short discovery session with our team in 370 New Enterprise Way. We’ll align gauges, tracks, and clips to your drawings and timeline.
