Interior framing is the assembly of non-structural and structural wall, soffit, and ceiling systems using light and heavy gauge steel studs, tracks, and channels. It establishes layout, load paths, and surfaces for drywall, doors, and MEP. For projects in the United States and Canada, code-compliant interior framing drives speed, straightness, and acoustic performance.
By Dass Metal Products • Last updated: June 27, 2026
Quick Summary
Interior framing organizes spaces with steel studs, tracks, and channels laid out to plan, fastened to floors and ceilings, braced for stiffness, and finished with drywall. Use 16 or 24 inches on-center layouts, proper deflection connections at slabs, and bridging for straightness. Verified products and clear sequencing reduce rework.
Here’s the high-level view so you can skim, share with your crew, and frame faster with fewer touch-ups.
- What you’ll learn: definitions, why interior framing matters, step-by-step workflow, tool lists, QA checklists, and real project examples.
- Who this helps: builders, general contractors, drywall/framing contractors, and specifiers balancing schedule, quality, and code.
- Why Dass Metal: CSSBI-certified, Canadian-made steel studs, tracks, channels, and trims; custom profiles; dependable delivery across the United States and Canada.
What Is Interior Framing?
Interior framing is the process of creating internal walls, ceilings, and soffits using steel studs, tracks, and channels. It sets the primary layout, spacing, and attachment details that determine flatness, deflection capacity, and acoustic isolation before drywall and finishes are installed.
We use the term to cover non-load-bearing partitions, chase walls, corridor walls, shaftwall assemblies, and interior load-bearing stud walls where required. In practice, you’re selecting gauges, profiles, and connections to match span, height, and acoustic targets.
Core components
- Studs: Non load bearing (light gauge) and load bearing (heavy gauge) members sized by height and load.
- Tracks: Standard track for typical legs, deep track for taller walls and added tolerance, and slotted deflection track for head-of-wall movement.
- Bracing: Bridging/carrying channel, furring channel, and windbrace to control stud twist and increase stiffness.
- Acoustic elements: Resilient channel and isolation details to raise sound control.
- Finishing trims: 90°/130° cornerbead, J trim, L trim, and Z-Bar for clean drywall terminations.
Where it shows up
- Tenant improvements, schools, healthcare, hospitality, and residential layouts.
- Shaft enclosures using shaftwall/CH studs with fire-rated board systems.
- Curved partitions using U-Flex track to achieve consistent radii.
Typical layout grids are 16 inches or 24 inches on-center depending on wall height, board thickness, and performance targets. Fastener schedules set screw sizes and spacing; head-of-wall deflection details maintain slab movement without board cracking.
Why Interior Framing Matters
Interior framing determines straightness, door fit, acoustic privacy, and drywall lifespan. Correct gauges, bracing, and deflection details prevent callbacks, while consistent on-center spacing and fastener schedules speed installation. The right system shortens punch lists and protects finishes.
Here’s the thing: you see the results of framing in every finished surface. Wavy walls telegraph through paint. Misaligned openings fight doors and glass. Overly rigid head-of-wall connections crack board at the first seasonal movement. Good interior framing avoids these outcomes.
- Straightness and flatness: Bridging and channel keep studs from rotating, limiting “telegraphing” after taping and paint.
- Acoustics: Resilient channel and staggered studs can raise sound isolation measurably when installed to spec.
- MEP coordination: Proper stud punch-outs and planned openings reduce field drilling and protect galvanization.
- Lifecycle: Correct head-of-wall deflection connections reduce gypsum cracks and door binding over time.
In our experience supporting contractors across the United States and Canada, most rework ties back to three preventable issues: missed layout control lines, incorrect fastener patterns, and skipped bridging. Solve those and schedules tighten up.
How Interior Framing Works
Interior framing follows a repeatable sequence: layout control, track anchoring, stud placement, bracing, rough opening framing, and inspection before board. Each step has measurable checkpoints—on-center spacing, plumb tolerance, and deflection gaps—that limit punch-list items later.
Below is the practical flow our customers follow when deploying light gauge steel framing systems on commercial and residential jobs.
Typical layout tolerances
- On-center spacing: 16 or 24 inches, held within ±1/8 inch over 10 feet.
- Plumb: Within 1/8 inch over 8 feet using a laser or 78-inch level.
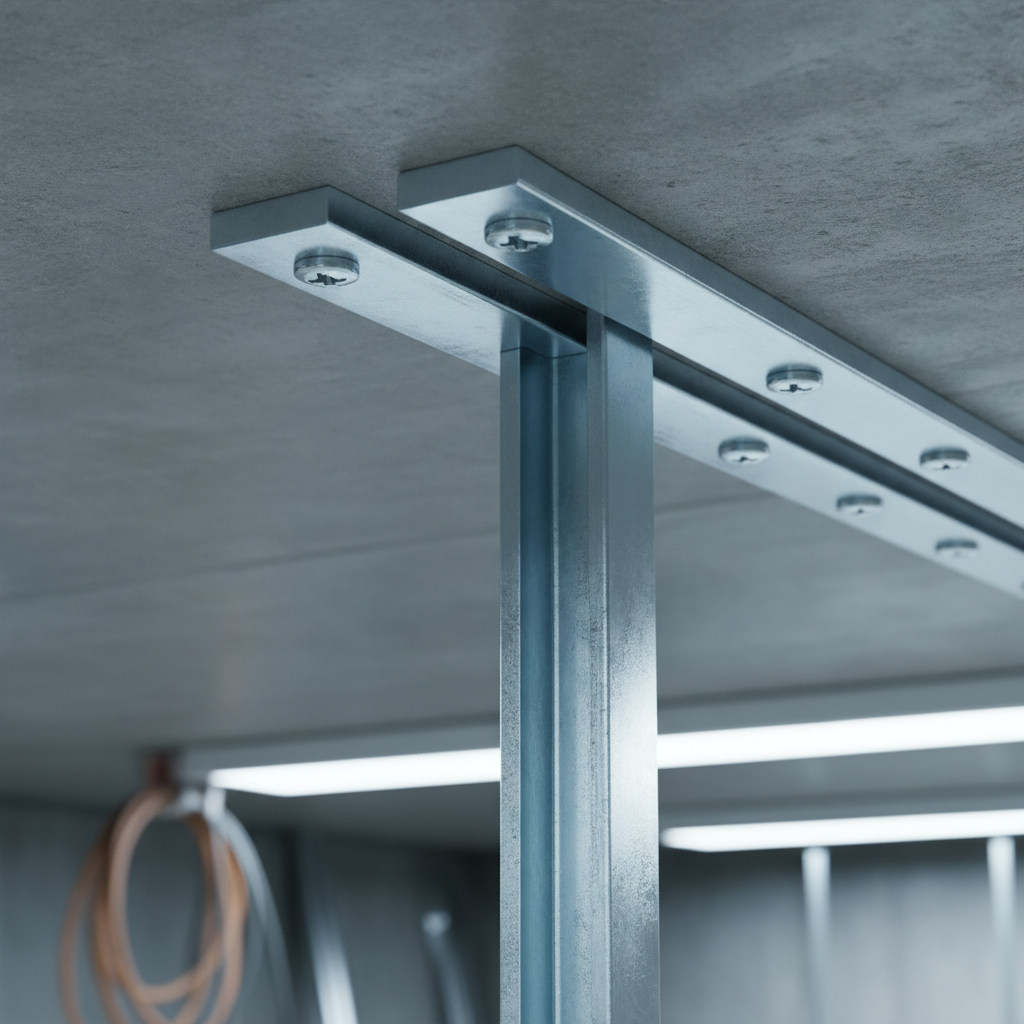
- Head-of-wall gap: Maintain the specified deflection space (e.g., 1/2 to 1 inch) and use slotted deflection track to allow movement.
- Fastener spacing: Track anchors commonly 12 to 24 inches apart depending on substrate and engineering.
Core system choices
- Stud gauge: Heavier gauges for taller walls or load-bearing runs; lighter gauges for typical partitions to save weight and speed handling.
- Track type: Standard for most interiors, deep for tall walls and added tolerance, slotted at heads to preserve deflection.
- Bracing strategy: Bridging/carrying channel at prescribed intervals; windbrace where lateral stiffness is required.
- Acoustic plan: Resilient channel where suites, classrooms, or patient areas need higher sound isolation.
When these inputs are aligned with plans and specs, crews work in rhythm: measure, anchor, place, brace, and verify. That cadence is what removes surprises later.
Types, Methods, and Approaches
Interior framing systems vary by purpose: non-structural partitions, load-bearing stud walls, shaftwalls, acoustic walls, and curved or soffit details. Matching gauge, track, and bracing to wall height and use case ensures code performance without overbuilding.
Non-structural (light gauge)
- Use cases: Tenant partitions, corridors, offices, and most interior layouts.
- Typical spacing: 16 or 24 inches on-center, adjusted by board type and wall height.
- Key components: Non load bearing steel studs with standard or deep track, bridging channel, and finishing trims.
Load-bearing (heavy gauge)
- Use cases: Interior bearing or tall walls where studs carry vertical loads.
- Engineering: Load bearing stud framing systems with specified gauges, track legs, and anchor schedules.
- Bracing: Windbrace and bracing channels to meet deflection targets at design loads.
Acoustic and resilient assemblies
- Use cases: Multifamily suites, hotels, offices, and healthcare rooms.
- Key components: Resilient channel correctly oriented and fastened to studs, plus insulation and board layers per spec.
- Outcome: Damped vibration transfer through staggered contact points and decoupling.
Specialty and curved work
- Curves: U-Flex track for consistent radii without slotting track in the field.
- Soffits and chases: Furring channel and utility angles to create plumb, square surfaces quickly.
- Shaftwalls: Shaftwall/CH studs with proper track, clips, and board sequencing for rated enclosures.
Best Practices That Prevent Rework
Prevent rework by locking in layout early, using the correct track at the head-of-wall, installing bridging at set intervals, and documenting fastener patterns. Combine laser control lines with pre-cut studs and clear checklists to keep walls plumb and straight.
Layout and control
- Snap full-height control lines, then verify with a laser. Hold on-center spacing to the plan—often 16 or 24 inches.
- Pre-drill concrete where allowed and stage anchors every 12 to 24 inches for speed and consistency.
- Use labeled bundles by length so installers grab the right stud without measuring each time.
Head-of-wall deflection
- Use slotted deflection track under concrete slabs to accommodate movement.
- Maintain the specified gap (e.g., 1/2 to 1 inch) and verify screws land within slots—never pin through the slot.
- Document each head-of-wall condition in photos for the QC log before board goes up.
Bridging, straightness, and stiffness
- Install bridging/carrying channel at regular intervals to stop twist and bow on tall walls.
- Add windbrace where plans indicate lateral stiffness requirements.
- Check flatness with a 6-foot straightedge before releasing for board.
Acoustic execution
- Orient resilient channel correctly; fasten board to the channel, not directly to studs, to keep decoupling.
- Seal perimeters with acoustic sealant and maintain gaps where specified to avoid rigid connections.
- Coordinate MEP penetrations with grommets and sealant to preserve isolation.
These habits turn into measurable improvements: flatter walls, fewer screw pops, cleaner reveals, and smoother handoffs to finishing crews.
Tools and Resources
Successful interior framing depends on precise layout tools, correct fasteners, and engineered components. Use lasers, layout tapes, impact drivers, and certified studs, tracks, channels, and clips. Reference product literature, load tables, and MSDS to match gauges and fastener schedules to design.
Field-proven tooling and documentation keep crews aligned and submittals clean.
- Layout and measuring: Laser level, layout tape with 16/24-inch markings, plumb bob, and chalk line.
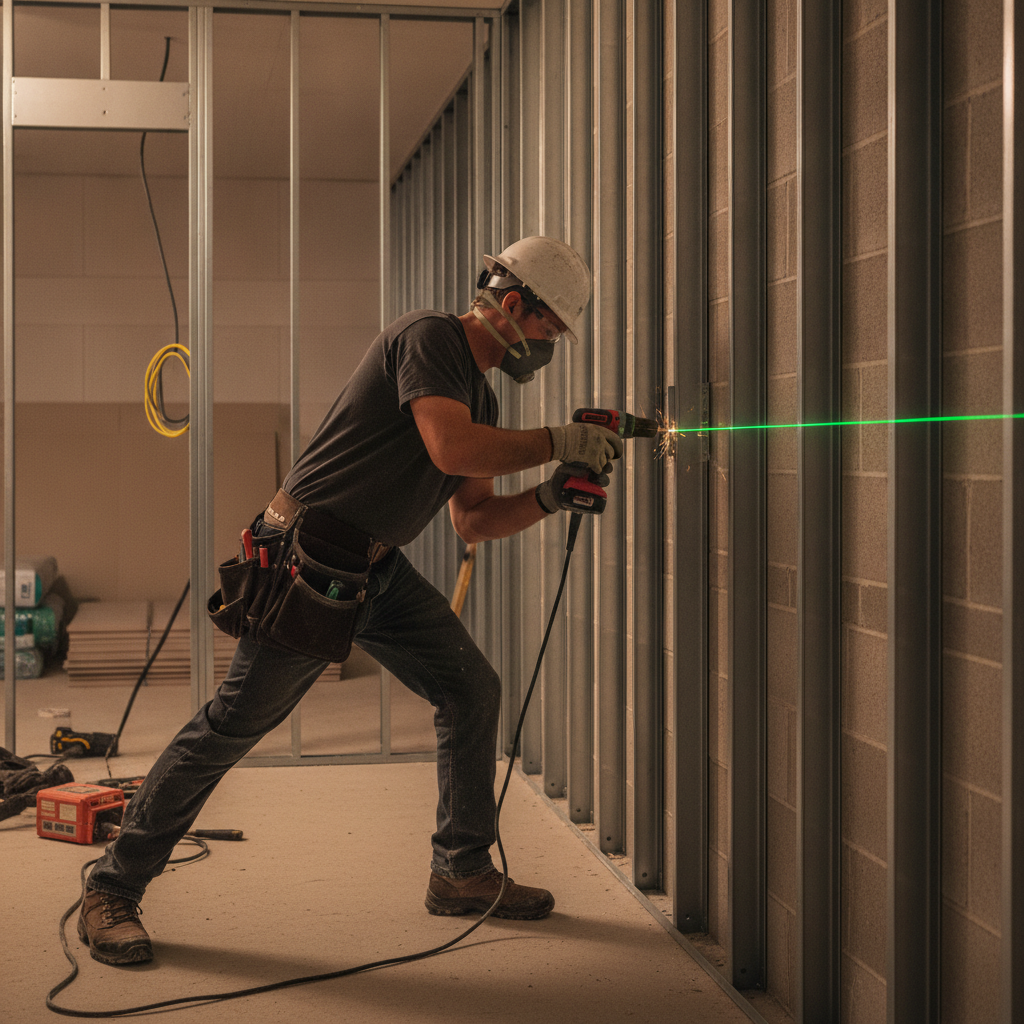
- Cutting and fastening: Aviation snips, chop saw with metal blade, impact driver, and self-drilling screws (#8 or per spec).
- Anchoring: Powder-actuated or mechanical anchors matched to substrate and track gauge.
- Documentation: Product brochures, load tables, standards, and MSDS to inform selection and submittal packages.
Explore techniques in our light gauge framing guide and component choices inside our steel stud framing guide to align tools with assembly methods.
Step-by-Step: Frame an Interior Wall
Lay out control lines, anchor tracks, insert studs at 16 or 24 inches on-center, add bridging and rough openings, then verify plumb and head-of-wall gaps before board. Photograph QC points and sign off spacing, fasteners, and deflection clearances.
1) Preconstruction planning
- Review plans for wall heights, gauges, acoustic requirements, and special conditions like shaftwalls.
- Confirm delivery sequence so studs, tracks, and clips arrive staged by area.
- Prepare a wall schedule: location, stud gauge/size, track type (standard, deep, slotted), and bracing intervals.
2) Layout
- Snap floor and ceiling lines; verify dimensions to doors and intersections.
- Mark on-center positions at 16 or 24 inches for the entire run to avoid drift.
- Check for slab high spots; plan shims or deep track where needed.
3) Track installation
- Cut track cleanly; vacuum dust near anchors for bond quality.
- Anchor per schedule (often 12–24 inches apart) and use slotted deflection track at heads when specified.
- Confirm leg orientation and keep tracks in plane to simplify stud insertion.
4) Stud insertion and fastening
- Insert studs tight to the bottom track and within the head slot if using deflection track.
- Fasten per spec—typically one or two screws per flange where required.
- Check plumb with a laser as you go to avoid cumulative errors.
5) Bracing and openings
- Install bridging/carrying channel and windbrace per spacing schedule.
- Frame doors and windows with jack and king studs sized to height and hardware.
- Add webslide clips or deflection side clips where adjustable or movement-tolerant connections are needed.
6) Quality checks before board
- Verify on-center spacing along the full run and at corners.
- Measure the head-of-wall gap to confirm deflection space is preserved.
- Run a 6-foot straightedge; correct bow or twist before release.
For a deeper walkthrough, see our primer on interior stud wall framing and common pitfalls in drywall framing mistakes.
Process and Selection Table
Select track type to match wall height and movement, then standardize fastener and bracing intervals. This table summarizes when to use standard, deep, or slotted deflection track and which checkpoints to verify before boarding.
| Condition | Recommended Track | Typical Spacing / Notes | QC Checkpoint |
|---|---|---|---|
| Typical partition ≤ 10 ft | Standard track | Studs at 16 or 24 in. o.c. | On-center within ±1/8 in. |
| Tall wall > 10 ft | Deep track | Bridging at set intervals | Plumb within 1/8 in. over 8 ft |
| Head-of-wall under slab | Slotted deflection track | Maintain 1/2–1 in. gap | No fasteners pinning slot |
| Acoustic separation | Standard or deep (per wall) | Resilient channel installed | Board fastened to channel |
| Curved partition | U-Flex track | Radius per spec | Smooth arc, no kinking |
Choosing Gauges, Channels, and Trims
Match stud gauges to wall height and load, select track legs for tolerance and movement, and use bridging and resilient channels to control straightness and sound. Finishing trims like J and L trims and cornerbeads make reveals crisp and durable.
Stud and track selection
- Non load bearing studs: Light gauge options sized to typical heights for speed and handling.
- Load-bearing studs: Heavy gauge members for interior bearing walls; coordinate with engineering.
- Track legs: Standard for most; deep where slab variations demand more tolerance.
Bracing and channels
- Bridging/carrying channel to lock stud faces and resist twist.
- Furring channel to create plumb surfaces for board and finishes.
- Windbrace where lateral demands increase stiffness requirements.
Acoustic and finishing details
- Resilient channel to decouple board from studs.
- 90°/130° cornerbead for high-traffic outside corners.
- J trim, L trim, and Z-Bar for terminations at ceilings, windows, and dissimilar materials.
See how these choices come together in our steel wall studs guide and the overview of steel stud wall framing.
Case Studies and Field Examples
Coordinated layout, correct track selection, and disciplined QC cut punch lists dramatically. The examples below show how head-of-wall deflection, bridging, and resilient channel details protect finishes and speed turnover.
Example 1: Corridor walls with slab movement
- Challenge: Seasonal slab deflection risked board cracks along corridors.
- Solution: Slotted deflection track at heads, 1/2–1 inch maintained gap, documented fastener positions in slots.
- Result: Smooth paint lines and doors stayed aligned after HVAC startup and seasonal changes.
Example 2: Tall atrium partitions
- Challenge: 12–14 foot walls showed face bow and telegraphing.
- Solution: Deep track with scheduled bridging/carrying channel; verified plumb every second stud with a laser.
- Result: Flatness held through taping; fewer skim coats and faster paint.
Example 3: Acoustic privacy near meeting rooms
- Challenge: Sound bleed between conference rooms and open office areas.
- Solution: Resilient channel with proper board attachment and perimeter sealant; MEP penetrations grommeted and sealed.
- Result: Noticeable improvement in privacy and reduced post-occupancy complaints.
Looking for execution visuals? These project galleries from trade partners provide helpful field context: a framing and drywall project showcase, a services overview with framing scope explained here, and a homeowner-oriented basement framing guide for conceptual comparison.
Need a quick spec check? Our engineering team has 40+ years in steel framing. Share your wall heights, acoustic targets, and movement conditions—we’ll match gauges, tracks, and channels to your design and delivery timeline.
Start with our interior wall framing checklist and then explore the steel stud framing guide for submittal-ready notes.
Tools, Checklists, and Downloads
Standardize your workflow with a framing scope checklist, fastener schedule template, and QC photo log. Combine these with product brochures and load tables so crews and submittals match, reducing RFIs and keeping the board schedule intact.
- Scope checklist: Wall IDs, heights, stud gauges, track types (standard, deep, slotted), and bracing intervals.
- Fastener template: Track anchors by substrate; screw types and spacing for studs, channels, and trims.
- QC photo log: Head-of-wall gaps, bridging installation, rough openings, and pre-board flatness.
- Product references: Keep brochures, standards, and MSDS with your submittal package.
If you’re new to light gauge details, our light gauge metal framing guide covers sequencing and common field questions.
Frequently Asked Questions
Most questions center on spacing, track choices, and acoustic details. Keep on-center spacing consistent, use slotted deflection track where movement is expected, and install resilient channel correctly to preserve sound isolation.
What spacing should I use for interior steel studs?
Most partitions use 16 or 24 inches on-center depending on wall height, board type, and performance targets. Taller walls and areas needing higher stiffness often benefit from 16 inches on-center with scheduled bridging for straightness.
When do I need slotted deflection track?
Use slotted deflection track at the head-of-wall beneath concrete slabs when structural movement is expected. Maintain the specified gap and ensure fasteners remain within the slots to allow vertical deflection without cracking gypsum board.
How does resilient channel improve acoustics?
Resilient channel decouples gypsum board from studs, interrupting the vibration path. Proper orientation and fastening—attaching board to the channel rather than studs—helps reduce sound transmission and improves room-to-room privacy.
What’s the difference between standard and deep track?
Standard track suits typical interior walls. Deep track provides taller legs that improve tolerance and stud engagement on higher partitions or uneven slabs. Deep track is often paired with bridging to maintain straight faces on tall walls.
Conclusion
Interior framing succeeds when layout is precise, the right track is used at heads, and bridging and acoustic details are installed correctly. Standardize your checks, document fasteners and gaps, and coordinate deliveries to keep schedules on track.
- Lock in 16 or 24-inch on-center spacing early and verify with a laser.
- Use slotted deflection track where slabs move; never pin slots.
- Install bridging at set intervals to keep walls straight and doors true.
- Protect acoustics with resilient channel and sealed perimeters.
- Leverage brochures, load tables, and MSDS for correct selections.
Key Takeaways
Standardize layout, choose track types deliberately, and enforce QC on spacing, plumb, and deflection gaps. These steps reduce callbacks, protect finishes, and shorten punch lists for interior framing across the United States and Canada.
- Interior framing sets finish quality—straightness and acoustics start here.
- Track choice (standard, deep, slotted) should follow height and movement.
- Bridging, resilient channel, and correct trims elevate performance.
- Clear checklists and photo logs eliminate avoidable rework.
