J-track shaft wall is a fire-rated shaft enclosure that uses J-shaped steel track at the floor and head to capture shaftliner panels and CH studs. It keeps edges straight, allows head-of-wall movement when detailed, and speeds elevator and stair core builds for projects across Canada and the United States.
By Navjot Dass • Last updated: 2026-07-01
Summary
A J-track shaft wall uses J-track at the base and head to receive shaftliner boards and CH studs, creating a narrow, fire-rated core enclosure. It accelerates layout, preserves alignment, and, with slotted head details, maintains movement tolerance—reducing rework and inspection issues on multi-story projects.
If your schedule hinges on finishing elevator and stair cores, a repeatable shaftwall method matters. Dass Metal Products supports builders and drywall contractors with CSSBI-certified components, imperial/metric load tables, and engineering guidance so crews can frame, inspect, and close faster with fewer punch items.
What Is a J-Track Shaft Wall?
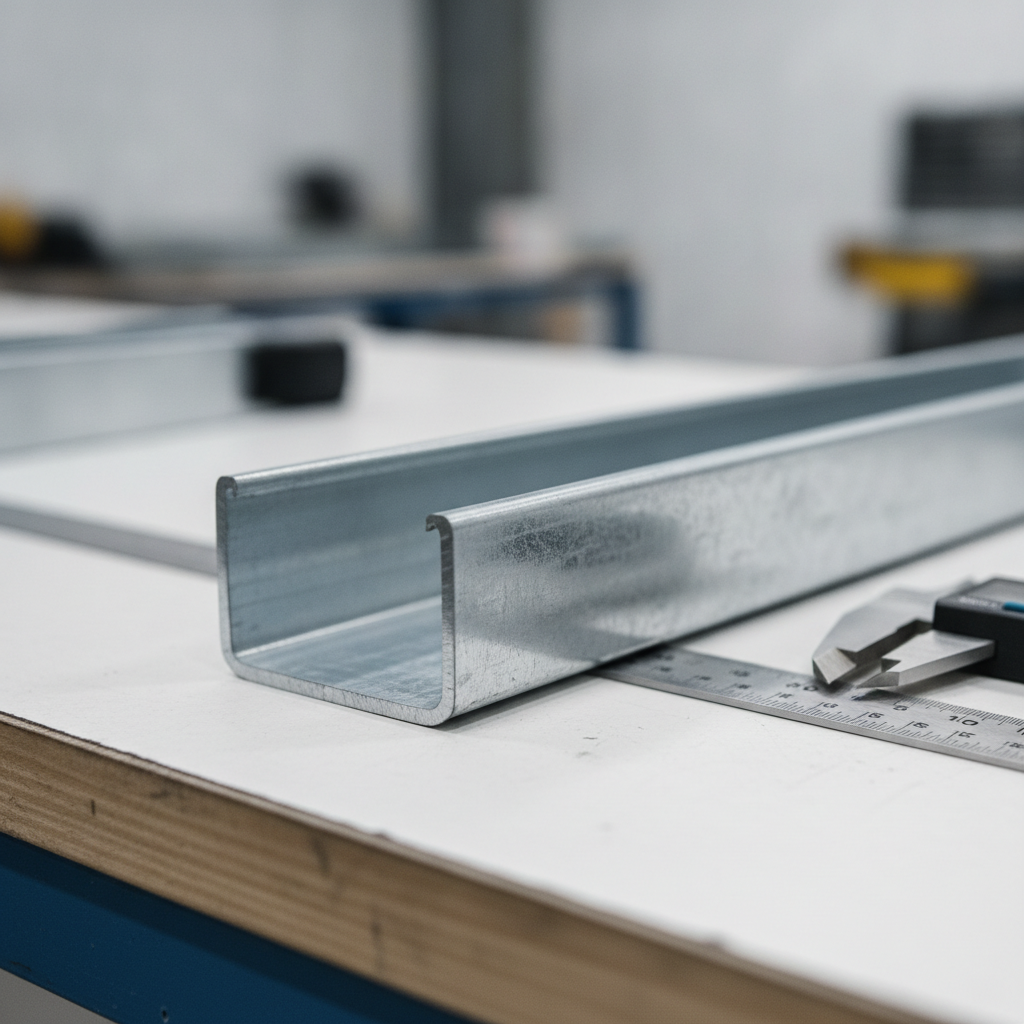
A J-track shaft wall is a noncombustible, fire-rated enclosure around elevator or stair cores that uses J-shaped receiver track at the floor and head, interlocking CH studs, and 1-inch shaftliner panels. The track captures board edges while listed head details allow vertical movement.
Think of J-track as a slim receiver that keeps panel edges true. The return leg and flange guide 1-inch shaftliner panels while CH (shaftwall) studs interlock to lock panels in place. Typical spacing is 16 inches or 24 inches on center, depending on design loads and listed system requirements.
Because cores run long distances, even a 1/16-inch misalignment per stud can telegraph into door frames and reveals. J-track helps crews maintain straight, tight joints over 50-foot or longer runs without constant shimming—one reason it shows up in high-rise and healthcare work.
Why J-Track Matters for Shaftwall Performance
J-track improves speed, alignment, and fire continuity. It creates a clean receiver for boards, minimizes shimming, and—paired with slotted head-of-wall details—maintains movement tolerance so assemblies pass inspection and stay crack-free during slab deflection and seasonal drift.
Time savings compound. If crews shave 10–15 minutes per 20 linear feet by reducing shimming and rework, a 300-linear-foot core can save several labor-hours per floor. Multiplied over 20 floors, that’s dozens of hours redirected to critical-path tasks. The payback is predictability: consistent capture at the base, deflection capacity at the head, and straighter reveals.
From a quality standpoint, tight, continuous joints limit light leaks into shafts. With 1-inch shaftliner and listed perimeter seals, you maintain the rating while improving acoustic separation between the shaft and occupied spaces.
How a J-Track Shaft Wall Works
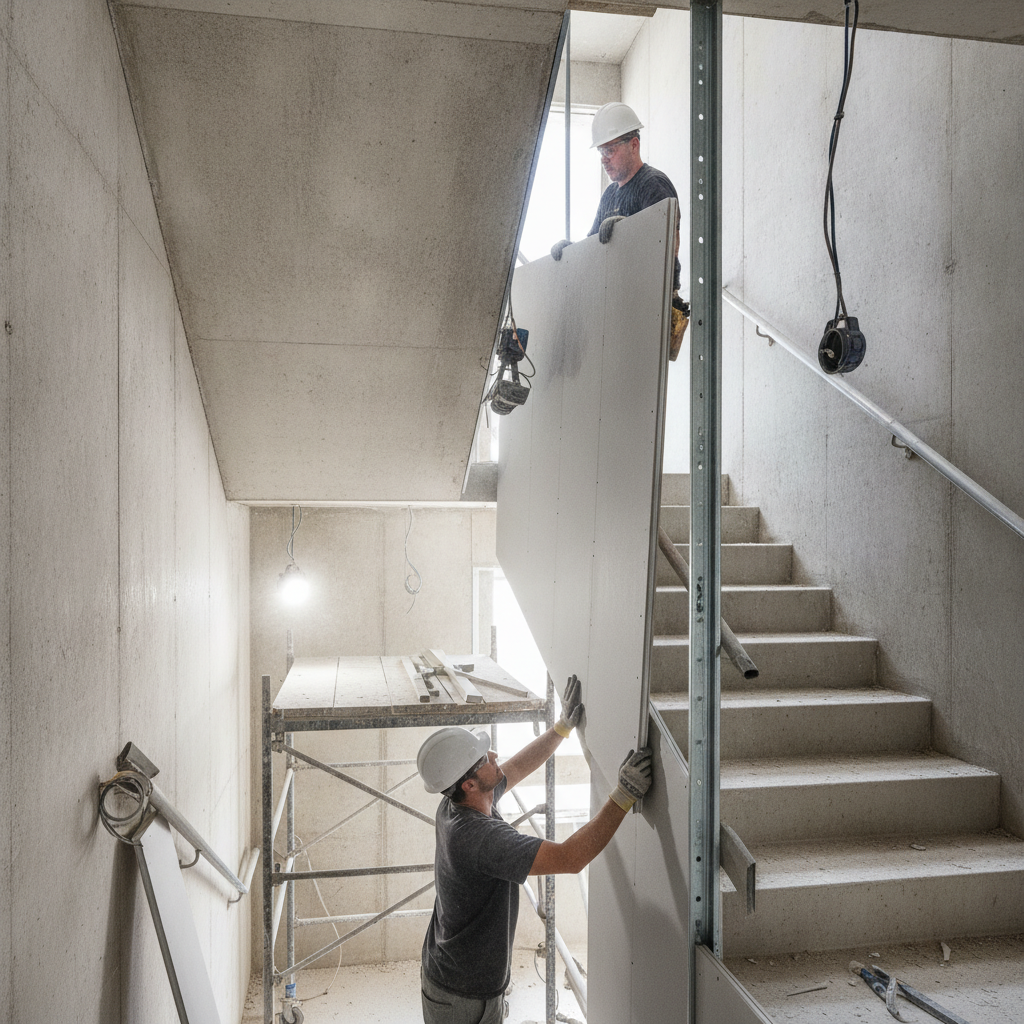
Set J-track at the base and a J or slotted deflection track at the head, place CH studs at design spacing, slide 1-inch shaftliner panels into the receiver, then lock with interlocking studs and add face layers. A listed head detail preserves movement while the wall stays rated.
The assembly centers on four parts: J-track (base), head track (often slotted for deflection), CH studs, and shaftliner boards. Installers snap lines, anchor the base at uniform spacing (often 16–24 inches), set the head with a measured gap, then insert panels. Face-layer gypsum on the occupied side completes the wall and receives trims.
For elevator cores, long straight runs—frequently 60 feet or more—benefit from uniform anchors. Pre-drilling reduces web distortion so each board seats fully. Where drift is expected (for example, 1/2 inch at the head), a slotted deflection track lets studs fasten while the track slides with the slab.
Dass Metal Products manufactures the full kit—J Track, Slotted Deflection Track, CH studs, and trims—with CSSBI-certified processes and both imperial and metric documentation. Engineering support helps teams tailor profiles to site tolerances and head-of-wall movement, which can range from 1/4 inch to over 1 inch depending on the structure.
For a deeper primer on receivers and layout techniques, see our metal stud track guide. For head movement strategy, review the deflection track guide and the more advanced slotted deflection track overview.
Track Types and Related Components
Use J-track as the slim receiver, deep track when you need extra leg capture, and slotted deflection track at heads where vertical movement is required. Pair them with CH studs, shaftliner boards, and finishing trims to balance tolerance, drift, and clean exposure.
Core components in a shaftwall
- J Track (Receiver): Seats 1-inch shaftliner at floor and head; standard legs for typical capture.
- Deep Track: Taller legs improve capture where slab flatness varies more than 1/8 inch across a few feet.
- Slotted Deflection Track: Pre-slotted web allows 1/4–1 inch or more of vertical movement, depending on listing and gap.
- CH Stud (Shaftwall Stud): Interlocks with panels; spacing commonly 16 or 24 inches on center.
- Face-Layer Gypsum: Typically 5/8-inch Type X on the occupied side for durability and finish.
- Perimeter Seals: Mineral wool and sealant as required by the listed fire detail.
Helpful add-ons
- Resilient Channel: Gains 3–8 STC points in many assemblies when correctly detailed on the occupied side.
- Bridging/Carrying Channel: Braces studs or supports transitions to adjacent framing.
- J and L Trim: Clean, durable edges at openings and terminations; does not replace structural track.
When tolerances are tight and exposure is high, crews often combine base J-track with a slotted head track. That pairing keeps the profile slim—useful when a corridor must remain at a precise width—and still allows the 1/2–3/4 inch of head movement a structural engineer may call out.
Explore product specifics for the shaftwall CH stud and the companion L track that’s often used in adjacent framing transitions.
Design and Installation Best Practices
Stringline runs, pre-drill anchors, and verify leg capture on every board. Use listed head-of-wall details with measured gaps and fastener patterns, and document inspections floor-by-floor to prevent daylight at joints and preserve the fire rating.
Field-proven sequencing
- Layout: Snap chalk lines; check offsets at least every 10 feet.
- Anchor base track: Uniform spacing (often 16–24 inches) with pre-drilled holes to keep the web flat.
- Install head track: Use slotted deflection where drift is specified; leave the listed gap (for example, 5/8 inch).
- Place CH studs: Plumb and brace, then confirm on-center spacing with a tape check.
- Insert shaftliner: Seat panels fully into the J receiver; no daylight at the leg.
- Lock and layer: Engage CH studs, add face-layer gypsum, then fasten per pattern.
- Seal and trim: Apply mineral wool and sealant at perimeters; finish openings with J or L trim.
Quality checks that prevent rework
- Receiver straightness: Tolerance drift of 1/8 inch over 10 feet can show at frames; re-string if needed.
- Head movement: Verify gap and fasteners match the listing; document with a photo per 20 feet.
- Capture depth: Confirm the board is fully seated; partial capture is a common source of light leaks.
- Penetrations: Sleeve and seal per the listed assembly; label for inspection.
Need a refresher on head details? Start with our practical slotted deflection track guide and the overview article on deflection track best practices. For a full framing context, see our shaft wall framing guide.
J-Track vs. Deep Track vs. Slotted Deflection
Choose J-track for slim receivers and standard tolerances, deep track when slab flatness is poor or extra capture is needed, and slotted deflection track at heads to accommodate drift. The right mix preserves ratings while keeping cores plumb and fast.
| Component | Primary Use | Leg/Feature | Movement | Notes |
|---|---|---|---|---|
| J Track | Base/head receiver | Standard leg | With listed head detail | Fast layout; tight edges |
| Deep Track | Extra capture | Deeper legs | Depends on head detail | Absorbs tolerance better |
| Slotted Deflection Track | Head-of-wall drift | Slotted web | Yes (vertical) | Prevents binding/cracking |
Want a deeper dive into slotted systems? Our slotted deflection track overview expands on gap sizing, fastener patterns, and inspection documentation you can standardize across projects.
Tools, Resources, and Submittals
Successful shaftwall packages include product datasheets, load/span tables in imperial and metric, listed head-of-wall details, and MSDS. Align submittals to the specified system so approvals are smooth and field inspections are fast.
- Datasheets and guides: J Track, CH Stud, and slotted deflection track installation references.
- Load/span tables: Verify on-center spacing and leg capture for your design pressures and heights.
- Listed details: Head-of-wall, penetrations, and perimeters for the exact shaftliner assembly.
- MSDS and standards: Keep on site for safety and compliance checks.
Need help packaging a shaftwall submittal? Dass Metal’s engineering team supports contractors with profile selection, deflection strategy, and documentation—so your first inspection passes cleanly.
Start with our plain-language primers on J-tracks in framing and a practical shaft wall framing guide.
Mini Case Studies and Examples
Standardizing J-track shaftwall sequencing reduces rework and speeds cores. Consistent head gaps, uniform anchors, and documented captures turn inspections into quick walk-throughs—freeing crews to focus on doors, frames, and MEP coordination.
- High-rise core (20+ floors): Switching to a slotted head detail with a 5/8-inch gap eliminated seasonal binding. Per-floor install time dropped by 30–45 minutes as shimming was reduced.
- Healthcare stair enclosure: Deep track at the base improved capture over uneven slab transitions (up to 3/16 inch variation), cutting callbacks for daylight at joints.
- Tenant corridor: Resilient channel on the occupied side achieved projected STC targets without altering the listed shaftliner assembly.
For component-level context on studs, see the metal stud track guide and our quick overview of what J-tracks do in broader framing assemblies.
Common Mistakes With J-Track Shaft Walls
Typical errors include skipping slotted head details where movement is required, allowing wavy base track, mixing unlisted components, and missing perimeter seals. Each risks cracking, light leaks, and failed inspections—costly rework on fast-track jobs.
- No movement allowance: Rigidly fixing studs to structure at the head can tear board edges as slabs move seasonally (often 1/4–3/4 inch).
- Wavy receivers: Even a 1/8-inch bow over 10 feet shows up at frames; re-snap and reset before paneling.
- Unlisted substitutions: Mixing parts not covered by the listing jeopardizes ratings and approvals.
- Missed seals: Skipping mineral wool or sealant at perimeters invites light leaks that inspectors catch immediately.
Align your approach with our shaft wall framing guide and tighten head details using the slotted deflection playbook.
Frequently Asked Questions
These direct answers cover where J-track goes, how it differs from trim, how to handle movement, and what to do for acoustic control. Share them with crews to speed pre-task planning and inspections.
Where is J-track required in a shaft wall?
Use J-track at the floor and head as the receiver for shaftliner boards and CH studs. Where vertical drift is specified, replace the head with a slotted deflection track and keep the listed gap so the joint stays rated as the structure moves.
Is J-track the same as J trim?
No. J-track is a structural receiver track that captures 1-inch shaftliner panels. J trim is a finishing profile for exposed edges. It does not provide structural capture and should not replace track in a shaftwall assembly.
How do I handle head-of-wall movement?
Use a listed slotted deflection track with a measured gap, then fasten studs to the track per the pattern. The track slides relative to the slab, absorbing 1/4–1 inch or more of vertical movement without cracking the face layer.
Can I add sound control to a shaft wall?
Yes. Add resilient channel or furring to the occupied side to decouple the face layer and seal perimeters carefully. This often increases STC performance while keeping the core shaftliner and CH stud assembly unchanged.
Key Takeaways
- J-track shaft wall assemblies use J-track receivers with CH studs and 1-inch shaftliner to deliver narrow, rated cores.
- Slotted head details preserve 1/4–1 inch of vertical drift and prevent cracking at the face layer.
- Stringlines, uniform anchors, and capture checks eliminate daylight at joints and speed inspections.
- Dass Metal supports teams with CSSBI-certified products, imperial/metric load tables, and engineering guidance.
Next Steps
Standardize your shaftwall details, align submittals to listed systems, and brief crews on leg capture and head movement. A repeatable approach reduces rework and accelerates cores on any multi-story project.
Ready to align design and field? Start with our shaft wall framing guide, level up your head-of-wall strategy in the deflection track guide, and confirm receiver choices in the J-tracks overview. For component data, see the shaftwall CH stud and related L track pages. If your core interfaces with reinforced concrete, this foundation wall rebar detail is a handy reference during coordination.
