Sheetrock metal corner bead is a rigid L‑shaped (or bullnose/130°) metal profile that caps drywall outside corners to keep them straight, impact‑resistant, and clean after finishing. It aligns gypsum board edges, reduces cracking at high‑stress junctions, and speeds up taping and sanding. For builders working around 370 New Enterprise Way in Vaughan, ON, it’s a dependable finishing essential.
By Navjot Dass — Dass Metal Products
Last updated: 2026-05-09
At a Glance
Corner bead protects drywall outside corners and delivers crisp lines. The best results come from pairing the right bead type (paper-faced metal, expanded metal, vinyl, bullnose, or 130°) with proper fastening and two to three mud coats. This guide explains selection, installation, and pro tips for faster, crack-resistant finishes.
This complete guide is written for drywall and framing contractors, builders, and specifiers who want consistent, professional results. You’ll learn how to choose the right bead, install it correctly, and avoid common callbacks.
- What sheetrock metal corner bead is and when to use each type
- Step-by-step installation that speeds finishing by a full pass in many cases
- Best practices for impact resistance, alignment, and clean reveals
- Real project examples using Dass Metal Products’ 90°/130° Cornerbead profiles
Local considerations for 370 New Enterprise Way
- Plan winter deliveries and interior work sequences around cold snaps; temperature swings can affect joint compound drying and bead adhesion.
- Busy build windows (late spring through fall) tighten schedules; pre‑ordering corner bead and complementary trims helps keep crews moving.
- For commercial interiors across Vaughan, coordinate corner bead type with door frame profiles and ceiling grid transitions to reduce onsite rework.
What Is Sheetrock Metal Corner Bead?
Sheetrock metal corner bead is a light-gauge steel profile that caps drywall outside corners to create straight, durable edges. It’s fastened to gypsum panels, then embedded in joint compound. Options include paper-faced metal, expanded metal, and specialty angles like 130° returns and bullnose radii.
In framing and drywall finishing, outside corners take more abuse than any other plane change. A metal bead adds a hard, true edge so mud skins smoothly and sanding is minimal. Paper‑faced variants improve bonding and reduce edge blistering. Typical stock lengths are 8, 10, and 12 ft, with galvanized coatings for corrosion resistance.
- Core function: protect corners from dings and create a plumb, straight line for paint.
- Common angles: 90° square, 130° obtuse returns for soffits/partitions, and bullnose radii for soft, rounded corners.
- Fastening: crimping tools, drywall nails/screws, or all‑purpose joint compound (for paper‑faced metal) prior to finishing coats.
- Compatibility: works with steel stud framing, resilient channel, and furring systems common to commercial interiors.
Because corners are high‑impact zones near doors, corridors, and equipment paths, corner bead selection can reduce patch cycles significantly over a building’s life. For teams leveraging Dass Metal Products’ Canadian‑made ecosystem—studs, track, resilient channel, and 90°/130° Cornerbead profiles—spec alignment becomes simpler and more predictable.
Why Corner Bead Matters for Finish Quality and Speed
Corner bead matters because corners fail first. A rigid steel edge spreads impact loads, keeps lines straight, and reduces crack initiation at joints. Paper-faced metal beads often cut one finishing pass by promoting bond and feathering, helping crews hit schedules with cleaner results.
Finishing is often the critical path. Every extra pass costs time across dozens or hundreds of corners. Choosing the right bead can drop coats from three to two on many projects while improving line quality. Straighter edges also reduce putty touch‑ups after primer—one of the most common late‑stage delays we see.
- Durability: galvanized steel withstands repeated bumps in corridors and near moving carts; bullnose softens impact by distributing force.
- Consistency: paper‑faced metal creates a uniform bond line that sands predictably, minimizing rework.
- Speed: with tight framing, proper bead, and a 10–12 in. knife, crews commonly finish corners in two passes plus a skim.
- Aesthetics: 90° corners remain the default in most offices; specialty 130° returns are favored for soffits, column wraps, and feature walls.
We’ve found that on multi‑suite interiors, the compounding effect of optimized corners can recover days on the schedule. It’s a small component with outsized influence on perceived quality—especially under grazing hallway light, where waviness shows instantly.
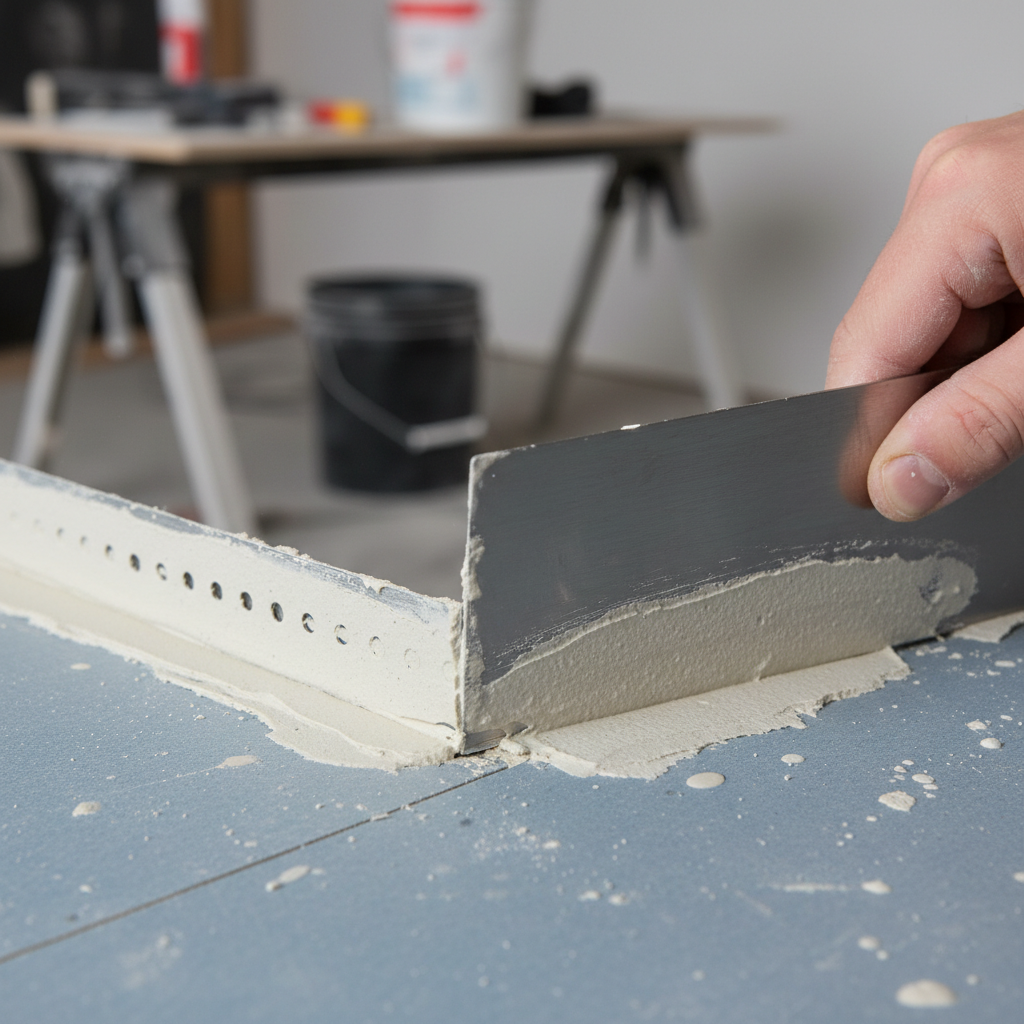
How Corner Bead Works: From Fastening to Finish
Corner bead works by capping the drywall edge with a straight, rigid steel profile, then embedding it in compound to lock the bead and feather the transition. Stable fastening, even coverage, and proper sanding produce crisp, durable corners ready for primer and paint.
Whether you use expanded metal or paper‑faced metal, the mechanics are the same: stabilize the edge, embed, feather, and sand. Here’s a proven field sequence contractors across Vaughan and the GTA rely on when pairing steel stud framing with sheetrock metal corner bead.
- Pre‑check framing: Confirm studs and track alignment. Out‑of‑plane studs telegraph into the corner line.
- Dry fit: Cut bead to length. Test on the corner; ensure equal legs on both faces and a snug fit at the floor/ceiling.
- Fasten: For paper‑faced metal, bed in all‑purpose mud with firm knife pressure; for expanded metal, use a crimper or evenly spaced fasteners.
- First coat: Embed bead fully, strike off excess, and check that the nose is centered. Let dry completely.
- Second coat: Feather 8–12 in. out each side, maintaining a slight crown over the nose to avoid a flat spot.
- Skim and sand: Apply a thin skim for pinholes. Sand with 150–220 grit using a pole sander; avoid burning through paper.
- Inspect under light: Use a raking light to catch ridges before primer. Touch up as needed.
On high‑traffic corners—outside restroom entries, copier bays, or school corridors—consider vinyl or bullnose profiles for added resilience and a softer look. Pairing with channel studs or light gauge steel studs ensures the substrate stays true, which is half the battle in corner quality.
Types of Corner Beads and When to Use Them
Choose paper-faced metal for speed and bonding, expanded metal for rugged mechanical fastening, vinyl/PVC for moisture-prone areas, bullnose for softened edges, and 130° returns for soffits and feature transitions. Match profile to traffic, lighting, and design intent.
Each bead family solves a different problem. Contractors who match bead type to space usage and lighting avoid waves, chips, and callbacks. Below is a quick comparison to help you specify with confidence across offices, schools, clinics, and retail interiors.
| Type | Best For | Fastening | Pros | Considerations |
|---|---|---|---|---|
| Paper‑faced metal | Most interiors; fast finishing | Mud‑set embed | Bonds well, fewer blisters, often 2 coats + skim | Requires clean, even compound spread |
| Expanded metal | High‑impact corridors; rugged installs | Crimpers, nails, or screws | Mechanical hold, durable nose | Usually needs an extra coat |
| Vinyl/PVC | Moisture‑prone or specialty profiles | Staples + mud | Corrosion‑proof, flexible profiles | Thermal movement; use compatible compounds |
| Bullnose | Design‑driven soft corners | As above | Softens impacts; unique look | Needs matching base/trim components |
| 130° Cornerbead | Soffits, column wraps, returns | Mud‑set or fastened | Cleans up obtuse transitions neatly | Confirm angle consistency across run |
For standardized results in professional interiors, pair beads with well‑braced studs, correct drywall framing practices, and consistent lighting checks. Dass Metal Products supplies 90°/130° Cornerbead engineered for smooth embed and true lines across long runs.
Best Practices for Pro‑Level Corners
The best results come from true framing, centered bead placement, full embed on first coat, wide feathering (8–12 in.), and sanding under raking light. Use paper-faced metal for speed, and crimp or fasten expanded metal in high-traffic zones.
- Start with straight framing: Shim or adjust studs before board-up. A true substrate saves a coat later.
- Cut square, test fit: Keep legs equal; avoid short legs that telegraph gaps.
- Embed fully: Drive excess mud out from under paper‑faced flanges to prevent bubbles.
- Feather wide: Aim 8–12 in. from the nose to blend edges under side lighting.
- Let coats cure: Rushing sanding raises fuzz and causes pitting in the skim.
- Use raking light: Check for ridges before primer; it’s faster to fix now than post‑paint.
- Protect early: In busy corridors, corner guards after prime avoid early dings.
Crews that standardize on these moves report fewer punch items and a straighter look after paint. When integrating with resilient channels or furring channel, verify flush plane transitions before embedding the bead.
Tools and Resources You’ll Actually Use
You only need a few reliable tools: a quality taping knife set (6, 10, 12 in.), a corner roller (for paper-faced), sanding pole with 150–220 grit, and a crimper or stapler for mechanically fastened beads. Add a raking light for fast quality checks.
- 6, 10, and 12 in. taping knives and a hawk or pan
- Corner roller and/or clincher for paper‑faced metal beads
- Crimper, nails/screws, or stapler for expanded metal or vinyl
- Pole sander with 150–220 grit; vacuum‑assisted options reduce dust
- All‑purpose joint compound for embed; lightweight for finish
- Raking light or bright portable LED for inspection
For a step‑by‑step refresher you can share with new hires, bookmark this corner bead installation walkthrough. And when you’re selecting trims for a package, align beads with studs, track, and channels from one ecosystem so tolerances play nicely together.
Free spec check: If you’re packaging studs, track, resilient channel, and trims, our engineering team in Vaughan can review takeoffs and suggest the right 90°/130° Cornerbead mix for your schedule. Reach out to Dass Metal Products for a consult.
Case Studies and Field Examples
Real projects show the impact: matching bead type to traffic and lighting cut rework, and paper-faced metal often reduced a coat. Coordinated packages—studs, track, channel, and bead—kept corners straight and schedules tight.
Office corridor retrofit
A GTA office retrofit paired light gauge steel studs with paper‑faced 90° beads along 180+ corridor corners. With careful embed and 12 in. knives, crews finished in two passes plus a skim. Grazing light tests before primer helped eliminate ridges; punch items dropped notably versus prior phases.
Healthcare tenant improvement
In a clinic build, patient corridor corners used expanded metal for toughness near gurney paths, while admin areas used paper‑faced for speed. 130° beads finished obtuse soffit returns cleanly. Coordinating with metal framing system standards held lines straight.
Retail interior with bullnose accents
Boutique retail spaces used bullnose beads at select corners for a softened aesthetic. Where carts and fixtures hit frequently, vinyl beads and early corner guards minimized repairs during store set.
Troubleshooting: Common Mistakes and How to Fix Them
Most corner issues trace to poor embed, narrow feathering, or out-of-plane framing. Re-embed loose flanges, widen the second coat to 10–12 in., and correct substrate irregularities before finishing to stop waves and shadow lines.
- Blisters/bubbles under paper: Cut open, re‑embed with fresh compound, and feather wide.
- Wavy line after paint: Check framing; sand crown edges and widen skim to blend.
- Cracked nose: Replace damaged section; use corner guards in high‑traffic areas.
- Shadowing under side light: Increase feather width and skim both faces evenly.
- Rust spots: Ensure galvanized product; prime properly and avoid prolonged wetting.
If problems recur, revisit your framing approach. Our corner framing guide details how to keep studs straight and intersections true so bead lines stay razor sharp.
Specification and Submittals
Specify angle, material, fastening, and finish sequence. Include lengths, coatings, and whether beads are paper-faced or expanded metal. Coordinate with studs, track, and channels to ensure compatible profiles and consistent plane transitions.
- Angle and profile: 90°, 130°, or bullnose radius; leg lengths and nose profile.
- Material and coating: galvanized steel for interiors; vinyl/PVC in moisture‑prone areas.
- Fastening method: mud‑set for paper‑faced; crimp/staple/screw for expanded or vinyl beads.
- Finish sequence: embed, second coat, skim; sanding grits and inspection steps.
- System coordination: note compatibility with light gauge studs, channels, and drywall practices.
For submittals, keep product data for 90°/130° Cornerbead on hand along with QA notes and finish standards your GC expects at punch.
Frequently Asked Questions
Install sheetrock metal corner bead by stabilizing the corner, embedding the bead fully, feathering 8–12 inches each side, and sanding under raking light. Choose paper-faced for speed or expanded metal for rugged hold in high-traffic areas.
What’s the difference between paper-faced metal and expanded metal corner bead?
Paper-faced metal embeds in compound for a fast, smooth bond that often reduces one finishing pass. Expanded metal is mechanically fastened for rugged hold in high-traffic areas but may need an extra coat to hide the mesh.
How many coats do I need over corner bead?
Most pros use two coats plus a final skim. Feather 8–12 inches out from the nose for a seamless blend, then sand with 150–220 grit under a raking light before priming.
When should I choose a 130° corner bead?
Use 130° beads for obtuse transitions such as soffits, column wraps, and feature walls. They clean up returns that would look wavy with a standard 90° bead and reduce mud buildup at wider angles.
Can I use vinyl corner bead in commercial spaces?
Yes. Vinyl/PVC beads are corrosion-proof and offer flexible profiles. They’re useful near moisture or where softer impacts are expected. Use compatible compounds and account for thermal movement.
Does framing quality really affect corner straightness?
Absolutely. Out-of-plane studs telegraph directly into the corner line. Verify alignment of studs, track, and channels before bead install; it’s the fastest way to avoid waves under grazing light.
Key Takeaways
For crisp, durable corners: true up framing, match bead type to usage, embed fully, feather wide, and check with raking light before primer. Paper-faced metal speeds finishing; expanded metal adds rugged hold.
- Sheetrock metal corner bead is the simplest way to protect and straighten corners.
- Paper‑faced metal often trims a finishing pass; expanded metal shines in high‑traffic zones.
- Feather 8–12 in. per side and sand under raking light for dead‑straight lines.
- Coordinate studs, track, channels, and bead for predictable, repeatable quality.
Conclusion: Build Corners That Stay Straight
Choose the right bead, prepare the substrate, and follow a consistent embed–feather–skim sequence. When paired with quality steel studs and channels, corner bead delivers straight, durable lines that hold up under use and scrutiny.
If your team manages interiors across Vaughan and the GTA, standardizing on bead types and finish sequences will cut punch lists and help schedules stick. Dass Metal Products backs that with Canadian‑made studs, track, channels, and 90°/130° Cornerbead—plus engineering support to align specs and deliveries.
Next step: Book a quick consult with our Vaughan team to review your corner bead package and coordinate logistics. We’ll help you lock in straight, resilient corners from the first unit to the last.
