Stud wall framing is the assembly of vertical studs and horizontal tracks to create straight, plumb interior or structural walls. At 370 New Enterprise Way in Vaughan, Dass Metal Products supplies CSSBI-certified steel studs, standard and deep tracks, and accessories that help crews frame faster and deliver code-ready results on tight schedules.
By Navjot Dass • Last updated: June 8, 2026
At a Glance: Stud Wall Framing Summary
Stud wall framing uses studs, tracks, and connectors to build straight, plumb, and square walls. Success depends on accurate layout, proper gauge selection, true plumb, mid-span bracing, and allowance for deflection. Steel systems from Dass Metal Products streamline these steps with engineered profiles, load tables, and purpose-built clips.
Here’s what you’ll get in this complete guide, written for builders, drywall contractors, and site supers who want straighter walls with fewer call-backs.
- Clear definition of stud wall framing and the parts that matter
- Step-by-step framing workflow with on-site checks and tolerances
- Exactly 7 pro tips for clean, straight walls (aligned with our title)
- Best practices for non-load-bearing, load-bearing, and shaftwall conditions
- Tools, resources, and mini case examples from real projects
Use the table of contents to jump to the section you need, or read straight through for the full playbook.
Table of Contents
Use this table of contents to navigate quickly. Each section answers one question end to end, so you can cite or brief your crew with confidence. The 7 Tips section lists field-proven habits for straight, fast walls you can hand over with pride.
- What is stud wall framing?
- Why stud wall framing matters
- How stud wall framing works (step-by-step)
- Types, methods, and approaches
- Top 7 stud wall framing tips
- Best practices and common mistakes
- Tools and resources
- Case studies and examples
- Local context: Regional Municipality of York
- Frequently asked questions
- Key takeaways
- Conclusion and next steps
What Is Stud Wall Framing?
Stud wall framing is the process of assembling vertical studs within top and bottom tracks to create walls that meet plumb, level, and deflection requirements. In steel systems, gauges run from light (e.g., 25) to heavy (e.g., 16), with bracing, clips, and channels ensuring straightness and strength.
In our work with builders and drywall contractors, stud walls fall into two broad categories: non-load-bearing partitions (light gauge) and structural or load-bearing assemblies (heavier gauge). Both rely on accurate layout, consistent screw fastening, and mid-span bracing to control twist and bow.
- Core components: steel studs, standard or deep track, screws (#6 or #8 self-tapping), shims, and sealants where required.
- Alignment tools: laser or string line, 6–8 ft. levels, and story poles for repeated heights.
- Performance add-ons: resilient channel for acoustics, bridging/carrying channel for lateral restraint, and slotted deflection track for drift.
On-center spacing typically runs 16 in. or 24 in., defined by design loads, height, and finish requirements. For straight, flat finishes, mid-span bracing at 48–60 in. height helps resist stud rotation during boarding.
Why Stud Wall Framing Matters
Good framing is the difference between fast finishes and weeks of patching. Straight, plumb walls reduce rework, improve door and millwork fit, and keep schedules on track. Steel systems add dimensional stability, predictable spans, and clean edges for consistent drywall quality.
Here’s the thing: finish quality is set long before taping. If the framing waves, drywall shows it. When crews hit layout tolerances (e.g., 1/8 in. over 10 ft. for plumb/level in many specs) and brace mid-span, boarding speeds up and joint work stays thin.
- Schedule impact: predictable spans and true plumb reduce boarding and taping time.
- Quality control: consistent screw patterns (e.g., 12–16 in. along studs) prevent popped fasteners.
- Risk reduction: using slotted deflection track above non-load-bearing walls prevents ceiling loads from transferring into partitions.
Dass Metal Products supports this with engineered, CSSBI-certified profiles and load tables in both metric and imperial, so site leads can verify spans and gauges without guesswork.
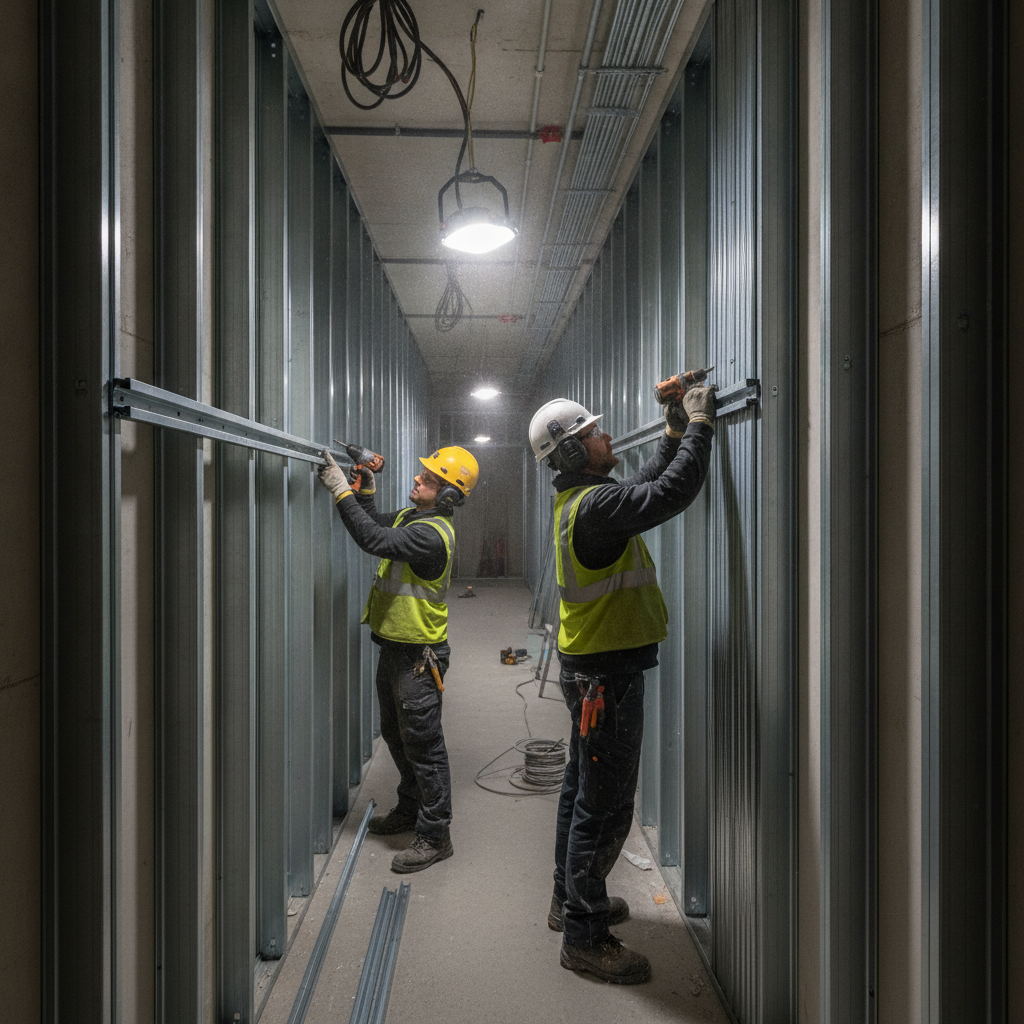
How Stud Wall Framing Works (Step-by-Step)
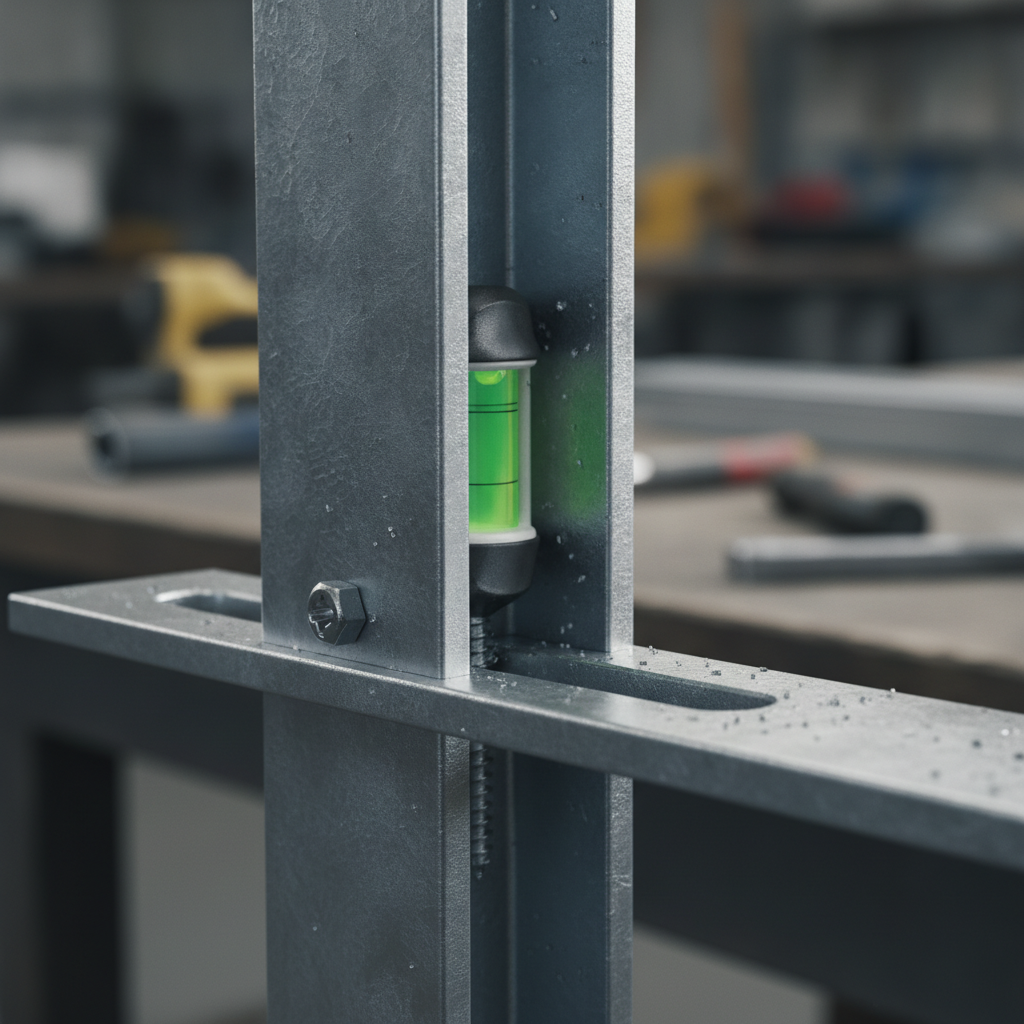
Accurate layout, correct gauge selection, and disciplined fastening drive straight walls. Snap lines, anchor track, stand studs plumb, brace mid-span, and allow for deflection where required. Verify with a laser and level after every 8–10 studs to prevent cumulative error.
- Review drawings and tables: confirm wall heights, on-center spacing (16 or 24 in.), allowed deflection, and required gauges.
- Snap layout lines: mark centerlines, door swings, and intersecting walls with chalk and a control line.
- Anchor bottom track: use standard or deep track; fasten to slab per spec and seal where required.
- Install top track: use slotted deflection track where ceilings or structure can move; leave the specified gap (often 1/2–1 in.).
- Cut and stand studs: seat studs fully in track; crown all studs the same way; check plumb with a 6–8 ft. level.
- Brace mid-span: add bridging/carrying channel or cold-rolled channel with clips; target 48–60 in. above floor for the first row.
- Square openings: frame jambs and headers; verify diagonals within 1/8–3/16 in. to keep doors swinging freely.
- Screw patterns: drive #6/#8 self-tapping screws; typical 12–16 in. spacing along flanges unless spec says otherwise.
- Acoustics (if needed): add resilient channel perpendicular to studs at 24 in. o.c. for sound isolation.
- Final QA: laser the wall; aim for 1/8 in. over 10 ft. plumb and 1/8 in. flatness across studs before boarding.
For curved partitions, Dass Metal’s U-Flex Track and special profiles simplify arcs with repeatable radius control, avoiding on-site kerfing that slows crews and weakens edges.
Deflection gaps must remain free and clear; do not fasten studs rigidly to the structure through slotted track. That small movement zone protects the partition when the structure live-loads or experiences thermal expansion.
Types, Methods, and Approaches
Framing approaches vary by function: non-load-bearing partitions (light gauge), load-bearing steel stud walls (heavy gauge), shaftwall assemblies for elevators, and specialty acoustic or curved conditions. Each uses specific tracks, channels, and clips to meet structural and performance goals.
Non-load-bearing interior partitions
- Studs: common widths include 2-1/2 in., 3-5/8 in., 6 in.; gauges often 25–20 for typical heights.
- Tracks: standard or deep track sized to stud width; consider deep track for easier stud insertion and added stiffness.
- Bracing: bridging/carrying channel or flat straps to control twist, especially on 24 in. o.c. layouts.
Load-bearing steel stud framing
- Heavier gauges: such as 18–16 gauge for tall or loaded walls; verify with engineered span/load tables.
- Headers and jambs: built-up members or proprietary shapes as designed by the engineer of record.
- Connections: use approved clips and anchors; maintain specified screw patterns and edge distances.
Shaftwall and rated assemblies
- Components: shaftwall CH studs, tracks, and fire-rated boards; follow manufacturer details precisely.
- Clearances: maintain plenum and deflection allowances per drawings; seal penetrations correctly.
- Access: coordinate doors, dampers, and access panels early to avoid rework.
Acoustics and vibration control
- Resilient channel: installed perpendicular to studs (often 24 in. o.c.) decouples the board for lower sound transmission.
- Furring channel: creates service space and flattens irregular substrates.
- Sealing: acoustical sealants at perimeters and penetrations preserve STC performance.
For a deeper dive into sizing and gauges, see our overview on steel stud wall framing and our guide to metal studs for typical spans and fastener practices.
Top 7 Stud Wall Framing Tips for Clean, Straight Walls
To build truly straight walls: control your reference line, select the right gauge, crown studs consistently, brace mid-span, verify every 8–10 studs, protect the deflection gap, and document QC. These seven habits prevent cumulative error and keep finishes flat.
- Own the control line: snap and protect a master reference; measure everything from it, not from drifting edges.
- Match gauge to height: pick the lightest gauge that meets the span per load tables to balance stiffness and speed.
- Crown the same way: orient stud crowns consistently; it’s a small habit that flattens the plane.
- Brace early, not late: add bridging/carrying channel after the first bay or two so studs don’t twist as the wall grows.
- Laser every 8–10 studs: catch a 1/8 in. drift before it becomes 3/8 in. and a patching headache.
- Respect deflection: use slotted deflection track and leave the specified gap clear; don’t hard-fastener it shut.
- Document QC: record plumb/flat checks and screw patterns; sign off by bay so issues don’t travel.
These seven tips align with our field playbooks and are reinforced in our interior stud wall framing explainer. Share them in your site huddles to build consistency across crews.
Best Practices and Common Mistakes
Best practices focus on control lines, mid-span restraint, and proper fasteners; common mistakes include skipping bracing, mixing gauges, and ignoring deflection. A two-minute laser check per bay often prevents hours of finish rework and punch-list churn.
Best practices
- Use deep track at the base for easier stud insertion in tight corridors.
- Add bridging clips and channel at 48–60 in. height on tall walls to stabilize boarding.
- Choose resilient channel for STC targets and keep fasteners off the framing flanges where required.
- Install deflection side clips where walls intersect moving structure; keep the engineered gap.
- Pre-frame door kits with built-up jambs and headers; confirm diagonals within 1/8–3/16 in.
Common mistakes
- Fastening studs through slotted track, eliminating the deflection function.
- Skipping mid-span bracing; studs rotate and telegraph waves into the board.
- Inconsistent screw patterns; backing out or popping fasteners under board movement.
- Mixing gauges in the same run without verifying spans.
- Ignoring substrate prep; shimming the base to control floor variations pays off.
Our walkthrough on drywall and metal studs pairs these practices with boarding techniques so both trades move faster together.
Tools and Resources
Core tools include laser levels, 6–8 ft. levels, snips or chop saws for steel, impact drivers with #2 Phillips or square bits, and anchors matched to substrates. For specs, use Dass Metal load tables, product brochures, and detailing guides in imperial and metric.
- Layout and QA: laser, chalk, 6–8 ft. level, story pole, feeler gauges for flatness checks.
- Cutting and fastening: snips for light gauge, metal-cutting chop saw for heavy, #6/#8 self-tappers, nut-setters.
- Bracing hardware: bridging channel, clips, flat straps, windbrace for lateral restraint as designed.
- Special profiles: U-Flex Track for curves; steel stud sizes reference for quick selection.
For code reminders and field checklists, see this contractor’s overview of basement framing rules and a practical framing guide. For structural reinforcement concepts related to adjacent scopes, review this rebar stirrups primer.
Steel vs. Wood Stud Walls (Quick Comparison)
Steel stud walls offer straightness, fire resistance, and consistent spans, while wood offers thermal mass and simple fastening. In commercial interiors, steel’s dimensional stability and predictable gauges reduce finishing risk and speed boarding.
| Factor | Steel Stud Walls | Wood Stud Walls |
|---|---|---|
| Straightness over time | High; minimal warp/cup | Variable; can warp/cup |
| Fire performance | Non-combustible | Combustible |
| On-center spacing | 16 or 24 in. typical | 16 in. common |
| Fasteners | #6/#8 self-tapping screws | Nails or wood screws |
| Acoustic options | Resilient/furring channels | Resilient channels available |
| Deflection handling | Slotted deflection track | Compression slip joints |
If your team installs both, align details so drywall crews can repeat screw patterns and spacing regardless of substrate—consistency beats re-learning details wall by wall.
Need a quick spec check? Our engineers in Vaughan review gauges, spans, and deflection details daily. Share your wall schedule, and we’ll confirm a fit from our standard catalog or a custom profile.
Start with our stud wall basics or jump to common framing mistakes to tighten your QA plan.
Case Studies and Examples
Teams deliver straighter walls faster when gauges, bracing, and deflection details are matched to conditions. These short examples show how small choices—deep track, early bracing, resilient channel—compound into cleaner finishes and fewer punch items.
Office fit-out, York metro
A tenant improvement in the Regional Municipality of York used 3-5/8 in. light gauge studs at 24 in. o.c. With deep track at the base and one row of bridging at 54 in., boarding advanced 12% faster week over week as measured by sheets installed per crew day. Resilient channel met the STC target without redesign.
Corridor run with ceiling drift
In a healthcare corridor, slotted deflection track with a 3/4 in. gap protected long walls against deck movement. After a controlled load test on adjacent areas, the partition remained crack-free at the head-of-wall, and the doors stayed square.
Curved feature wall
A lobby radius wall framed with U-Flex Track allowed uniform screw lines and consistent curvature. The crew avoided on-site kerfing and handed off a board-ready frame in a single shift, even with intersecting glass demising walls.
Local Context: Regional Municipality of York
Near 370 New Enterprise Way in Vaughan, crews frame interiors across York’s office, healthcare, and retail spaces. Proximity to transit, like the Queen St / Highway 50 corridor, helps deliveries and site access, while Canadian-made inventory shortens lead times.
Local considerations for 370 New Enterprise Way
- Plan deliveries to align with traffic windows near Queen St / Highway 50 to keep slab edges clear for track anchoring.
- Winter installs benefit from pre-heating spaces so sealants cure and track anchors seat firmly despite cold substrates.
- Coordinate with building ops; some York properties prefer early-morning impacts for core drilling to minimize tenant disruption.
Frequently Asked Questions
These quick answers address the questions builders and drywall contractors ask most in preconstruction and at the start of framing. Share them with site leads to align expectations and speed up QA walkthroughs.
What spacing should I use for steel studs?
Most interior partitions use 16 in. or 24 in. on-center spacing, defined by stud gauge, height, and finish requirements. Check your engineering tables and drywall manufacturer recommendations before committing to 24 in. o.c. on taller walls.
When do I need slotted deflection track?
Use deflection track when the structure above can move relative to the partition—long spans, dynamic spaces, or where drawings specify drift. The slot allows vertical movement without loading the wall or cracking finishes at the head.
How do I brace tall steel stud walls?
Install bridging or carrying channel with clips at mid-span, typically around 48–60 in. above the floor for the first row. Add additional rows for taller walls per design. Bracing prevents stud rotation and keeps the plane flat during boarding.
Can I mix stud gauges in a single wall run?
Avoid mixing gauges unless approved by the engineer of record. Changing stiffness mid-run can create telegraphing and finishing issues. If conditions change (height, loads), break the run and detail the transition cleanly.
Key Takeaways
Straight walls start with control lines, right-gauge studs, and early bracing. Verify with a laser every few bays, protect the deflection gap, and document QC. Dass Metal’s engineered profiles and resources reduce guesswork and accelerate handoff to finishes.
- Snap, protect, and measure from a single control line.
- Pick gauges from tables; don’t overshoot or undershoot stiffness.
- Brace mid-span early; add rows for tall walls.
- Respect the head-of-wall deflection detail.
- Use resilient and furring channels to hit acoustic and flatness goals.
Conclusion and Next Steps
Stud wall framing succeeds when layout, gauge, bracing, and deflection are treated as a system. With engineered steel studs, deep/standard tracks, and purpose-built clips, your crew can frame faster and hand off a flatter, cleaner surface to finishes.
If you’re planning a fit-out or have a tall wall run with drift requirements, share your wall schedule with our team in Vaughan. We’ll confirm spans from load tables and, when needed, recommend special profiles or install tips to keep your schedule moving.
Ready to frame straighter? Book a quick technical review with Dass Metal Products in Vaughan—then get your materials staged and your control lines snapped.
