Steel frame houses are residential buildings that use cold-formed steel studs, tracks, and channels as the primary framing system. Typical studs are 33–50 ksi yield strength, with gauges ranging from 25 to 12 depending on loads. In 370 New Enterprise Way, builders use Dass Metal Products’ engineered steel studs to gain precision, speed, and code-compliant performance.
By Navjot Dass • Last updated: 2026-05-10
Summary
Steel frame houses combine light gauge steel studs and tracks to form straight, dimensionally stable walls and floors. Builders choose steel for speed, accuracy, fire resistance, and design flexibility. This guide explains what steel-framed homes are, why they matter, how they work, best practices, tools, examples, and FAQs.
Use this complete guide as your practical field reference. We cover definitions, materials, connections, and inspections with contractor-ready checklists. You’ll also see how Dass Metal Products supports fast, reliable builds with Canadian-made, CSSBI-certified components and cross-border delivery to U.S. projects.
- What steel frame houses are and when to use them
- Design/installation methods for interior and exterior assemblies
- Pros/cons versus wood framing with a quick comparison table
- Best practices for deflection, bracing, and acoustics
- Tools, resources, and real project scenarios from our team
What are steel frame houses?
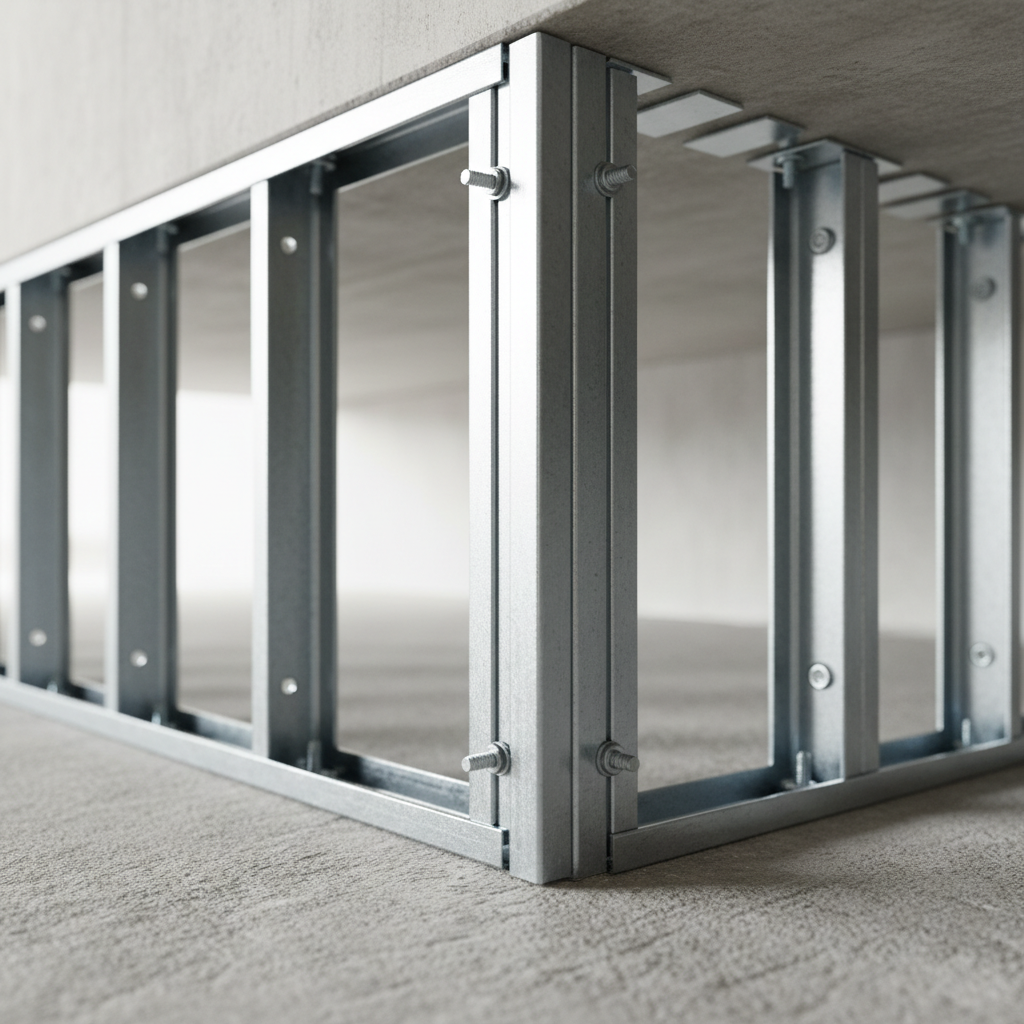
A steel frame house is a residential structure built with cold-formed steel studs, tracks, and channels instead of dimensional lumber. Using 25–12 gauge members, the system delivers straight, noncombustible, and termite-resistant walls that meet structural and acoustic targets when detailed with correct connectors, bracing, and sheathing.
At its core, a steel-framed home uses light gauge steel as the skeleton of interior and exterior walls, floors, and sometimes roofs. Components include studs, standard track or deep track, bridging/carrying channel, and clips. Design values typically reference 33 ksi or 50 ksi steel with approved coatings for corrosion resistance.
- Components: studs, track, bridging channel, resilient channel, furring channel, clips, fasteners, and sheathing.
- Typical gauges: 25, 22, 20, 18 (non-structural) and 16, 14, 12 (structural depending on loads).
- Finishing: drywall finishing sections like J trim, L trim, and 90°/130° cornerbead deliver crisp edges.
For builders in 370 New Enterprise Way, Dass Metal Products supplies both non-load-bearing and load-bearing profiles, plus engineering support so the framing package and details align with local requirements and schedules.
Why steel frame houses matter
Steel-framed homes matter because they improve build speed, dimensional stability, and fire resistance while reducing call-backs from warp, rot, or pests. With predictable load tables and precise profiles, crews frame faster, inspectors verify quicker, and owners gain long-term performance in demanding climates.
Here’s the thing: when schedules are tight, predictability wins. Straight studs mean faster drywall and fewer reworks. Noncombustible framing supports robust fire design. And because steel is not food for mold or termites, indoor quality and maintenance improve over time.
- Speed: Pre-punched knockouts, consistent lengths, and straight members help crews move faster and reduce layout errors.
- Stability: No shrinkage, twisting, or cupping—drywall finishes stay flatter and doors stay square.
- Fire and pests: Noncombustible framing and no appetite for termites or carpenter ants.
- Span and strength: High strength-to-weight ratios enable lean designs where spans or lateral loads matter.
- Documentation: Load tables and standards simplify engineering checks and inspections.
In our experience supplying across Ontario and the U.S., crews that switch to light gauge for houses often report measurable reductions in punch-list items. That adds up to smoother turnovers and happier clients.
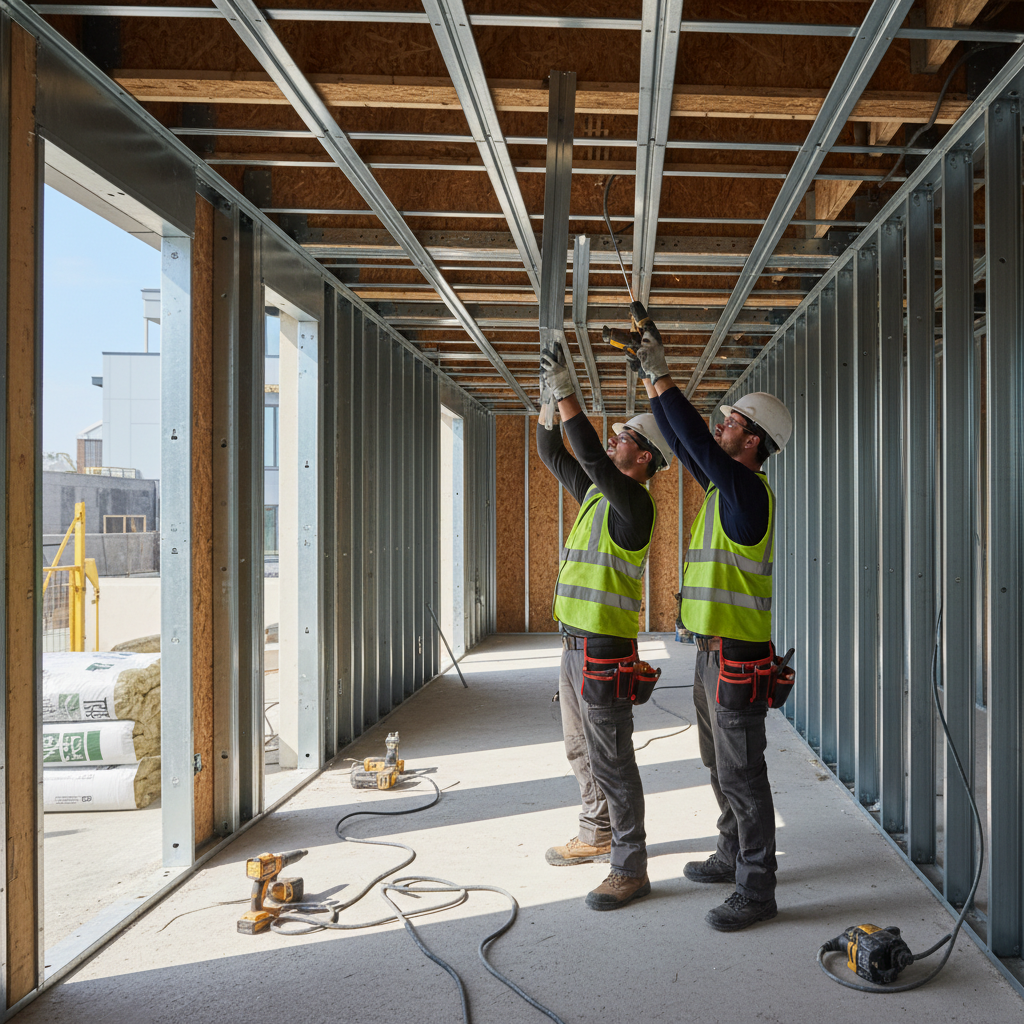
How steel frame houses work
Steel-framed houses assemble like a kit: tracks establish layout, studs drop in, and clips, screws, and channels lock the frame. Deflection tracks at the head, bridging for stiffness, and sheathing for shear create a complete, code-ready structure with predictable capacities.
Most residential projects mix non-structural interior partitions (often 25–20 gauge) with heavier exterior or load-bearing members (18–12 gauge) as dictated by loads and spans. Head-of-wall deflection, lateral bracing, and shear transfer are the key design/inspection checkpoints.
- Layout: Snap lines; install standard track or deep track.
- Stud placement: Insert studs at specified spacing (e.g., 16″ or 24″ o.c.) with fasteners per schedule.
- Deflection accommodation: Use slotted deflection track at the head to separate vertical building movement from walls.
- Stiffening: Install bridging/carrying channel, windbrace, or furring where specified.
- Acoustics: Add resilient channel and insulation for sound control.
- Finish quality: Use J trim, L trim, and cornerbead for clean edges.
For deeper fundamentals of the material system, see our internal primer on cold-formed framing in the cold-formed metal framing guide, which complements this residential-focused overview.
Types, methods, and approaches
Steel-framed homes use non-load-bearing interior studs and heavier load-bearing or exterior studs where required. Methods range from stick-built on site to panelized walls and hybrid steel-wood systems. Correct tracks, clips, and channels ensure strength, deflection control, and fast installation.
Interior framing (non-load-bearing)
- Common gauges: 25–20 with 33 or 50 ksi material; spacing at 16″ or 24″ o.c.
- Key details: standard track at base, slotted deflection track at head where slabs move.
- Acoustics: resilient channel ceilings, insulation, and staggered studs for critical rooms.
For field tips on non-load-bearing assembly, our post on using steel studs highlights common spacing, fasteners, and finishing trims that speed boarding.
Exterior/load-bearing framing
- Common gauges: 18–12 depending on axial and wind loads; often 50 ksi material.
- Bracing: bridging/carrying channel, windbrace, and bridging clips per design.
- Openings: Use boxed headers or built-up studs; maintain screw patterns.
When projects require higher capacities, see our heavy gauge framing guide for detailing that keeps members straight and connections verifiable.
Panelized and hybrid approaches
- Panelized walls: Factory-built wall panels accelerate schedules and improve tolerances.
- Hybrid: Wood floors with steel walls, or vice versa, tuned to local trades and supply.
- Curves and specials: Use U-Flex track to form radiused partitions cleanly.
For a step-by-step residential walkthrough, this independent field article on how to frame a basement with steel studs provides a homeowner-friendly view that still maps to pro practice.
Steel vs. wood: quick comparison
Steel framing offers straightness, fire resistance, and pest immunity; wood offers familiarity and easy field cutting. For many houses, steel wins on dimensional stability and long-term finish quality, while wood can work where crews and tools are already optimized for lumber.
| Factor | Steel frame houses | Wood-framed houses |
|---|---|---|
| Dimensional stability | Does not shrink, warp, or cup; finishes stay flatter | Subject to shrinkage and warping over time |
| Fire performance | Noncombustible framing; detailing still required | Combustible; requires protective measures |
| Pests and moisture | Termite- and mold-resistant framing | Vulnerable to termites and rot |
| Strength-to-weight | High; allows lean designs where spans matter | Lower; may require larger sections |
| Field familiarity | Requires steel-specific fasteners and techniques | Widely familiar to many crews |
| Acoustics | Excellent with resilient channel and insulation | Good with isolation details; more mass helps |
| Environmental | Highly recyclable; consistent material | Renewable resource; variable moisture content |
For a broader systems perspective, our primer on light gauge steel framing explains where residential projects benefit most from cold-formed members.
Best practices for residential steel framing
Focus on head-of-wall deflection, bridging, corrosion protection, and acoustic isolation. Use manufacturer load tables, keep screw patterns consistent, and stage materials so crews can work continuously. Inspect early and often to prevent compounding errors.
Deflection and movement
- Use slotted deflection track at the head where concrete slabs or trusses move.
- Preserve the vertical slot; don’t overfill with fasteners or compound.
- Document allowable movement (e.g., ±¾”) in your field notes.
Bridging and stiffness
- Install bridging/carrying channel per spacing schedule to control lateral buckling.
- Use bridging clips or webslide clips to connect channels to studs cleanly.
- Where wind governs, add windbrace and verify anchor patterns.
Corrosion and interfaces
- Select appropriate coatings; separate dissimilar metals where needed.
- Use sealants and sill gaskets at concrete interfaces to reduce moisture transmission.
- Keep cut edges sealed when specified; sweep filings to avoid staining.
Acoustic isolation
- Install resilient channel on ceilings and critical walls; maintain clip spacing.
- Avoid short-circuiting isolation with long screws or continuous blocking.
- Combine with batt insulation and seal penetrations for best STC results.
We compiled field-ready habits in our drywall framing mistakes guide. Share it during kickoff so everyone frames to the same playbook.
Local considerations for 370 New Enterprise Way
- Plan deliveries to match crew size; just-in-time staging reduces clutter and maintains safety on active residential sites in 370 New Enterprise Way.
- Account for seasonal temperature swings by confirming deflection head details and expansion allowances before drywall.
- Coordinate inspections early; share stud gauges, track types, and clip schedules with the design team and AHJ to prevent rework.
Tools and resources to build faster
Standardize on dedicated steel-cutting tools, magnetic levels, and screw guns with depth control. Use manufacturer load tables, MSDS, and standards to verify selections. Field checklists and pre-task plans help crews keep rhythms tight and consistent across rooms and floors.
- Tools that pay off: aviation snips, chop saw with metal blade, screw guns, laser levels, crimpers, nibblers, and magnetic torpedo levels.
- Design data: Consult load tables and standards to match 33/50 ksi members to spans, loads, and spacing.
- Checklists: Pre-rock inspection list (tracks anchored, studs square, bridging installed, head slots free).
- Training: Brief crews on screw patterns, clip use, and avoiding acoustic short circuits.
For a structured, step-by-step field read, this independent construction walkthrough—structural metal stud framing guide—pairs well with your superintendent’s pre-task plan.
Case studies and real-world examples
Successful steel-framed homes rely on precise takeoffs, matched gauges, and clear head-of-wall details. When logistics, engineering, and field training align, crews finish framing and boarding faster with fewer callbacks—especially on complex layouts and multi-story homes.
- Custom profiles on a deadline: A residential builder needed radiused partitions. Using U-Flex track and custom studs from our team, crews framed curves in hours, not days, keeping the schedule intact.
- Acoustic-critical suites: With resilient channel, batt insulation, and sealed penetrations, a duplex achieved strong isolation between living spaces, reducing post-move-in noise complaints.
- Cross-border schedule: A U.S. project aligned Canadian-made, CSSBI-certified studs with tight phasing. Our delivery windows matched crew availability, eliminating idle time onsite.
Need help choosing gauges or clips for an upcoming residence? Our engineering support can review spans, opening counts, and deflection targets so your submittal is right the first time.
Planning a steel-framed home? Dass Metal Products supplies Canadian-made studs, tracks, channels, and trims with dependable delivery across Canada and the U.S. Share your plans and we’ll align profiles, gauges, and timelines to your site.
Installation steps (field-tested)
Lay out tracks accurately, stand studs plumb, and lock the system with clips, bridging, and sheathing. Keep screw patterns consistent and head slots free for movement. Inspect early to confirm alignment before services and drywall.
- Layout and tracks: Snap lines; install standard or deep track. Anchor per schedule.
- Stand studs: Insert studs at spacing with correct orientation. Check crowns (yes, steel can have a mild bias).
- Head-of-wall: Use slotted deflection track; do not bridge slots with fasteners or compound.
- Bridging: Install bridging/carrying channel and bridging clips at specified heights.
- Openings: Box studs and headers; maintain screw counts and edge distances.
- Services: Run MEP through pre-punched knockouts; protect with grommets.
- Sheathing and board: Attach per pattern; do not overdrive screws.
- Finishing trims: Install J trim, L trim, and cornerbead for clean edges.
For more on sequencing and bracing choices, see our overview of steel frame bracing options used in single- and multi-story homes.
Codes and inspection readiness
Be inspection-ready with stamped designs, member schedules, and installation details. Provide data sheets, load tables, and coating specs. Field photos of head slots, bridging, and anchor patterns speed approvals and reduce re-inspection risk.
- Submittals: Product data, load tables, and fastening schedules for 33/50 ksi members.
- Field photos: Document head-of-wall slots, bridging locations, and base anchors.
- Coordination: Share clip types (e.g., deflection side clip, webslide clip) and where they’re used.
- Sheathing: Confirm shear values and patterns with your engineer of record.
If you’re new to residential steel, start with our light gauge and steel studs primers to align terminology before plan review.
Datasheets and field references
Keep a binder (or shared folder) with member gauges, clip types, screw patterns, and approved coatings. Pair this with a pre-rock checklist and a punch-list template to lock in consistent field quality across units and floors.
- Stud and track gauges, steel grade (33/50 ksi), and spacing assumptions
- Clip schedules: deflection side clip, webslide clip, bridging clip
- Acoustic details: resilient channel layouts and isolation notes
- Finishing: J trim, L trim, cornerbead types and locations
Another handy independent reference for crews is this practical steel stud framing sizes explainer, which helps convert between common size callouts on submittals.
Related articles
Want to go deeper on methods and sequencing? Explore complementary guides that break down member selection, detailing, and bracing. Linking concepts across these reads helps new team members ramp up quickly and reduces field ambiguity.
Pair this article with our cold-formed framing guide for broader context, then scan the tips in drywall framing: avoid mistakes to keep finishing quality high in steel-framed homes.
Frequently Asked Questions
These quick answers address the most common questions builders ask when planning steel-framed homes. Each response is concise so superintendents, estimators, and inspectors can confirm next steps fast.
What are the main materials in a steel frame house?
Cold-formed steel studs and tracks, bridging/carrying channel, resilient and furring channels, and purpose-made clips. Drywall finishing trims like J trim, L trim, and cornerbead complete edges for clean finishes.
Do steel-framed homes meet residential codes?
Yes. With engineered designs, approved gauges, and correct detailing (deflection heads, bracing, and sheathing), steel framing meets structural and fire requirements for residential construction. Keep submittals, load tables, and data sheets ready for inspection.
How do I control sound in steel-framed houses?
Use resilient channel on ceilings and selected walls, add batt insulation, and seal all penetrations. Avoid long screws that touch studs through the channel, which can short-circuit isolation.
When should I choose steel over wood?
Choose steel when you need straight, stable walls; higher fire resistance; or when pests and moisture are concerns. It’s also advantageous for longer spans, tight schedules, and projects seeking consistent, documented capacities.
Conclusion and key takeaways
Steel frame houses deliver speed, stability, and safety when detailed correctly. With clear submittals, matched gauges, and trained crews, you’ll frame faster and finish flatter—and your punch lists will show it. Dass Metal Products supports each step with engineered, Canadian-made components.
- Plan: Confirm gauges, spans, and head-of-wall deflection early.
- Build: Keep screw patterns consistent; install bridging and clips per schedule.
- Verify: Photograph critical details for quick inspections.
- Finish: Use trims and isolation details to protect board quality and acoustics.
Next step: Share your drawings with our team. We’ll line up profiles, gauges, and delivery windows so your steel-framed home starts—and finishes—strong in 370 New Enterprise Way.
