Channel furring is the process of installing light-gauge, hat-shaped steel channels to create a level, decoupled surface for drywall or cladding. It improves alignment, acoustics, and moisture control. At 370 New Enterprise Way in Vaughan, Dass Metal Products manufactures furring channel and related components engineered to speed installation and meet code across Canada and the United States.
By Navjot Dass • Last updated: June 12, 2026
Overview & Table of Contents
Furring channel streamlines wall and ceiling builds by creating a straight, decoupled plane for drywall. This guide explains what it is, when to use it, best practices, tools, and on-site examples—so builders and architects can specify and install with confidence.
This complete guide is written for builders, drywall contractors, and specifiers who need clear, field-tested answers. Use it as a planning checklist, a submittal companion, and a jobsite reference.
- What furring channel is and how it works
- Where it saves time and reduces rework
- Types, gauges, and mounting methods
- Spacing, fasteners, and code-minded details
- Tools, resources, and example installs
What Is Furring Channel?
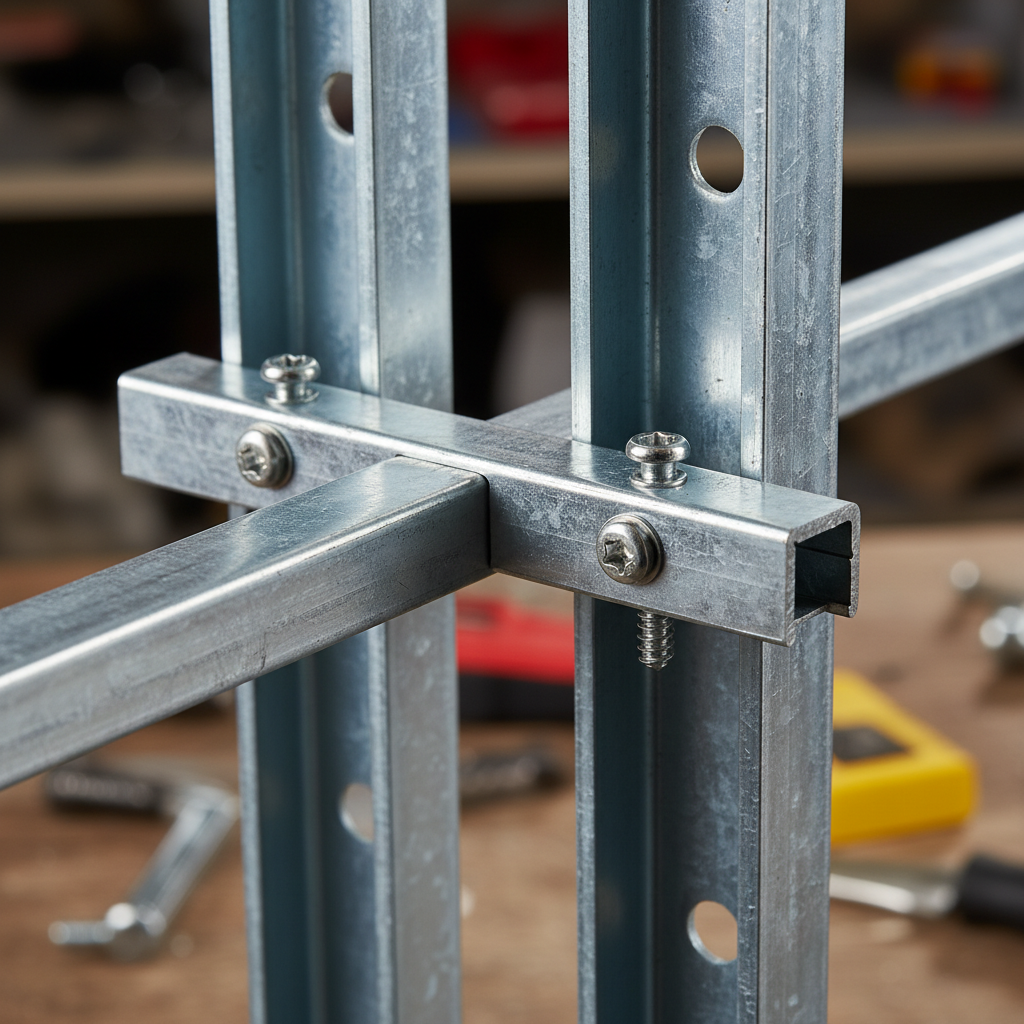
Furring channel—often called hat channel—is a cold-formed steel section used to level, decouple, and straighten substrates for drywall and cladding. Installed perpendicular to studs or structure, it improves flatness, acoustics, and service routing while reducing shimming and rework.
In steel stud assemblies, channel furring serves as the intermediary layer between framing and sheathing. The profile’s raised web and flanges create consistent stand-off, which helps:
- Absorb minor stud variances to deliver flatter finishes
- Decouple drywall for better sound isolation on partitions
- Provide chase space for MEP and low-voltage cabling
- Protect gypsum from minor substrate moisture transfer
On exterior soffits and interiors with uneven substrates, furring channel replaces ad hoc shims with a precise, repeatable plane. It also integrates cleanly with resilient channel, carrying/bridging channel, and deflection tracks in comprehensive steel framing systems.
For dimensions, gauges, and coating options, see the dedicated product page for our furring channel specifications. You can review profile geometry and reference load data alongside compatible trims.
Why Furring Channel Matters
Furring channel reduces finishing labor, supports acoustic control, and mitigates moisture telegraphing. By creating a predictable, decoupled plane, crews hang faster, tape less, and achieve more consistent Level 4/5 finishes with fewer callbacks.
Here’s what most project teams don’t realize: the few extra minutes adding channel furring at layout can save hours of skimming and sanding later. The benefits compound across long corridors, unit stacks, and amenity ceilings.
- Speed and uniformity: Straighter planes reduce touch-ups and finish cycles. On corridor runs over 100 feet, we routinely see 1–2 skim coats instead of 2–3.
- Acoustics: Decoupling limits direct vibration transfer, improving privacy between rooms; resilient variants can add 3–8 STC points when detailed correctly.
- MEP friendliness: The stand-off space simplifies routing and device mounting, typically allowing 1/2–3/4 inch clearance for low-voltage and backer plates.
- Moisture moderation: Air space helps limit cold-bridge effects and small substrate irregularities, especially on perimeter walls and soffits.
- Integration: Works with resilient channel, carrying/bridging channel, and deflection components to meet structural, acoustic, and movement requirements.
We’ve seen high-rise corridors go from three skim coats to one when crews standardize furring channel on out-of-plumb cores. A 10–20% improvement in hang-and-tape productivity is common when layouts are laser-verified every 10–12 feet.
How Furring Channel Works
Furring channels mount perpendicular to studs or structure to form a secondary plane. The hat profile’s web sets stand-off, while flanges receive fasteners. This creates decoupling that improves flatness and sound control, and offers a service cavity for wiring.
The mechanics are simple but powerful. The raised web establishes a consistent offset; the flanges distribute screw load; and the continuous linear member averages small variances across multiple studs or joists. Result: fewer high/low spots and tighter joint lines.
- Attachment: Self-drilling screws to steel studs; masonry anchors or concrete pins to solid substrates; clips for isolation or deflection where needed.
- Orientation: Perpendicular to framing for walls; orthogonal grids for ceilings with carrying channel above.
- Spacing: Commonly 16 or 24 inches on-center, coordinated with board orientation and thickness.
- Isolation: Combine with resilient channel or isolation clips where STC targets apply or base-building vibration exists.
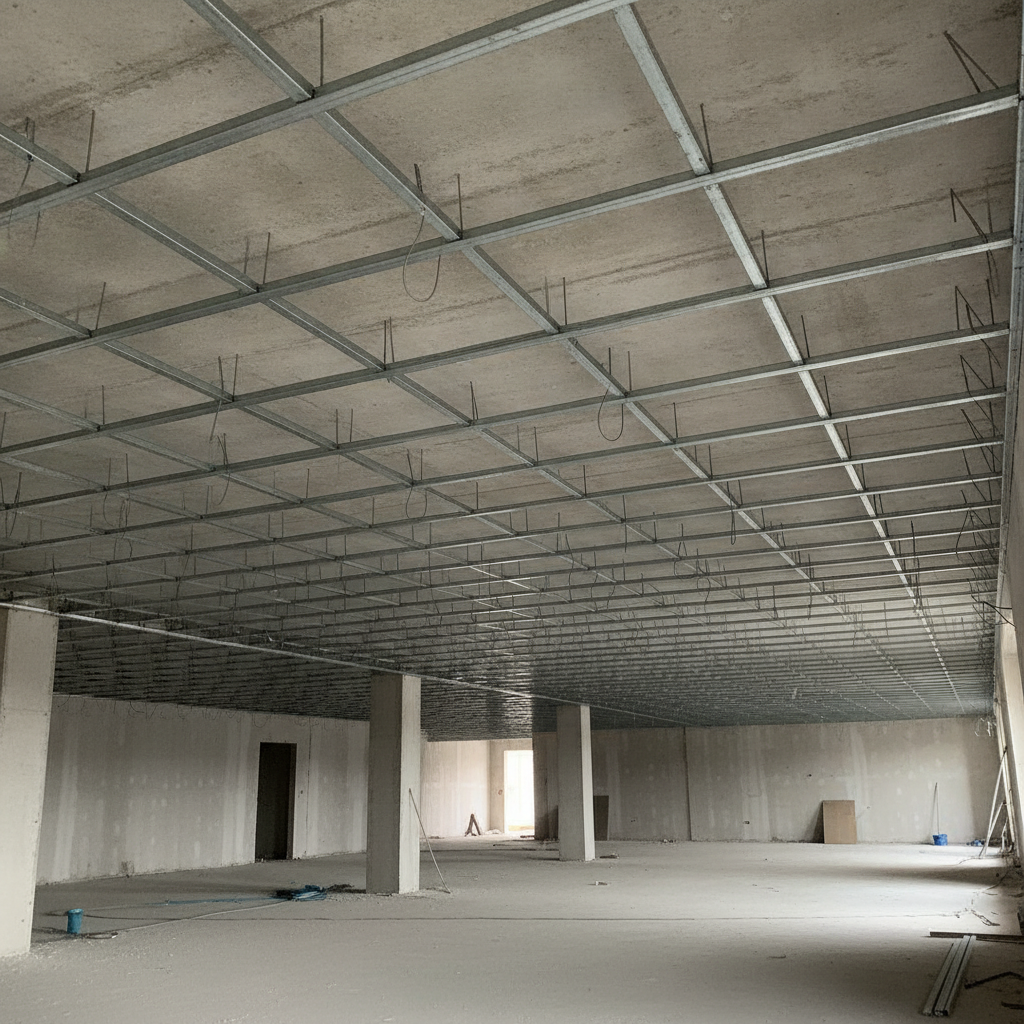
For suspended ceilings, carrying (a.k.a. bridging) channel spans longer distances and supports rows of furring channel, producing a rigid, level plane for gypsum board and linear metal panels alike. Explore our carrying/bridging channel details to plan grid spacing and wire drops.
Types, Gauges, and Methods
Most projects use standard hat-shaped furring channel for walls, resilient channel for acoustic decoupling, and carrying/bridging channel plus hanger wire for ceilings. Choose gauge and spacing based on span, load, and board type.
Common channel types
- Furring (hat) channel: Primary leveling member for walls and soffits; typical o.c. spacing is 16–24 inches.
- Resilient channel: Single-leg profile that decouples drywall to raise STC on targeted partitions.
- Carrying/bridging channel: Heavier section used in ceiling grids to support furring rows and gypsum.
- Z-Bar and L track: Edge termination and panel transition details; helpful for reveals and clean stops.
Gauges and spans
- Light-gauge (25–20 ga): Most interior partitions, furred walls, and typical ceilings with standard board.
- Heavier gauge (18–16 ga): Longer spans, specialty ceilings, or higher loading conditions, as engineered.
- Span checks: Verify with manufacturer load tables for the exact profile and spacing before mobilization.
Mounting methods
- Direct-fix: Screw hat channel to studs or to concrete/masonry with appropriate anchors and embedment.
- Clip-isolated: Use acoustic or deflection clips where movement or sound control is critical.
- Suspended: Hang carrying channel with wire (often 4-foot grid, as engineered), then fasten furring underneath for a level ceiling plane.
Where fire-rating, movement joints, or moisture exposure are present, coordinate accessories like J-trim, L-trim, and slotted deflection track to preserve performance while maintaining clean terminations. Keep deflection allowances (often 1/2–1 inch) at the top of non-load-bearing walls beneath structure.
Best Practices for Layout and Installation
Lay out channels to align with board edges, keep consistent on-center spacing, and verify straightness every 10–12 feet. Use compatible fasteners, control joints at design intervals, and protect against corrosion in humid zones.
Layout that speeds taping
- Snap reference lines and pre-mark 16 or 24 inch centers to match board width.
- Align with tapered board edges to cut down on butt joints by 20–30% in long runs.
- Pre-plan backing for fixtures and millwork to avoid excessive field cuts.
Fasteners and connections
- Use self-drilling screws for steel framing; maintain typical screw spacing of 12 inches on walls and 8 inches on ceilings for gypsum (verify with board manufacturer).
- When fastening to concrete or masonry, select anchors with appropriate embedment and corrosion protection.
- Don’t short-circuit resilient channels with rigid ties, back-to-back studs, or blocking that bridges the break.
Quality checks that pay off
- Laser or string-line every 10–12 feet; remediate high/low spots before boarding.
- Confirm deflection details at tops of partitions; slotted track and clips prevent board cracking.
- Document control joints per design—commonly every 30–40 feet inside conditioned spaces.
If you’re coordinating a mixed system—hat channel on most walls, resilient channel on acoustic partitions—capture it on shop drawings. Our drywall-framing mistakes guide shows how clear submittals reduce RFIs and prevent rework during peak schedule periods.
Tools and Resources You’ll Actually Use
Bring a laser, chalk line, self-drilling screws, impact driver, and snips. For planning, use manufacturer load tables, product brochures, and standards documentation to align spans, gauges, and coating with project conditions.
Field tools
- Laser level, chalk, 6–8 foot levels for close checks
- Impact driver, snips, and a rotary hammer for anchors
- PPE appropriate to substrate (eye/hearing protection, gloves, dust control)
Planning documents
- Product brochures and profile geometry for hat, resilient, and carrying channels
- Load tables for allowable spans at 16 and 24 inches o.c.
- Coating specifications (e.g., galvanized levels) for moisture-prone zones
Dass Metal Products backs these with engineering support. Start with our steel studs reference guide and coordinate studs, tracks, and channels up front. For partition planning, our interior stud wall framing overview and stud wall framing tips help align teams around consistent, field-proven details.
Where concrete interfaces are involved, cross-trade clarity reduces delays. For example, reinforcing and embeds drive anchor choices and locations; a primer like this foundation rebar detailing overview is useful context during preconstruction meetings.
Local Supply & Logistics in Vaughan (Regional Municipality of York)
For fast turnarounds in the Regional Municipality of York, Dass Metal Products supplies furring channel directly from 370 New Enterprise Way. Local stock, custom runs, and coordinated delivery windows keep drywall crews on schedule across Vaughan and nearby job sites.
Proximity matters when schedules tighten. Our Vaughan facility manufactures Canadian steel components with CSSBI-controlled processes and supports cross-border shipments to U.S. projects. That means submittals, shop drawing support, and palletized orders can move in hours, not days, when you need them to.
- Local pickups and timed deliveries reduce idle time for boarding crews during crunch periods.
- Custom profiles and quick-turn lengths help eliminate site cutting and improve safety.
- Coordinated shipments with studs, track, and trims limit partial deliveries and staging clutter.
When staging near public transit, plan truck arrivals around peak times near the Highway 50 – Zum Queen Stop EB to improve access. For winter installs, acclimate board and maintain stable temperatures to reduce joint shrinkage in cold snaps typical of York Region.
Furring vs. Resilient vs. Carrying Channel
Use hat-shaped furring for leveling walls and soffits, resilient channel when acoustic decoupling is the priority, and carrying channel to build suspended ceiling grids that support furring rows and drywall.
| Channel | Primary Use | Typical o.c. | Acoustic impact | Notes |
|---|---|---|---|---|
| Furring (hat) | Leveling walls/soffits | 16–24″ | Moderate (decoupling) | Improves flatness; easy service routing |
| Resilient | Sound isolation on partitions | 24″ (check board) | High (spring action) | Avoid short-circuiting with rigid ties |
| Carrying/Bridging | Suspended ceiling support | As engineered | Indirect | Supports furring rows; hung with wire |
While these roles are distinct, many projects combine all three: hat channel for alignment on most partitions, resilient channel for key demising walls, and carrying channel in amenity ceilings. For product specifics, see our metal framing channel guide covering coordination tips and accessory choices.
Need a quick span check? Share your board type, spacing, and intended span. Our engineering team will confirm a gauge and layout so your crew can hang with confidence.
Mini Case Studies & On-Site Examples
Across corridors, unit demising walls, and amenity ceilings, standardized furring channel reduces skim cycles, speeds board installs, and improves acoustic consistency. Here are condensed examples drawn from recent project work.
High-rise corridor alignment
- Challenge: Out-of-plumb core walls created 3/8 inch swings over 10 feet.
- Approach: 7/8 inch hat channel at 16 inches o.c. over light-gauge studs, laser-verified every 12 feet.
- Result: Tapers moved to one skim + sand; board crew averaged 15% faster hang rates corridor-wide.
Mixed-use amenity ceiling
- Challenge: Soffit undulations telegraphing through painted drywall after first coat.
- Approach: Suspended carrying channel with hat channel rows; added control joints every 30–40 feet per design.
- Result: Straighter joints post-paint; eliminated a second rework cycle and reduced punch-list items by half.
Acoustic partition upgrade
- Challenge: Tenant privacy concerns between meeting rooms with back-to-back boxes.
- Approach: Resilient channel on one side only; preserved wall thickness and device locations.
- Result: Noticeable speech privacy improvement without redesigning MEP; fewer noise-related tickets after move-in.
Retail fit-out against masonry
- Challenge: Uneven block wall with 1/2 inch highs/lows made direct board attachment impractical.
- Approach: Direct-fix hat channel with masonry anchors; controlled stand-off to 3/4 inch for conduit clearance.
- Result: Clean finished plane; consistent reveals at storefront transitions; faster fixture layout.
Coordinating with millwork early is smart when flush installations are needed. For example, built-in shelving and branded fixtures benefit from flatter, predictable planes; a commercial millwork primer like this overview of custom built-ins for retail environments can help teams align tolerances and backing locations during design.
Local considerations for 370 New Enterprise Way
- Plan deliveries to avoid peak bus times near Highway 50 – Zum Queen Stop EB; it eases access for flatbeds.
- Winter installs: allow acclimation before finishing to reduce joint shrinkage across the Regional Municipality of York’s cold snaps.
- Coordinate cross-border shipments early for U.S. sites; engineering submittals help keep inspections smooth.
Frequently Asked Questions
Install furring channels perpendicular to studs at 16–24 inches o.c., verify straightness with a laser, and select gauge using manufacturer load tables. Use resilient channel when sound isolation is the top priority, and carrying channel to suspend ceilings.
What’s the difference between furring channel and resilient channel?
Furring (hat) channel levels and decouples the substrate for flatter finishes. Resilient channel is designed to increase sound isolation by introducing a spring-like break. Use hat channel for alignment and general decoupling; use resilient channel where acoustic performance is the priority.
How far apart should I space furring channels?
Most interiors use 16 or 24 inches on-center, coordinated with drywall orientation and thickness. Ceilings and specialty boards may require tighter spacing. Always verify spans and spacing against the manufacturer’s load tables for the exact profile and gauge.
Can I attach furring channel directly to concrete or masonry?
Yes. Use appropriate concrete or masonry anchors, and check embedment requirements. For improved acoustics, consider isolation clips between the wall and the channel. Confirm corrosion protection when working near moisture-prone areas.
When should I use carrying channel instead of just furring?
Use carrying channel to build suspended ceiling grids over uneven structure or when spanning greater distances. It supports rows of furring channels and creates a rigid, level plane for drywall or panels. This method also eases coordination around MEP.
Key Takeaways
Standardize furring channel wherever flatness, speed, and acoustic consistency matter. Verify spans with load tables, coordinate trims and clips, and document your layout. Expect straighter walls, fewer callbacks, and cleaner finishes when teams follow a consistent method.
- Channel furring levels walls and soffits and creates a decoupled plane.
- Use resilient channel where sound isolation targets apply.
- Suspend ceilings with carrying channel and wire for longer spans.
- Laser-verify alignment every 10–12 feet and match o.c. to board width.
- Plan corrosion protection and movement joints early to avoid rework.
Conclusion and Next Steps
Adopt a repeatable approach: define where you’ll use hat, resilient, and carrying channels; confirm spacing with load tables; and capture details on shop drawings. This disciplined method shortens finish cycles and improves handover quality.
- Review furring channel specs and confirm gauge for your spans.
- Coordinate ceiling grids with carrying channel assemblies.
- Align stud selection using our steel studs reference guide.
If you’re planning a retrofit against masonry or basement walls, a homeowner-level primer like this basement framing guide provides helpful context. For commercial projects in Greater Toronto and beyond, we’ll help you tailor profiles, quantities, and delivery windows to your schedule.
Working near Vaughan? Book a quick design review at 370 New Enterprise Way. We’ll align gauges, spacing, and trims with your specs so crews can hang with confidence and finish strong.
