Steel framing channel is the cold-formed steel profile used to brace studs, carry loads across bays, and create mounting or furring planes for drywall and finishes. It improves stability, reduces deflection, and speeds installation. At 370 New Enterprise Way in Vaughan, our team at Dass Metal Products engineers steel channels to CSSBI standards for reliable, code-ready performance.
By Navjot Dass | Last updated: 2026-06-11
Above-the-fold summary
Steel framing channels include bridging/carrying channels, resilient channels, and furring channels. Use them to control stud twist, meet deflection criteria, and improve acoustics. This 2026 guide explains sizing, spacing, fastening, and submittals—plus on-site tips from Dass Metal Products engineering team in Vaughan.
This quick section gives you the lay of the land so you can skim, decide, and get building with confidence. If youre a GC, framing contractor, or specifier, youll find practical rules of thumb, code-aligned details, and submittal-ready notes.
- What channels are, when to use each, and how they work together
- Typical sizes, gauges, and on-center spacing for common wall types
- Deflection and drift allowances (e.g., 1/2 in head gaps, L/360)
- Fasteners, clips, and field checks that prevent callbacks
- Acoustic assemblies using resilient channel with clear dos/donts
- Submittal checklist and inspection-ready documentation
Overview
Channels are simple, high-leverage components that solve stability, alignment, and acoustic problems in metal wall and ceiling systems. The right channel choice can shave hours from layout, tighten tolerances, and help walls meet serviceability limits without upsizing studs or overfastening.
Heres how to use this guide: scan the channel types, check the tables, then jump to best practices. We include internal resources like our metal framing channel guide and system-level guidance in our steel framing system overview so you can move from concept to shop-ready details.
Local considerations for 370 New Enterprise Way
- Plan deliveries off-peak near Highway 50 corridors; coordinate staging to keep channels and studs dry and straight before installation. The Queen St / Highway 50 corridor can see mid-day surges.
- Winter installs in the Regional Municipality of York benefit from preheating interior zones; stable temperatures keep zinc-coated channels dry for cleaner fastening and consistent torque.
- For projects close to the Highway 50 – Zum Queen Station Stop WB, reserve curb space early; our team can kit channels by floor to reduce handling and packaging waste.
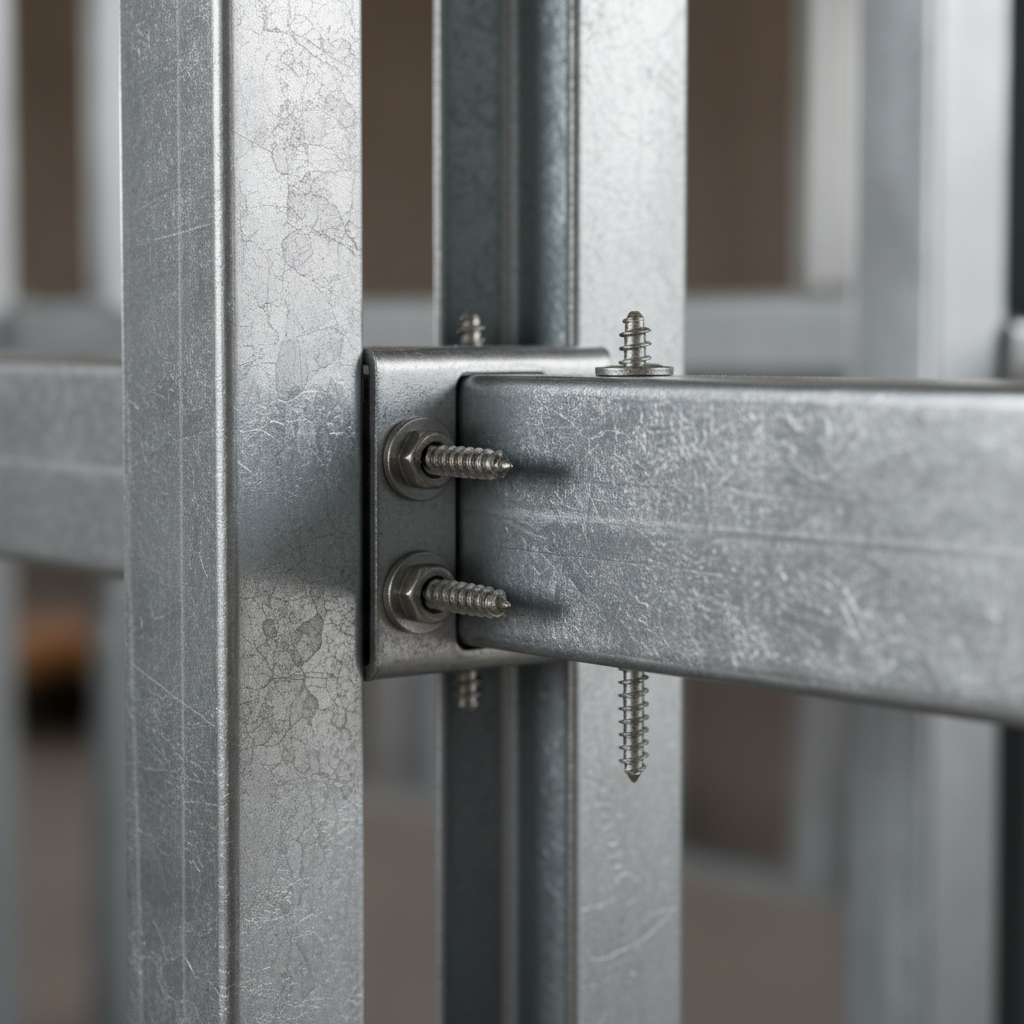
What is a steel framing channel?
A steel framing channel is a cold-formed, galvanized steel profile used to brace studs (bridging/carrying channel), decouple drywall (resilient channel), or create leveling planes (furring channel). It controls twist, limits deflection, and delivers alignment for faster boarding and better finishes.
In our work with interior framing across Ontario, three families cover 90% of needs: bridging/carrying channel running horizontally through stud punch-outs; resilient channel installed perpendicular to studs for sound control; and furring channel to level substrates, carry cladding, or create service cavities.
- Bridging/Carrying Channel: Runs through stud web knockouts; locks the stud field and improves lateral stiffness.
- Resilient Channel (RC): Creates a spring-like break between studs and gypsum to reduce sound transmission.
- Furring Channel (Hat Channel): Forms a true plane over uneven substrates, supports gypsum, acoustical panels, or cladding.
At Dass Metal Products, our channel profiles complement non-load-bearing and load-bearing stud systems. They integrate cleanly with standard track, deep track, and slotted deflection track found in our light gauge framing guide.
Why steel framing channels matter on your job
Channels cut rework by stabilizing studs, reduce board cracking by controlling deflection, and improve STC ratings with decoupling. They also standardize fastener patterns, which speeds inspections and shortens punch lists across interior partitions and soffits.
On real jobs, small layout errors compound. A single twisted stud can telegraph a ridge down a 40-foot corridor. Bridging channel at 48 inches on center keeps fields plumb so 12-foot boards butt clean. Resilient channel avoids hard coupling that would otherwise transmit footsteps or elevator noise into suites.
- Quality: Flat, true planes reduce compound coats and sanding passes.
- Speed: Predictable spacing (e.g., 24 in. o.c. RC) streamlines fastening patterns.
- Compliance: Head-of-wall gaps (e.g., 1/2 in.) and drift clips pair well with slotted track to meet drift/deflection limits.
- Safety: Properly braced stud bays resist construction-phase impacts and reduce loose members.
We regularly kit channels by level for multi-phase deliveries, which keeps corridors clear and ensures the right gauges land with the right wall types. That alone can save hours per floor on mid-rise projects.
How steel framing channels work
Bridging channels resist lateral movement and torsion in studs; resilient channels decouple gypsum from structure to reduce vibration; furring channels level uneven substrates and provide a continuous mounting plane. Together, they stabilize, decouple, and align.
Think in three mechanisms: restraint, decoupling, and alignment. Bridging restrains studs using the web knockouts lever arm. Resilient channel adds a compliant path that damps vibration energy before it reaches drywall faces. Furring aligns the finish plane, making uneven substrates irrelevant to board layout.
- Restraint (Bridging/Carrying): Insert channel through knockouts; fasten at end studs with clips; tie mid-bays as required. Typical spacing: 48 in. o.c. (corridors) or 60 in. o.c. in low-traffic zones.
- Decoupling (RC): Mount perpendicular to studs, flange down; fasten board to RC only. Common spacing: 24 in. o.c. for 1/2 in. gypsum; 16 in. o.c. for heavier layers or ceiling use.
- Alignment (Furring): Shim or use leveling clips; maintain a true plane to within 1/8 in. over 10 ft for premium finishes.
Keep an eye on fastener selection. Self-drilling screws (#8 or #10) with proper point lengths prevent spin-out; consistent torque delivers snug seating without crushing flanges.
Types of steel framing channel (with typical sizes)
Most interiors use three: bridging/carrying channel for stud restraint, resilient channel for sound control, and furring channel to create a leveling plane. Typical depths range from 7/8 in. (RC) to 1-1/2 in. (furring). Spacing runs 16 24 inches on center depending on load and board layers.
Bridging/Carrying Channel
- Purpose: Control stud rotation and lateral bow; support fixtures or services when detailed.
- Sizes: Common depths ~1-1/2 in.; length per bay or continuous with splices.
- Spacing: 48 in. o.c. typical; tighten to 2436 in. o.c. at openings or abuse-prone areas.
- Fasteners: #8 or #10 self-drilling; clip or direct screw depending on detail.
- Where it shines: Long corridor walls, tall partitions, and areas with trolley/cart traffic.
Explore profile details and compatible clips in our system notes referenced from the steel frame bracing guide.
Resilient Channel (RC)
- Purpose: Reduce sound transmission by decoupling drywall from framing.
- Sizes: Typical depth 7/8 in.; single-leg profile with slotted web.
- Spacing: 24 in. o.c. for walls with single 1/2 in. gypsum; 16 in. o.c. when using multi-layer or ceilings.
- Dos: Run perpendicular to studs; keep screws centered in slots; board only to RC.
- Donts: Dont short-circuit the system by screwing board back to studs or by compressing insulation against RC hardware.
Furring Channel (Hat Channel)
- Purpose: Create a continuous, level plane for gypsum, tile backers, or specialty panels.
- Sizes: 1-1/2 in. typical depth; widths vary by application.
- Spacing: 16 in. o.c. for heavy finishes; up to 24 in. o.c. for standard gypsum.
- Applications: Shim over uneven concrete, build service cavities, or carry acoustic panels.
- Next step: See product specifics in our furring channel overview.
Steel framing channel best practices (2026 update)
Mark knockouts, pre-stage lengths, and lock the first two bays before you run. For RC, keep a strict no-short-circuit rule. For furring, laser a control line and shim to tolerance. Close with a documented inspection so the board crew inherits a flat, quiet frame.
Layout and staging
- Snap lines for channel runs before studs are fully tightened. This keeps channels square when you cinch the field.
- Use pre-cut bundles labeled by room or zone; this prevents mixing gauges and lengths during rush periods.
- In long corridors, start at midspan to balance tolerances and work out to ends for clean tie-ins.
Fastening discipline
- Use consistent torque settings on drivers; aim for snug without dimpling flanges.
- Center screws in RC slots; off-center fasteners raise the coupling stiffness and erode acoustic benefit.
- At ends, use bridging clips sized for the channel; over-clamping can pinch and introduce noise paths.
Quality checks that pay back
- Pull-string or laser check: keep planes within 1/8 in. over 10 ft for finish-grade walls.
- Confirm head gaps (e.g., 1/2 in.) where slotted deflection track is specified; add labels for inspectors.
- Photograph hidden channels at penetrations; it speeds approvals when fixtures mount later.
Our cold-formed steel framing notes consolidate these checks so crews and inspectors work from the same playbook.
Code alignment, deflection, and drift
Serviceability limits like L/360 for walls and documented head-of-wall gaps keep cracks away from corners and doors. Slotted deflection track plus bridging delivers predictable performance when the structure moves under wind or live loads.
Two practical numbers keep jobs out of trouble. First, deflection limits: L/360 is a common target for gypsum-lined walls. Second, head-of-wall movement: document a 1/2 in. gap where slotted deflection track is specified, along with drift clips where required. Properly spaced bridging helps the stud field share loads and resist racking.
- Specify slotted deflection track at head-of-wall where vertical movement is expected.
- Maintain channel spacing (e.g., 48 in. o.c.) to stabilize tall bays during structural drift or wind gusts.
- Label head gaps on field photos to show compliance during inspections.
Installation steps: from delivery to sign-off
Success follows a simple sequence: receive and stage by area, layout and pre-drill, install and brace, inspect and document. Closing with a punch-ready checklist protects your schedule and your finishers.
- Receive & Stage: Keep bundles dry; separate by gauge and length. Use room tags so the right channels land in the right zone.
- Layout: Mark centerlines at design spacing (e.g., 24 in. o.c. RC; 48 in. o.c. bridging). Confirm stud knockouts align.
- Install: Run channels through bays; fasten ends with clips or screws; maintain level and plumb.
- Verify: String-line checks; record head gaps and clip counts; photo-log concealed work before boarding.
- Handover: Share submittal sheet with spacing, gauge, and fastener schedule; align with board crew.
Comparison table: channel types and use-cases
Choose bridging for stability, resilient channel for sound isolation, and furring for alignment and cladding support. Depth, spacing, and fastening patterns vary by use-case; align them with your board layers, wall height, and abuse exposure.
| Channel Type | Primary Purpose | Typical Depth | Common Spacing | Where It Excels |
|---|---|---|---|---|
| Bridging/Carrying | Restrain studs; limit twist/bow | ~1-1/2 in. | 48 in. o.c. (tighten near openings) | Tall corridor walls; high-traffic zones |
| Resilient (RC) | Decouple gypsum; reduce STC loss | ~7/8 in. | 24 in. o.c. walls; 16 in. o.c. ceilings | Multifamily, hotels, healthcare |
| Furring (Hat) | Create level plane; carry finishes | ~1-1/2 in. | 1624 in. o.c. per finish | Uneven substrates; tile backers |
Tools and resources for channel success
Use lasers for alignment, torque-limited drivers for consistent seating, and labeled kits for speed. Pair tools with a one-page submittal and a punch-ready checklist so inspectors and board crews accept your work on the first pass.
- Layout: Rotary laser, chalk line, and a 10-ft straightedge for quick plane checks.
- Cutting: Chop saw with metal blade or snips rated for your gauge; deburr for safe handling.
- Fastening: #8/#10 self-drilling screws; torque-limited drivers avoid over-crushing flanges.
- Documentation: One-page submittal with profile, gauge, spacing, and fastener schedule.
- Reference: See our system overview in the steel framing system guide.
For broader building integration, our sister site offers reinforcement contextsee this steel rebar guide for structural coordination insights.

Case examples: what good looks like
On corridors, bridging at 48 in. o.c. and RC at 24 in. o.c. produce board-ready frames with fewer ridges and fewer popped screws. On feature walls, furring held to 1/8 in. over 10 ft yields tighter reveals and crisper tape joints.
- Mid-rise multifamily: We kitted RC by floor and color-tagged lengths. Crews cut fasteners by 20+ per bay thanks to standardized patterns; punch-list items dropped sharply.
- Ambulatory care fit-out: Bridging tightened tall exam room walls so heavy casework could anchor to prescribed zones without hunting for studs.
- Office refresh: Furring over uneven CMU produced a true plane; the GC avoided a full float coat and days of schedule drag.
In our experience, the biggest wins come from disciplined staging and a documented closeout. When the next trade sees a level, labeled field, momentum builds.
Common mistakes to avoid
The fastest way to lose channel benefits is to short-circuit resilient channels, skip bridging at openings, or ignore tolerance until the board crew arrives. Fix these upstream to unlock speed and finish quality.
- Short-circuiting RC: A single screw back to a stud can conduct noise; brief the board crew and mark studs where needed.
- Under-bridging: Skipping a run near a door invites twist and cracks; tighten spacing around openings.
- Tolerance drift: If you dont string-line early, waves set in; fix planes before boarding.
- Unlabeled gauges: Mixed gauges create uneven fastening behavior; label bundles clearly at delivery.
For more system-level pitfalls, see our steel framing system guide which ties channels to studs, tracks, and clips.
Specs, submittals, and inspection-ready notes
Great submittals are short and specific: profile, gauge, spacing, fasteners, and clips. Add a sketch and a photo example. Inspectors and board crews will thank you, and your schedule will stay intact.
- Profiles & Gauges: List depths (e.g., RC 7/8 in.; furring 1-1/2 in.) and steel thicknesses by wall type.
- Spacing: 24 in. o.c. for RC walls; 16 in. o.c. for RC ceilings; 48 in. o.c. for bridging unless otherwise noted.
- Fasteners & Clips: Specify #8/#10 screws, clip types, and any end conditions at control joints.
- Deflection/Drift: Note head gaps (e.g., 1/2 in.) with slotted track and required drift clips where detailed.
- Photos: Include one concealed-condition image for each typical wall type.
We keep a living library of details tied to our product families, from studs and standard track to slotted deflection track. Those resources dovetail with this metal framing channel guide and our light-gauge framing overview.
Integration with Dass Metal framing systems
Channels perform best as part of a systemstuds sized correctly, tracks suited to movement, and clips matched to loads. Dass Metals CSSBI-aligned components are engineered to work together so spacing, fasteners, and tolerances remain predictable.
Our interior framing families include non-load-bearing light gauge studs, heavy-gauge load-bearing framing, standard track, deep track, and slotted deflection track. Channels integrate at known slots and flange widths, which simplifies clip selection and fastening patterns.
- Right-size studs to wall height and board loads; avoid over-gauging just to buy stiffness you can get with correct bridging.
- Match head-of-wall conditions with slotted track where deflection/drift must be accommodated.
- Choose compatible accessories (deflection side clips, webslide clips) so the load path remains clear.
For a broader project view, our framing system overview connects channels to studs and tracks in a single reference: steel framing system.
Sustainability and waste reduction
Pre-cut, right-gauge channel bundles reduce scrap, handling, and rework. Standardizing spacing and fasteners lowers waste and supports cleaner site logistics—a quick win for both ESG reporting and day-to-day efficiency.
- Pre-cut lengths: Reduce offcuts and sharp edges; improve safety and speed.
- Standard patterns: 24 in. o.c. RC and 48 in. o.c. bridging simplify inventory and training.
- Packaging: Recyclable wraps and kitting by area cut down on misc. plastics and strapping.
We also publish framing benefits insights on our network—for context on structure coordination and material choices, see this steel framing benefits roundup and a sister resource on reinforcement supply planning.
Need help choosing the right channel?
Send us your wall schedule and well mark up channel types, spacing, and fasteners. Our engineering team turns typicals into shop-ready notes so your crews move quickly and inspectors sign off confidently.
Share three items and well return a redlined typical: wall heights, board layers, and any special acoustic or movement requirements. Well match profiles (e.g., RC 7/8 in., furring 1-1/2 in.) and detail fasteners, clips, and head-of-wall conditions for a clean closeout.
Frequently Asked Questions
Use bridging channel to restrain studs and resilient channel to improve acoustics. Space RC at 24 in. o.c. on walls (16 in. o.c. on ceilings) and bridging at ~48 in. o.c., tightening near doors. Fasten board only to RC to avoid short-circuits.
Whats the difference between bridging channel and resilient channel?
Bridging channel stabilizes the stud field by resisting twist and lateral movement. Resilient channel decouples the gypsum from studs to reduce sound transmission. Use bridging for stability and RC for acoustics; they often appear together in high-performance walls.
How far apart should resilient channels be spaced?
On walls, 24 inches on center is common for single-layer gypsum. Use 16 inches on center for ceilings or where multiple gypsum layers increase weight. Always fasten drywall to the channel onlynever back into studsto preserve acoustic isolation.
Where should I tighten bridging channel spacing?
Tighten around doors, glazing, and high-abuse zones. Dropping from 48 inches to 24 or 36 inches on center near openings helps keep studs plumb and prevents cracks at jamb corners or hardware impacts.
Can I hang cabinets or TVs from channels?
Channels arent primary structure. For casework or TV mounts, locate studs or add dedicated backing per the drawings. Bridging can assist with alignment, but use specified blocking or backing for concentrated loads.
Whats a good head-of-wall gap when using slotted deflection track?
A 1/2 inch head gap is a common target for interior partitions, but follow the drawings. Combine slotted deflection track with the specified drift clips and keep channels at their documented spacing to control racking during movement.
Key takeaways
Choose bridging to stabilize studs, resilient channel to cut noise, and furring to level surfaces. Keep RC at 24 in. o.c. on walls (16 in. o.c. ceilings), bridging around 48 in. o.c., and hold planes within 1/8 in. over 10 ft. Document head gaps and clip types for fast sign-off.
- Steel framing channel stabilizes, decouples, and alignsthree mechanisms, one kit of parts.
- Standardized spacing and fasteners speed inspections and reduce punch lists.
- System thinking wins: channels, studs, tracks, and clips must match.
- Short, specific submittals keep projects moving and protect finishes.
