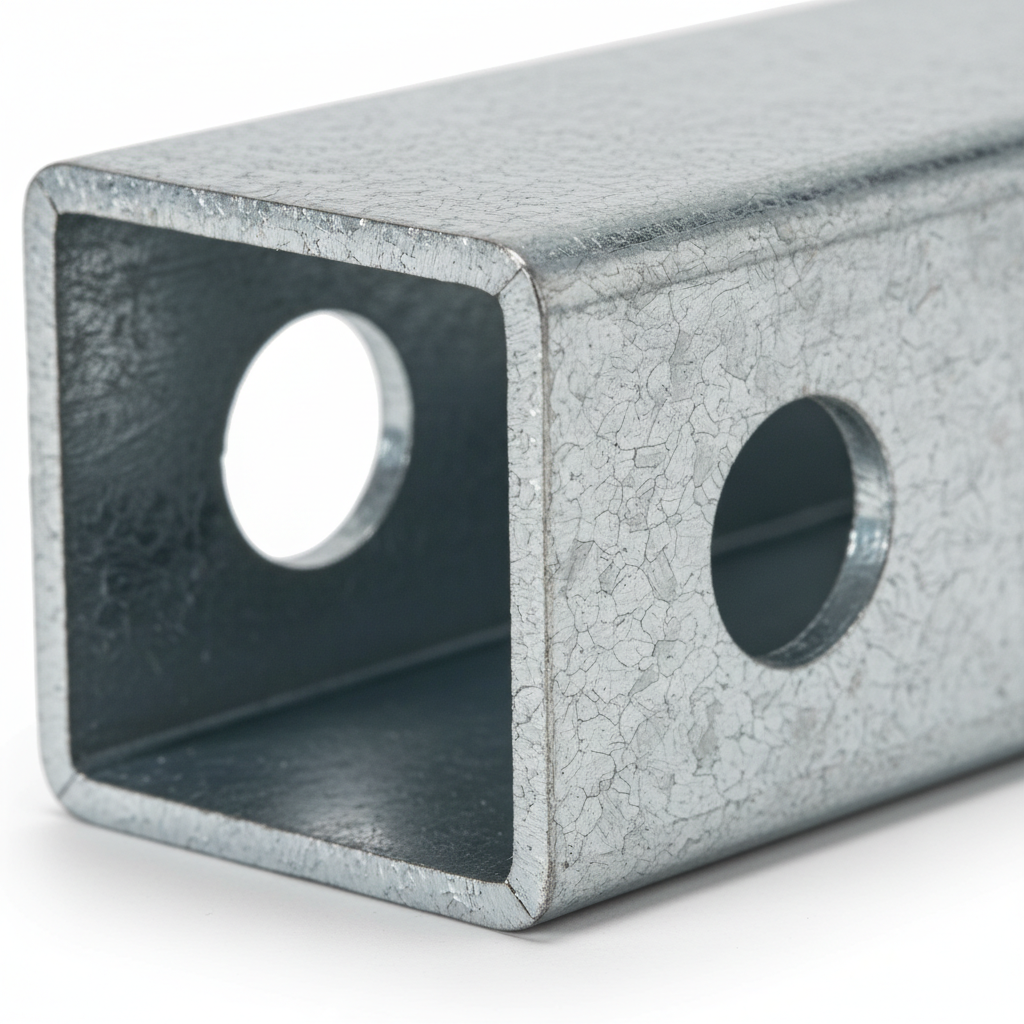
Galvanized steel studs are cold-formed, zinc-coated framing members used to build straight, stable walls and ceilings that resist corrosion. Their consistent dimensions speed layout and fastening, reducing rework and waste. From our Vaughan facility at 370 New Enterprise Way, we supply galvanized steel studs, tracks, and accessories engineered for code-compliant performance.
By Navjot Dass • Dass Metal Products
Last updated: 2026-06-10
Summary
Galvanized steel studs combine corrosion resistance, dimensional accuracy, and speed of installation. This guide explains what they are, when to use light versus heavy gauge, how coatings like G40/G60/G90 work, head-of-wall deflection details, acoustic upgrades, and field-tested practices to finish interiors faster with fewer callbacks.
In this complete, field-focused guide, you’ll learn how to specify, install, and inspect galvanized steel studs with confidence. We connect standards and specs to real-site workflows so your crews move faster and deliver predictable, code-ready results.
- Definitions, specs, and coatings (ASTM designations, gauges, dimensions)
- Where galvanized studs outperform alternatives in 2026 schedules
- Installation sequences, screw patterns, spacing, and tolerances
- Acoustics (resilient channel), bracing, and deflection details
- Local logistics from our Vaughan hub serving the Regional Municipality of York
What Are Galvanized Steel Studs?
Galvanized steel studs are cold-formed C-shaped members made from zinc-coated sheet steel. The zinc layer shields against corrosion, extending service life in interior and exterior assemblies. Uniform thickness and straightness speed layout, align drywall, and reduce shimming compared with variable wood framing.
At Dass Metal Products, galvanized steel studs sit at the core of our Interior Framing and Exterior Structural Framing systems. Crews favor them for straight walls, consistent screw engagement, and predictable behavior with firestopping and drywall tolerances.
Key characteristics
- Profile: C-shaped web with flanges and small returns for stiffness and screw bite.
- Coating: Zinc galvanization (e.g., G40, G60, G90) for corrosion resistance.
- Gauges: Light gauge for non-load-bearing interiors; heavy gauge for structural or tall walls.
- Lengths: Standard lengths reduce cuts; custom lengths minimize waste and butt joints.
- Holes: Service holes for MEP routing; knockouts sized for common raceways.
Why it matters: predictable studs keep layout at 16 inches or 24 inches on center without forcing drywall seams off the mark. That consistency shortens hanging time and limits board fractures at edges.
Why Galvanized Steel Studs Matter in 2026
In fast-track interiors around the Regional Municipality of York, galvanized steel studs keep walls straight, resist moisture, and maintain schedules. At 370 New Enterprise Way, we stage coated, code-aligned studs so contractors avoid supply gaps, hold tolerances, and reduce callbacks even under compressed timelines.
Labor is tight, punch lists are long, and schedules are unforgiving. Galvanized studs deliver repeatable outcomes that help you finish on time.
- Dimensional reliability: Straight studs minimize shimming; fewer drywall pops later.
- Corrosion resistance: Zinc coating protects against humidity in basements, bathrooms, and coastal influences.
- Compatibility: Pairs cleanly with fireproofing, acoustic assemblies, and head-of-wall movement joints.
- Speed: Consistent flange thickness improves screw bite, reducing strip-outs and do-overs.
- Code alignment: Manufactured to recognized steel and coating standards for permitting confidence.
Teams also see fewer material losses compared with framing lumber variability. Predictable studs translate into tighter material takeoffs that track to your procurement plan.
How Galvanizing and Specifications Work
Galvanized studs use sheet steel coated with zinc to prevent rust. Coating designations (e.g., G40, G60, G90) indicate total zinc mass. Higher designations provide stronger corrosion resistance, useful for damp interiors or exterior backup walls exposed to intermittent moisture.
Galvanizing is more than a finish—it’s a sacrificial layer that protects cut edges and screw penetrations. Here’s how spec language maps to field realities.
Common specification markers
- Base metal thickness (BMT): Actual steel thickness before coating; aligns with nominal gauges.
- Coating designation: G40/G60/G90 indicate zinc mass per unit area; higher resists longer.
- Yield strength: Typically 33–50 ksi in light gauge components; structural members may be higher.
- Tolerances: Straightness, twist, and length tolerances support plumb walls and flat planes.
| Attribute | Light Gauge (Non-Load) | Heavy Gauge (Load-Bearing/Tall) |
|---|---|---|
| Typical Gauge | 25–20 | 18–12 |
| Yield Strength | 33–50 ksi | 50+ ksi |
| Coating | G40 or G60 | G60 or G90 |
| Typical O.C. Spacing | 16″ or 24″ | 12″–24″ (per calc) |
Action tip: when specifying damp areas (e.g., mechanical rooms), consider moving from G40 to G60, and use sealants or membranes at interfaces to limit trapped moisture.
Types, Coatings, Gauges, and Where Each Fits
Choose light gauge galvanized studs for non-load-bearing interior partitions and heavy gauge for tall or structural applications. Pair with standard track, deep track, or slotted deflection track as the head/base conditions demand. Use resilient or furring channels to meet acoustic or leveling requirements.
Our catalog covers interiors, exteriors, acoustics, and finishing. Getting the mix right accelerates layout and inspection.
Core galvanized framing members
- Non Load Bearing Steel Studs (Light Gauge): Bread-and-butter partitions at 16″ or 24″ o.c. Pair with standard track and fasten using common screw patterns.
- Load Bearing Stud Framing (Heavy Gauge): For tall walls or structural roles. Coordinate with engineering for stud size, spacing, and lateral bracing; see our heavy gauge overview.
- Standard Track / Deep Track: Standard for typical head/base; deep track to capture stud ends where deflection or tolerance is higher.
- Slotted Deflection Track: Allows vertical building movement; pair with head-of-wall sealants and firestopping.
- Bridging/Carrying Channel + Clips: Provides lateral bracing and alignment control across stud rows.
- Resilient Channel & Furring Channel: Controls sound transmission, levels uneven substrates, and creates service cavities.
Finishing and specialty
- 90°/130° Cornerbead, J/L Trim, J Track: Protects edges and creates clean transitions at finishes.
- Windbrace, Deflection Side Clip, Webslide Clip: Hardware to restrain or allow movement where required.
- Special Profiles: Custom-formed components to resolve geometry conflicts or unique architectural intent.
For a deeper framing primer, see our light gauge metal framing guide and light gauge studs overview.
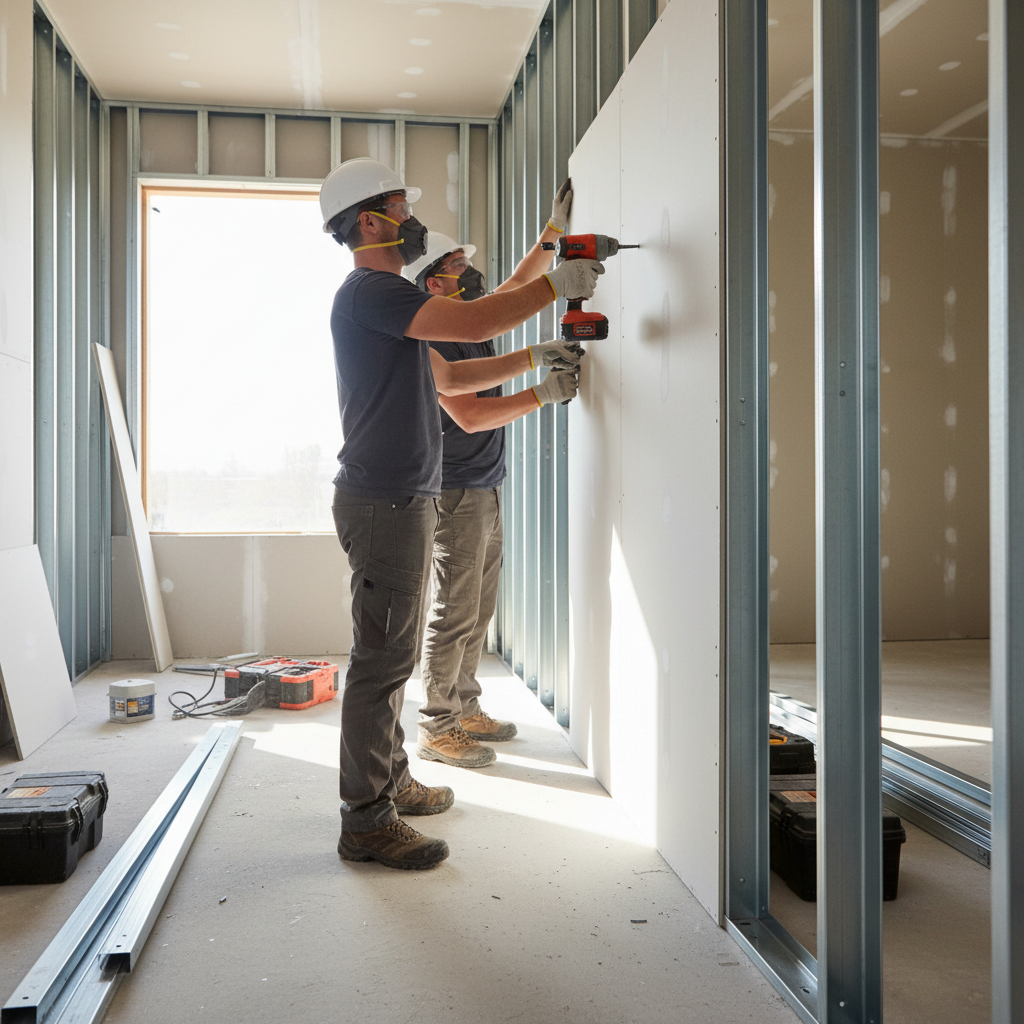
How Galvanized Steel Studs Install: A Reliable Sequence
A clean, repeatable sequence—layout, track, studs, plumb/brace, MEP rough-in, and board—keeps walls straight and inspections smooth. Use 16″ or 24″ o.c. spacing as designed, anchor track to substrate, and set screw patterns that match board thickness and fire/acoustic requirements.
Here’s the field-proven flow we recommend on interiors.
Step-by-step workflow
- Snap lines and verify plumb: Confirm slab/soffit conditions; note level swings exceeding 1/4″ in 10′.
- Set track: Install base and head track. For movement joints, use slotted deflection track per design.
- Cut and place studs: Maintain 1/4″–3/4″ head clearance where deflection is specified.
- Plumb and brace: Use temporary braces; install bridging channel to lock alignment at designated elevations.
- Rough-in MEP: Route through service holes; protect edges with grommets if required.
- Board and tape: Hang gypsum with approved screws (e.g., 1–1/4″ for single layer), typically 12″ o.c. on edges and 16″ o.c. in field unless specified otherwise.
Quality checks: verify fastener penetration (at least three exposed threads), spot-check stud spacing at multiple points, and record deflection clearances at heads for inspection notes.
Head-of-Wall Deflection: Details That Prevent Cracking
Use slotted deflection track or deep leg track to accommodate vertical building movement—commonly 1/2″ to 1-1/2″. Keep screws out of the slots to preserve slip. Seal, then firestop per tested assembly so the joint moves without telegraphing cracks into the finish.
Movement happens. Good details let the structure move while the wall stays intact.
- Deflection gap: Maintain the specified clearance above studs; never overpack with board.
- Fastening: Screws engage the stud to the slotted track web, not the top leg, so the stud can slide.
- Sealants and firestopping: Follow tested systems; document materials and bead sizes.
- Inspection notes: Photograph clearances and slot locations before closure for records.
We stock slotted deflection track and matching clips so your head-of-wall joints pass the first inspection. Pair with deflection side clips where lateral restraint and vertical slip must coexist.
Acoustics: Using Resilient Channel and Furring
Resilient channel decouples drywall from studs to cut sound transfer. When installed horizontally at 24″ o.c. and kept clear of stud-to-board short-circuits, it can improve sound class ratings and reduce noise complaints in multifamily, healthcare, and office fit-outs.
Noise complaints stall turnover and drive rework. Smart acoustic assemblies get ahead of the issue.
- Orientation: Horizontal resilient channel, open edge to the floor unless assembly dictates otherwise.
- Spacing: Often 24″ o.c.; check tested assembly for spacing, screw type, and board layers.
- Short circuits: Avoid direct screws from board to studs; fasten to the channel flanges only.
- Sealants: Perimeter acoustic sealant at top, bottom, and sides helps block flanking paths.
For leveling or service cavities, use furring channel to create a flat plane over uneven substrates or to route services without notching studs.
Bracing and Bridging: Keeping Walls True
Install bridging or carrying channel at designated elevations to prevent stud buckling and maintain plane. Use rated clips, space bracing rows per design (often mid-height and near the top for tall walls), and verify tension/compression bracing where wind or suction loads apply.
Left unchecked, tall studs can wave. Bridging locks alignment so finished walls stay flat.
- Row placement: For 10′ partitions, a single mid-height row may be enough; taller walls require multiple rows.
- Clip selection: Match clip type to the designed slip or fixed condition.
- Sequence: Don’t skip bridging until “later”—install before board to keep plane true.
We stock bridging/carrying channel and bridging clips to keep your planes dead-flat, speeding board and taping.
Fire, Moisture, and Durability Considerations
Galvanized steel does not feed mold or rot. With proper board, sealants, and tested fire assemblies, galvanized studs help deliver lasting partitions. Use higher zinc coatings in damp zones and keep cut edges sealed or protected by finishes to extend service life.
Performance is system-wide: studs, boards, insulation, sealants, and firestopping must all match the tested assembly.
- Fire resistance: Coordinate layer counts, screw patterns, and joint treatment with tested designs.
- Moisture: Select MR boards where humidity spikes; consider G60 or higher in mechanical or below-grade spaces.
- Galvanic caution: Isolate dissimilar metals that could drive corrosion at connections.
Document materials used per wall type so inspectors and insurers see a clear compliance trail.
Specs, Submittals, and Resources You Can Count On
Clear submittals win approvals faster. Use product data, load tables, and coating designations, and reference tested systems for fire and sound. Dass Metal provides brochures, engineering support, and CSSBI-aligned documentation to streamline approvals and inspections.
Project teams move faster when everyone trusts the paperwork.
- Brochures and load tables: Include stud sizes, BMT, yield strength, and allowable heights.
- Coating details: State G-designation and any special environmental exposure notes.
- Clips and channels: List bracing clips, resilient/furring channels, and deflection components.
- Drawings and photos: Attach head-of-wall details and bridging layouts with callouts.
Explore practical framing how-tos in our steel studs usage guide and quick primers in the steel studs guide.
Planning and Local Logistics from Vaughan
Staging galvanized steel studs from our Vaughan hub reduces site idle time. Proximity to 370 New Enterprise Way shortens lead paths across the Regional Municipality of York, with timed drops that match your floor sequence and minimize double-handling on busy sites.
Local coordination keeps crews productive and materials flowing.
Local considerations for 370 New Enterprise Way
- Schedule deliveries between peaks near Queen St / Highway 50 to avoid traffic delays and keep lifts moving.
- Winter installs demand dry storage and quick enclosure; galvanization helps, but protect board edges from snowmelt.
- Coordinate off-hours drops for interior fit-outs; our team sequences loads to match your framing bays and elevator windows.
Need specific staging by floor? Our engineers and logistics planners translate drawings into palletized bay-by-bay kits so foremen can frame continuously without waiting for material.
Mini Case Studies: Faster Interiors with Galvanized Studs
Consistent studs, preplanned drops, and the right accessories compress schedules. Recent Vaughan-area fit-outs used light gauge studs at 24″ o.c. in corridors, resilient channel at 24″ o.c. in suites, and slotted deflection track at heads—producing straighter walls and clean inspections on the first pass.
Here are condensed examples from projects our team supported.
Healthcare tenant improvement
- Challenge: Strict acoustic targets between exam rooms and corridors.
- Approach: Light gauge studs with resilient channel, perimeter sealant, and mineral wool.
- Outcome: Noticeable reduction in flanking paths; board crews maintained consistent screw rows, improving finish quality.
Office-to-lab conversion
- Challenge: Heavy MEP routing and head-of-wall movement needs.
- Approach: G60-coated studs, slotted deflection track, carrying channel bracing.
- Outcome: Smooth inspections on fire and deflection details; no board cracking observed during commissioning.
Multifamily corridor refresh
- Challenge: Tight weekend shutdown windows.
- Approach: Pre-bundled studs and tracks, layout at 24″ o.c. where allowed, and rapid screw patterns validated by assembly.
- Outcome: Crews finished ahead of reopening with straight, uniform corridors that reduced punch items.
Best Practices That Reduce Callbacks
Mark every stud centerline, confirm slab and soffit tolerance, and install bridging before board. Keep fastener patterns consistent and verify deflection gaps. These steps protect against cracks, pops, and plane deviations—common drivers of costly rework after paint.
From our field walk-throughs, these practices deliver the most lift.
- Layout discipline: Snap lines, check doors/relites, and mark 16″/24″ o.c. on floors and ceilings.
- Early corrections: Grind small slab crowns; shim or plane substrate high spots before track.
- Bridging first: Install channels/clips before MEP congestion makes access harder.
- Acoustic integrity: Watch for accidental board-to-stud screws that short-circuit resilient channels.
- Documentation: Photo deflection slots and firestopping before board; it speeds approvals.
For deeper comparisons between steel and wood framing trade-offs, see this primer on steel studs versus wood.
Tools and Resources for Specifiers and Foremen
Standardize success with product brochures, load tables, and detailing guides. Our engineering team helps translate drawings into floor-by-floor material lists, and our documentation supports permit reviews and inspections—so material, methods, and timelines stay aligned.
Use these resources to move faster and reduce friction.
- Product and load resources: Specs for studs, tracks, channels, clips, and finishing trims.
- Installation how-tos: Practical field tips in how to use steel studs.
- Sizing references: Dimensions overview in framing sizes.
- Reinforcement planning: On projects involving cores or slabs, coordinate with our rebar affiliate; see steel rebar basics.
Have a unique geometry or high-movement joint? Ask about special profiles and U-Flex track to solve details that slow your crews.
Process Checklist and Quick Reference
A short, repeatable checklist helps foremen keep crews aligned. Confirm substrate, set track, place studs, install bridging, route MEP, and hang board with the right pattern. Photograph deflection and firestopping details before close-in and keep submittals on hand for inspections.
- Substrate verified: level, plumb, and marked at 16″/24″ o.c.
- Track installed: standard, deep, or slotted per detail.
- Studs placed: head clearance maintained where required.
- Bridging installed: rows positioned per design.
- MEP routed: through service holes; protect edges as needed.
- Board hung: screw spacing per assembly; resilient channel protected from short circuits.
- Photos captured: head-of-wall joints, firestopping, and key hardware.
Comparison Table: Picking the Right Galvanization and Gauge
Match coating and gauge to exposure and loads. Interiors with normal humidity often use G40 at 16″/24″ o.c.; damp interiors benefit from G60; exterior backups or aggressive environments lean toward G90 with heavier gauges and tighter bracing patterns.
| Use Case | Suggested Coating | Typical Gauge | Notes |
|---|---|---|---|
| Standard Interior Partition | G40 | 25–20 | Common at 16″/24″ o.c.; resilient channel optional. |
| Damp Mechanical Room | G60 | 20–18 | Add perimeter sealant; watch for condensation paths. |
| Exterior Backup Wall | G90 | 18–14 | Taller studs, multiple bridging rows, weather barriers. |
| Tall Lobby Partition | G60 | 18–12 | Engineer spacing; include deflection joints and bracing. |
Need a fast framing plan?
Send us your floor plan and schedule. We’ll return a material breakdown, suggested coatings and gauges, and a delivery sequence that keeps your crews framing continuously without waiting for stock.
Our team converts drawings into palletized kits and a simple install plan anchored to your inspection milestones. Start with our concise steel studs usage guide and we’ll tailor specifics for your site.
Frequently Asked Questions
These quick answers cover coatings, spacing, deflection details, and acoustics. For project-specific guidance, send drawings and performance targets so we can align studs, tracks, and accessories to your exact assemblies.
What are galvanized steel studs best used for?
They’re ideal for non-load-bearing interior partitions, soffits, and shaftwall components, and they also serve as exterior backup framing. The zinc coating resists corrosion, while uniform dimensions deliver straight walls and consistent screw bite that speed drywall hanging.
Should I choose G40, G60, or G90 coating?
Match coating to exposure: G40 for typical dry interiors, G60 for damp interiors or high-traffic service spaces, and G90 for exterior backup or aggressive conditions. Heavier coatings add corrosion headroom. Your environment and maintenance plan guide the choice.
How far apart should studs be spaced?
Most partitions use 16 inches on center for rigidity and 24 inches on center where assemblies allow. Tall or load-influenced walls may require closer spacing. Always follow the engineered design or tested assembly for spacing, fasteners, and board layers.
What’s the right way to detail head-of-wall movement?
Use slotted deflection track or deep track to provide the specified vertical gap—often 1/2 to 1-1/2 inches—and keep fasteners out of the slip path. Seal, then firestop using a tested system so the joint can move without cracking the finish.
How does resilient channel improve sound control?
Resilient channel decouples drywall from the stud, reducing vibration transfer. When installed at the correct spacing with no screws short-circuiting into studs, it can significantly improve perceived noise isolation in apartments, clinics, and offices.
Key Takeaways
Galvanized steel studs save time through consistent geometry, corrosion resistance, and compatibility with acoustic and movement details. Specify the right coating and gauge, install bridging early, and document head-of-wall clearances to keep inspections quick and callbacks low.
- Use G40 for dry interiors, G60 for damp zones, and G90 for exterior backup.
- Lock planes with bridging before board; maintain 16″/24″ o.c. spacing as designed.
- Protect acoustic intent by avoiding short circuits on resilient channel systems.
- Photograph head-of-wall slip paths and firestopping before cover-up.
Conclusion
When schedules tighten, galvanized steel studs provide the speed, consistency, and durability that fit-out teams rely on. Pair the right coating and gauge with proven details, and coordinate deliveries from our Vaughan hub to keep crews moving without material gaps.
Ready to accelerate your next interior? Share drawings and milestones. We’ll help you lock in the right galvanized studs, tracks, channels, and trims—and ship them in the sequence your crews build.
