MaxTrak slotted deflection track is a slotted top-of-wall track that lets non-load-bearing partitions move independently from the structure while staying straight and crack-free. It absorbs vertical deflection and thermal drift at the head-of-wall. For projects near 370 New Enterprise Way in Vaughan and beyond, it helps drywall finishes look clean for years.
By Navjot Dass • Last updated: 2026-06-21
Quick Summary
A slotted deflection track allows the stud wall to “slip” at the head-of-wall during building movement. The slots guide fasteners so studs aren’t pinned to the structure, preventing cracks and screw pops. Use it wherever vertical deflection, drift, or thermal movement could telegraph into drywall.
This complete guide shows you how MaxTrak-style slotted deflection track works, when to choose it over deep or standard track, and how to install it for reliable head-of-wall performance.
- What you’ll learn: clear definitions, selection tips, installation steps, code and fire-joint notes, and QA checklists.
- Who it’s for: builders, drywall/framing contractors, architects, and engineers working with steel studs.
- Why it matters: fewer callbacks, straighter walls, cleaner ceilings, and dependable acoustic and fire performance.
What Is Slotted Deflection Track?
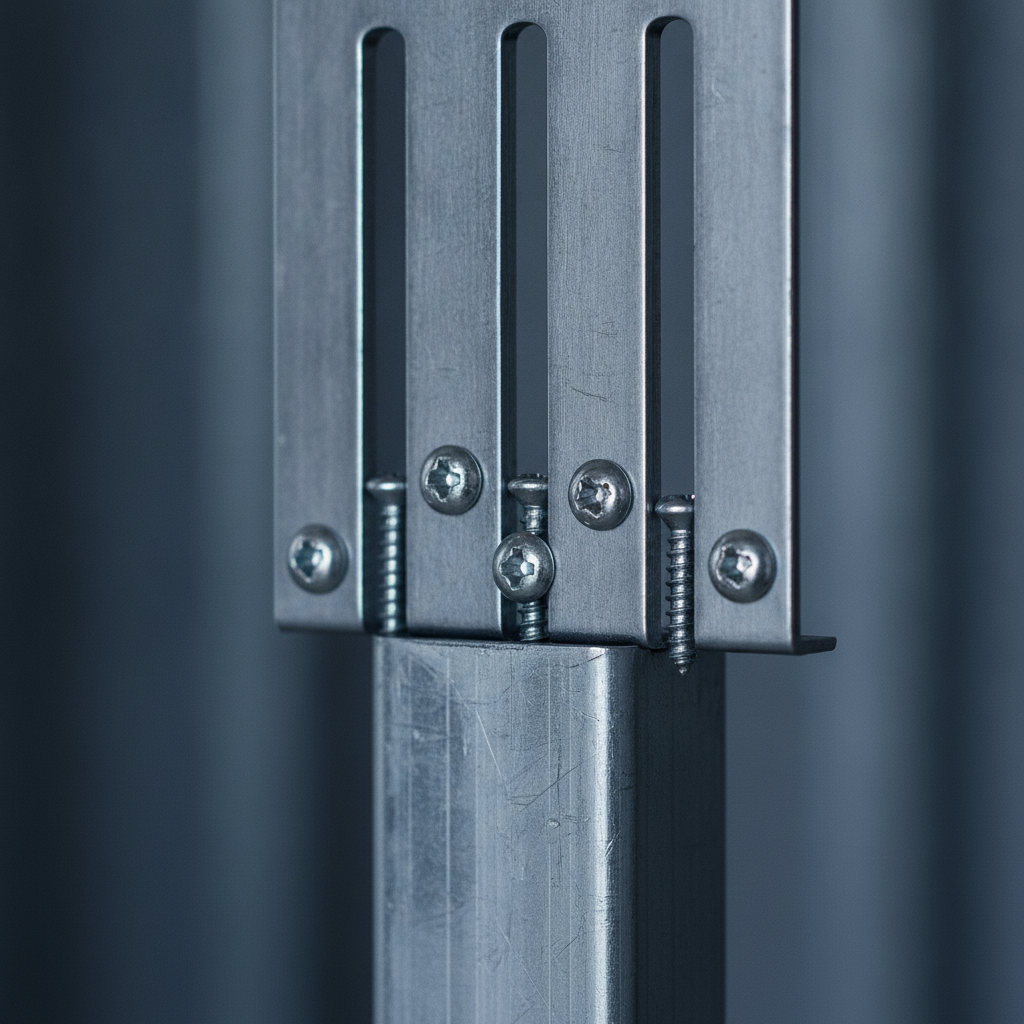
Slotted deflection track is a top track with elongated slots that let fasteners ride within the slot as the structure moves. Studs are attached through the slots, allowing vertical slip at the head-of-wall, which protects drywall from cracking and keeps reveals consistent.
In plain terms, slotted deflection track separates the non-load-bearing partition from structural movement. The “slip” occurs at the head, not at the base, so baseboards and floors stay tight, while the top of the wall quietly accommodates beam or slab deflection.
Core components of a slotted head-of-wall
- Slotted track profile: top track with engineered slots sized to the design slip (often 1–2 1/2 inches of total travel).
- Steel studs: typically 20–16 gauge for interior, heavier gauges for higher walls or exterior conditions.
- Fasteners: screws installed in the slotted leg only, centered to preserve movement range.
- Sealants and fire safing (where required): to maintain rated head-of-wall joints.
Where you’ll use it most
- Long corridors where minor slab camber or creep can telegraph into continuous drywall lines.
- Tenant improvements under existing roofs or slabs with unknown live-load deflection.
- High-bay spaces where HVAC/thermal swings can cause seasonal movement.
We manufacture slotted deflection track, standard track, deep track, and related accessories as part of our Interior Framing line. For an at-a-glance refresher, see our in-house primer on what slotted track is and when to specify it.
Why Slotted Deflection Track Matters
It prevents cracks at the ceiling line by allowing structural movement without stressing drywall joints. In the Regional Municipality of York—especially around 370 New Enterprise Way—seasonal temperature swings and long slab spans make deflection joints essential to keep interiors looking new.
If you’ve ever returned to a project to fix screw pops or hairline ceiling cracks, the head-of-wall likely transmitted movement to the partition. Slotted track solves this. It keeps the stud top free to slide, so gypsum joints stay tight and reveals stay aligned.
Benefits you can see—and measure
- Straighter walls: long corridors maintain true lines; even a 1/8-inch wobble becomes visible over 60 feet.
- Fewer callbacks: eliminating ceiling joint stress reduces touch-up cycles after turnover.
- Acoustic continuity: consistent head-of-wall details help maintain STC values across partitions.
- Fire continuity: when paired with listed joint systems, the assembly preserves fire rating while it moves.
For comparison notes on related track types, review our metal stud track guide covering deep and standard track nuances.
How Slotted Deflection Track Works
The slots create a controlled path for the screw to travel as the structure moves. With screws placed through the slotted leg—and not pinning the stud web—the stud top can “float,” absorbing vertical deflection or drift without cracking drywall at the head-of-wall.
Think of the slot as a miniature guide rail. When the floor above deflects under live load, or the roof expands in the sun, the fastener slides inside the slot instead of tearing gypsum. This is a simple mechanism delivering big reliability.
- Design slip: common design ranges are 3/4–1 1/2 inches, with projects requiring up to ~2 1/2 inches total travel.
- Fastener placement: center the screw in the slot to maintain travel both up and down.
- Stud engagement: maintain full stud height engagement inside the track; don’t over-tighten.
- Sealant strategy: flexible sealants at the finished joint help accommodate micro-movement.
We detail this mechanism extensively in our deflection track guide with diagrams and jobsite checklists.
Types, Methods, and Approaches
You can achieve head-of-wall movement using slotted deflection track, deep leg track with slip clips, or specialty head-of-wall clips. Slotted track is the cleanest all-in-one approach for many interiors, while clips help in high loads or unusual geometries.
Common head-of-wall options
- Slotted deflection track: integrated slip path; ideal for most interior non-load-bearing walls.
- Deep track + slip clips: longer legs for added engagement; clips create the movement path.
- Standard track with clips: used when standard leg height is fine and loads are modest.
- Specialty clip systems: engineered for large drifts or seismic designs.
Where each shines
- Slotted track: fastest install, fewer parts, predictable movement, neat finish lines.
- Deep track: tall walls or where extra leg height simplifies tolerances.
- Clips: concentrated loads or unique substrates (steel beams, uneven decks).
For a refresher on track families, see our overview of metal stud and track systems and our slotted deflection track primer.
Comparison at a glance
| Approach | Movement Handling | Speed | Complexity | Best Use |
|---|---|---|---|---|
| Slotted Deflection Track | 1–2 1/2 in total slip typical | Fast | Low (one profile) | Interior non-load-bearing partitions |
| Deep Track + Clips | Up to large drifts with proper clip selection | Moderate | Medium (more parts) | Tall walls, tight tolerances |
| Standard Track + Clips | Moderate slip ranges | Moderate | Medium | Typical interiors with modest loads |
Specifying and Sizing Slotted Track
Size slotted track by stud width, required slip, wall height, and expected loads. Confirm deflection criteria (for example, L/360 to L/480), then choose slot length and leg geometry that preserve the full movement range with screws centered in the slot.
We help architects and contractors translate engineering criteria into practical choices. For many interiors, 1 to 1 1/2 inches of total travel is sufficient, but large spans or roof structures may require ~2 inches or more. Heavier studs or tighter spacing can reduce stud bowing and keep finishes true.
- Stud width and gauge: 2 1/2, 3 5/8, 4, 6 inches common; 20–16 ga typical; heavier where needed.
- Deflection target: coordinate with structural engineer; longer spans often mean larger slip.
- Fire/acoustic requirements: select joint systems and sealants compatible with the slip detail.
- Fastener plan: maintain edge distances and center screws for bidirectional travel.
Need a baseline for other track families while you specify? Our Standard Track page is a handy reference for leg depths and matching stud sizes on standard track details.
Local considerations for 370 New Enterprise Way
- Plan deliveries with site access near the Highway 50 – Zum Queen Stop EB corridor; staging near that route can reduce unload times.
- Seasonal freeze–thaw cycles around Queen St / Highway 50 mean wider thermal swings; favor generous slip ranges on long runs.
- Coordinate with ceiling trades early; continuous ceiling features in York Region buildings benefit from a single agreed head-of-wall detail.
Installation Best Practices (Step-by-Step)
Mark the slip range, center fasteners in the slots, and never pin the stud web to the structure. Maintain required gaps, use the correct screws, and verify head-of-wall joint materials if the assembly is fire-rated.
- Layout and prep: snap lines, verify stud spacing (often 16 or 24 inches o.c.), confirm deflection direction and magnitude.
- Cut and place track: square cuts; deburr ends; set level with the specified head-of-wall gap.
- Set studs: full engagement inside the track; do not wedge tight to the deck; keep plumb.
- Fasten through slots: use specified screws; center each fastener within the slot; maintain spacing.
- Check movement: manually “float” a stud to confirm slip; ensure no screw bites the web or pins movement.
- Seal/insulate: install rated joint materials or acoustic sealants per drawings.
- Document QA: photo each zone; note slot centerline, screw type, and joint materials.
For crews cross-training on track families, our slotted track field guide and deflection best practices provide handy checklists.
Tools and Resources
Use manufacturer load tables, head-of-wall joint listings, and site checklists to verify performance. Pair slotted track with the right studs, clips, and sealants, and keep a field QA sheet for screw placement, slot centering, and movement verification.
- Design resources: internal load tables, engineering notes, and detailing examples for head-of-wall joints.
- Product ecosystem: steel studs, matching track families, resilient channel, and bridging/carrying channel.
- Fire/acoustic coordination: select compatible joint systems and perimeter sealants early in design.
- Related structural context: slab behavior is influenced by reinforcement; see JDass insights on reinforcing mesh for movement awareness.
Case Studies and Examples
On recent Ontario projects, slotted deflection track kept long corridors clean despite seasonal movement. In tall tenant spaces, deep track plus clips managed larger drifts. For retrofit ceilings, a compact slotted profile preserved headroom while eliminating recurring crack repairs.
Example 1: Long corridor in York Region
- Challenge: 120-foot corridor developed ceiling joint cracks each winter.
- Approach: swapped standard track for slotted deflection track with ~1 1/2 inches total slip.
- Result: no visible cracking through the first full freeze–thaw cycle; punch-list time cut significantly.
Example 2: High-bay tenant fit-out
- Challenge: roof expansion/contraction telegraphed into tall demising walls.
- Approach: deep track with specialty clips at head-of-wall, studs upsized from 20 to 18 gauge.
- Result: consistent reveals across 22-foot spans; fewer board fractures at top joints.
Example 3: Historic shell retrofit
- Challenge: uneven decks and unknown live-load deflection.
- Approach: slotted track throughout; clips only where beams intersected partitions.
- Result: simpler install, standardized details, lower rework during turnover.
Frequently Asked Questions
Contractors ask about when to use slotted track, how much slip to allow, and what fasteners to use. The short answers: use it whenever vertical movement could telegraph into finishes; size slip to structural criteria; and center approved screws in the slots.
When should I choose slotted deflection track over deep track?
Choose slotted track for most interior non-load-bearing partitions where you need a clean, simple slip detail. Pick deep track when walls are tall or tolerances are tight and you want extra leg height. Use clip systems if the design calls for larger drifts or unusual substrates.
How much movement should the slots accommodate?
Coordinate with the structural engineer. Many interiors target about 1 to 1 1/2 inches of total travel at the head-of-wall, while long spans or roof structures may require around 2 inches or more. Center screws in each slot so the assembly can move up and down.
Can I use slotted track in fire-rated assemblies?
Yes—when you follow a listed head-of-wall joint system. Use compatible fire safing and sealants, respect joint dimensions, and avoid pinning the stud. Always match the listing details so the joint maintains its rating while allowing movement.
What are the most common installation mistakes?
Pinning the stud to the structure, off-center screws in slots, and forgetting the head-of-wall gap. Also watch for over-tightening, missing fire safing, and mixing incompatible sealants. A brief pre-task plan and a photo-based QA checklist help avoid these issues.
Best Practices and Field Tips
Treat the head-of-wall like a control joint. Center every fastener in the slot, maintain the full slip range, and coordinate with ceilings and sprinklers so the joint can move freely without binding.
- Always verify slip: manually move a test stud after fastening; it should slide smoothly.
- Protect the gap: don’t pack the head-of-wall with hard mud or rigid materials that could bridge movement.
- Mock up first: build a 4–8 foot mock-up with lighting to reveal any alignment issues before full production.
- Standardize details: one head-of-wall detail across trades reduces coordination errors.
- Document: take progress photos of screws centered in slots at start, mid, and end of each run.
When you need a refresher on baseline geometry, our slotted deflection track guide links to checklists crews can use in the field.
Downloadable Tools, Checklists, and a Quick CTA
Bundle your head-of-wall details, QA checklist, and submittals before mobilizing. That single packet reduces RFIs and accelerates production. If you’d like a sample packet, our engineering support can share templates to adapt for your job.
- Spec sheet set: include track profile, stud sizes/gauges, fastener schedule, and joint details.
- Field QA sheet: slot centering, screw spacing, gap verification, and fire/acoustic notes.
- Coordination matrix: ceilings, sprinklers, MEP, and glazing where the joint continues.
Need help sizing or detailing? Our team supports Canada- and US-wide projects with submittals and practical guidance. Start with our deflection track guide and the quick refresher on stud and track systems. For slab behavior context, see JDass notes on steel wire mesh.
Conclusion and Key Takeaways
Use slotted deflection track wherever vertical movement can reach your partitions. Center screws in the slots, protect the head-of-wall gap, and coordinate fire/acoustic details. You’ll deliver straighter walls, fewer callbacks, and cleaner ceilings across long runs.
- Slotted track’s job: decouple partitions from structural movement.
- Selection: match slot length and geometry to the required slip.
- Execution: never pin the stud; keep screws centered in slots.
- Results: straighter lines, stable acoustics, and preserved fire ratings.
Next step: If your next interior involves long corridors or tall spans, loop us in early. We’ll align slotted track, studs, and joint systems so your head-of-wall performs on day one and year five. Book a quick consult at our Vaughan site—right off the Highway 50 corridor—or request templates to standardize your detail set.
