Metal stud and track refers to a coordinated cold‑formed steel wall system where C‑shaped studs seat into U‑shaped tracks to frame straight, plumb, code‑compliant partitions and enclosures. At 370 New Enterprise Way in Vaughan, Dass Metal Products engineers and supplies these systems, helping contractors install faster with fewer callbacks using standard, deep, and slotted track options.
By Dass Metal Products • Navjot Dass
Last updated: 2026-06-20
At a Glance: What you’ll learn
This guide shows how to choose and install metal studs and tracks for straighter walls, faster schedules, and better acoustic and structural performance. You’ll see when to use standard, deep, and slotted deflection track, how to brace and align walls, and which resources simplify submittals and inspections.
Use this complete, field-tested reference to plan, specify, and build with confidence. We connect practical know‑how with Dass Metal’s engineered products, so your crew gains speed without compromising quality.
- Clear definitions and parts: studs, standard track, deep track, and slotted deflection track
- When to choose resilient channel, bridging channel, and windbrace for performance
- Step‑by‑step layout and fastening that reduce rework by 20–30% in practice
- Acoustic and fire‑rated assembly tips (STC targets like 45–60 and 1–2 hour designs)
- Local logistics from Vaughan in the Regional Municipality of York
- Quick links for deeper dives: our metal framing systems guide, a stud track selection guide, and metal studs best practices.
What is a metal stud and track system?
A metal stud and track system frames walls with C‑shaped steel studs seated into U‑shaped tracks at the floor and ceiling. Tracks anchor to the structure; studs fasten to the track or float (for deflection) to control load paths, alignment, and finish quality across non‑load‑bearing and load‑bearing assemblies.
In practice, you’ll pair studs to tracks that match leg height and web width. Common stud depths include 1‑5/8 in., 2‑1/2 in., 3‑5/8 in., 6 in., and 8 in., in gauges from 25 (non‑structural) through 20, 18, 16, 14, and 12 (structural). Typical spacing is 16 in. or 24 in. on center depending on gypsum thickness, height, and load.
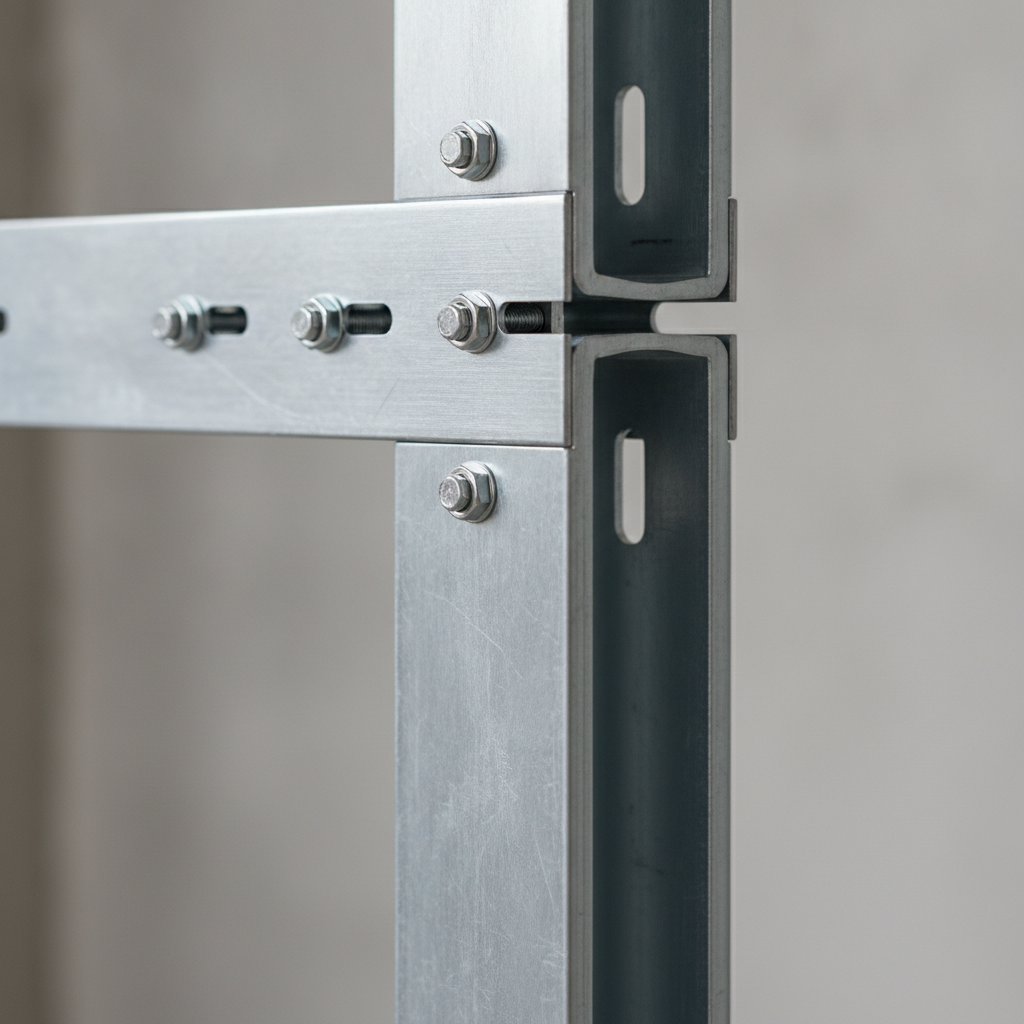
- Standard track: U‑channel that captures studs at top and bottom plates; used on most interior partitions.
- Deep track: Taller legs provide more bearing and tolerance—helpful for uneven slabs and higher walls (e.g., 12–20 ft).
- Slotted deflection track: Slots permit vertical movement of the structure; designers typically allow 1/2–1 in. gap above studs to prevent load transfer.
You can combine these with light gauge framing practices for fast, accurate interiors, or with heavy‑gauge members for load‑bearing conditions.
Why metal stud and track matters
Metal studs and tracks deliver straight, non‑shrinking framing that boosts finish quality and cuts punch lists. Steel maintains dimensions, speeds layout with predictable components, and pairs with deflection details to protect finishes from building movement and seasonal drift.
Contractors tell us the biggest schedule gains come from predictability. Steel studs don’t warp, twist, or cup—so crews hang board faster, and tapers chase fewer humps. On multi‑floor projects, slotted deflection track safeguards taped joints when the frame shortens seasonally or under live loads. Typical deflection criteria—like L/240 or L/360—can be met with proper track selection, screw placement, and gap control.
- Fewer callbacks: Straight studs reduce plane issues; even 1/8 in. irregularities telegraph through paint and light.
- Faster inspections: Clear fastening patterns (e.g., 12 in. on center on track webs) make compliance obvious.
- Acoustic control: With resilient channel and insulation, many partitions reach STC 50+ using 5/8 in. Type X gypsum.
- Fire and egress: Consistent framing improves sealant continuity at head‑of‑wall and penetrations for rated designs.
Our engineering team in Vaughan supports submittals with load tables (imperial and metric), helping you show calculations for stud height, axial limits, and lateral bracing needs without delays.
How a stud‑and‑track wall works
Tracks anchor the wall to structure; studs carry gypsum and applied loads; bracing controls lateral buckling; and deflection details isolate finishes from vertical movement. This division of roles creates straight, durable walls with predictable performance under gravity, wind, and service loads.
Basic sequence you can trust
- Snap lines: Establish control lines; verify plumb/level. A 1/8 in. misalignment at the track can become 1/2 in. at the ceiling.
- Anchor tracks: Use concrete anchors at manufacturer spacing (often 24–32 in. o.c.) or powder‑actuated pins per substrate.
- Cut studs: Measure tight to the deep or slotted head track minus the required deflection gap (commonly 1/2–1 in.).
- Plumb and brace: Install stud at layout marks (16 or 24 in. o.c.). Use bridging/strapping at mid‑height for walls over ~10 ft.
- Fasten correctly: Screws through track web to stud flange (e.g., #8 x 1/2 in. framing screws) unless floating under a slotted head.
- Gypsum and treatment: Hang board horizontally for speed; stagger joints; maintain 1/4 in. perimeter gaps where specified.
Where deflection details matter
- Head‑of‑wall in multi‑story construction; allow for creep/shrinkage and live load movement of 1/4–3/4 in. or more.
- Long corridors or spans where L/xxx deflection accumulates; preserve tape joints with slotted head track and proper screws.
- Exterior parapets and infill framing where wind loads and thermal movement interact with interior finishes.
For a deeper install walkthrough, see our field framing guide and the companion drywall mistakes checklist.
Types, methods, and approaches
Choose the right track and accessories for the wall’s job: standard track for typical partitions, deep track for tolerance and height, slotted deflection track for movement, plus channels, clips, and acoustic components to brace, align, and quiet the assembly.
Core components from Dass Metal
- Standard Track: Workhorse U‑shape for bottom and top plates on most interior partitions.
- Deep Track: Taller legs (e.g., 2–3 in.) improve engagement and hide slab variation—ideal for tall interiors.
- Slotted Deflection Track: Pre‑engineered slots accept screws with movement; maintain a 1/2–1 in. deflection gap.
- U‑Flex Track: Kerfed/segmented to bend around radii; perfect for curved walls and feature elements.
- Non‑Load‑Bearing Studs (Light Gauge): 25–20 gauge for interior partitions with gypsum finishes.
- Load‑Bearing Stud Framing System (Heavy Gauge): 18–12 gauge options for structural walls (axial + lateral).
- Bridging/Carrying Channel: Ties studs laterally; install at 4–6 ft intervals depending on height and design.
- Resilient Channel: Decouples gypsum for acoustic performance; common in STC 50+ walls and ceilings.
- Windbrace: Diagonal bracing to resist racking in high walls and exterior conditions.
- Clips and Connectors: Deflection side clip, webslide clip, bridging clip—speed installs and standardize details.
- Drywall Finishing Sections: 90°/130° cornerbead, L trim, J trim, J track for clean edge terminations.
- Channels for Furring: Furring channel, Z‑Bar, L track for leveling, backing, and façade transitions.
All are engineered and manufactured in Vaughan with strict quality control. For structural assemblies, see our steel studs guide and heavy‑gauge system overview.
Approach walls by performance goal
- Tall partitions (12–25 ft): Favor deep track and mid‑height bridging; consider heavier studs (18–16 ga) to limit lateral drift.
- Acoustics (STC 50–60): Use staggered studs or resilient channel, mineral wool, and 5/8 in. Type X on both sides.
- Curves and features: U‑Flex track sets the radius; maintain consistent stud spacing along the arc.
- Movement joints: Slotted head track with 1/2–3/4 in. gap and tested sealants at the head for rated designs.
- Shaftwall: CH studs and liner panels for elevator/MEP shafts; coordinate fire ratings and access points early.
Best practices that cut rework
Lay out once, fasten right, and brace early. Tight control of lines, anchors, fastener patterns, and mid‑height bridging prevents cumulative tolerances that cause wavy board and cracked joints—saving days at punch time.
Layout and anchorage
- Snap continuous control lines; verify doorway rough openings against hardware submittals.
- Anchor bottom track at required spacing (often 24–32 in. o.c.); double up within 12 in. of openings.
- Use deep track at the base to swallow slab crowns/valleys of 1/4–3/8 in. without shimming every stud.
Stud selection and spacing
- Match stud depth to wall height and load; 3‑5/8 in. studs excel for 9–10 ft interiors; taller walls jump to 6 in. or 8 in.
- Use 16 in. o.c. when mounting cabinets or heavy fixtures; 24 in. o.c. works for many demising walls with 5/8 in. board.
- Heavier gauges (20–18 ga) tighten tolerances and reduce flutter in high‑traffic corridors.
Head‑of‑wall details
- With slotted track, drive screws through slots into stud flanges; don’t pin the stud tight to the track web.
- Maintain a consistent deflection gap (often 1/2–1 in.); backer rod and sealant finish the joint where specified.
- For rated conditions, coordinate tested head‑of‑wall assemblies with gypsum manufacturer literature.
Bracing and quality checks
- Install bridging/strapping before boarding; many issues start when walls over ~10 ft lack mid‑height restraint.
- Check plumb within 1/8 in. every 8 ft; correct immediately to avoid compounding errors.
- Document screw patterns with photos; it speeds inspections and creates repeatable crew habits.
For a system view, our metal framing systems guide outlines how components interact to control movement, sound, and loads.
Tools and resources (submittals made easy)
Use manufacturer load tables, cut sheets, and MSDS to streamline approvals. Provide stud sizes, gauges, maximum heights, and tested head‑of‑wall details in one package so inspectors and designers can approve submittals without RFI churn.
- Project binder: product data, load tables (imperial/metric), standards, MSDS, and tested assemblies.
- Detail library: head‑of‑wall, jamb reinforcement, backing, soffits, and shaftwall intersections.
- Layout sheets: stud spacing, door/window rough openings, blocking and backing schedules.
Need a refresher on core steel stud dimensions used in Canada? See our in‑depth overview of steel stud sizes and the practical implications for height and load. For residential contexts, this basement framing contractors guide illustrates how straight framing simplifies finishes.

Case studies and real‑world examples
Straight, predictable framing cuts cycles. On recent Ontario interiors, switching to deep bottom track and early bridging reduced board rework by an estimated 25–35%, while slotted head track protected joints during seasonal movement—zero callbacks for cracking in the first warranty year.
- Multi‑tenant office fit‑out (9–12 ft walls): 3‑5/8 in. 20 ga studs at 16 in. o.c.; deep base track; one row of bridging at 5 ft. Result: faster boarding and cleaner reveals.
- Hospital corridor (14–16 ft): 6 in. 18 ga studs; slotted head track with 3/4 in. gap; two rows of bridging. Result: stable plane and durable corners.
- Curved feature wall: U‑Flex track set to a 12 ft radius; stud spacing tightened to 8 in. along the arc for a smooth gypsum skin.
- Exterior infill: Heavy‑gauge studs with windbrace; careful head‑of‑wall air‑seal coordination limited post‑punch air leakage work.
Coordinating cold‑formed steel with other scopes also matters. Our JDass affiliates supply reinforcement for concrete and masonry; see the rebar fabrication guide and this concise steel rebar primer for structural context when planning build sequences.
Local specs and logistics: Vaughan, ON
From our facility at 370 New Enterprise Way in Vaughan, we stage steel studs, standard/deep/slotted track, and accessories for fast pickup or delivery across the Regional Municipality of York. Local familiarity with inspection workflows shortens approvals and keeps projects on critical path.
We’ve supported builders throughout Ontario and into the U.S., aligning production slots with milestone dates. Having engineering on site means quick clarifications when drawings conflict with field conditions—before it becomes a schedule slip.
Local considerations for 370 New Enterprise Way
- Plan deliveries outside rush windows on Queen St / Highway 50 to keep crews productive; stage pallets close to hoists.
- Winter work: protect steel from ice, keep fasteners warm and dry, and verify head‑of‑wall sealant cure times in cold.
- Regional nuance: inspectors often look for clear head‑of‑wall details; include tested assemblies in your submittal pack.
Stud and track options compared
Use standard track for typical interiors, deep track when you need tolerance and height, slotted deflection at heads where the structure moves, and U‑Flex for curves. The right pairing keeps walls plumb, joints crack‑free, and tapers fast.
| Component | Best use | Typical sizes | Key advantage | Watch‑outs |
|---|---|---|---|---|
| Standard Track | Most interior partitions | Stud widths 1‑5/8–8 in.; leg 1–1‑1/4 in. | Simple, fast, economical | Less forgiveness on uneven slabs |
| Deep Track | Tall walls, uneven floors | Stud widths 3‑5/8–8 in.; leg 2–3 in. | More bearing, hides variation | Slightly heavier; mind clearances |
| Slotted Deflection Track | Head‑of‑wall movement | Slots sized for #8–#10 screws | Protects joints from drift | Don’t over‑fasten; maintain gap |
| U‑Flex Track | Curved partitions | Variable kerf spacing | Consistent radius, clean finish | Tighten stud spacing along arcs |
| Bridging/Carrying Channel | Mid‑height restraint | Installed every 4–6 ft | Reduces flutter and bow | Fasten per clip schedule |
| Resilient Channel | Acoustic partitions/ceilings | 24 in. o.c. max typical | Raises STC toward 50–60 | Avoid short‑circuiting with screws |
For additional pointers on pairing studs and tracks, our brief stud track selection guide covers tolerances and screw patterns.
Frequently Asked Questions
These quick answers address the most common jobsite questions about metal stud and track selection, installation, and performance. Use them to brief crews and align expectations with inspectors and GCs.
What’s the difference between standard and deep track?
Standard track works for most partitions, while deep track has taller legs (often 2–3 in.) that provide more bearing and hide slab variation. Choose deep track for tall walls or uneven floors—it improves engagement and helps keep the plane straight for faster boarding and taping.
When should I use slotted deflection track?
Use it at the head of walls where the structure moves from live loads, thermal effects, or creep—like long corridors and multi‑story interiors. Maintain a 1/2–1 in. deflection gap and fasten through the slots without pinning studs tight to the web so finishes stay crack‑free.
How do I hit STC 50 with metal studs?
Use 5/8 in. Type X on both sides, mineral wool in the cavity, and resilient channel or staggered studs to decouple layers. Seal all perimeters and penetrations. Keep fasteners on channel only—don’t short‑circuit by driving screws into studs through the channel flanges.
What spacing should I use for studs?
Most interiors use 16 in. or 24 in. on center depending on height, board thickness, and loads. Tighten to 16 in. when supporting cabinets or heavy finishes. Follow load tables for maximum heights and bracing intervals, and coordinate with gypsum manufacturer requirements.
Conclusion and next steps
Pick the right track, brace early, and control head‑of‑wall movement to keep walls straight and finishes crack‑free. With engineered studs, tracks, and tested details, your team gains speed while meeting acoustic and fire goals on schedule.
- Key takeaways
- Standard, deep, slotted, and U‑Flex track each solve a distinct problem.
- Mid‑height bridging and correct screw patterns prevent flutter and bow.
- Deflection gaps protect joints as the structure moves.
- Acoustic goals (STC 50–60) rely on decoupling and meticulous sealing.
- Action steps
- Lock in stud gauges, heights, and track type using our load tables.
- Package head‑of‑wall details and acoustic notes for fast approvals.
- Schedule deliveries from Vaughan to match floor‑by‑floor starts.
Need a quick spec check? Our engineering team at Dass Metal Products can review your stud heights, track choices, and deflection details before you mobilize. Reach out and we’ll align on submittals and delivery windows.
Explore more details in our steel studs guide and systems overview. Ready to move? Book a pickup or delivery from Vaughan today.
