Metal stud framing is the assembly of cold-formed galvanized steel studs and tracks to build straight, durable wall and ceiling systems. From our facility at 370 New Enterprise Way in Vaughan, we manufacture CSSBI-aligned, code-ready components so builders can specify, order, and install with confidence—whether for interior partitions or exterior wall framing.
By Navjot Dass — Dass Metal Products
Last updated: 2026-06-16
Overview and Table of Contents
This complete guide explains metal stud framing from design to installation. You’ll learn what it is, why it outperforms wood in many settings, how it’s assembled, key products, acoustic options, and field best practices—plus local supply tips for Vaughan and the Regional Municipality of York.
Use this guide to clarify specifications, streamline submittals, and reduce rework. We included quick-reference steps, example assemblies, and links to deeper reading on stud sizes, light gauge details, and full wall system guidance.
- What Is Metal Stud Framing?
- Why Metal Stud Framing Matters
- How Metal Stud Framing Works
- Types, Products, and Approaches
- Acoustics and Resilient Channel
- Best Practices On Site
- Tools and Resources
- Service and Supply in 370 New Enterprise Way and the Regional Municipality of York
- Planning and Pricing Factors
- Case Studies and Examples
- Frequently Asked Questions
- Key Takeaways
What Is Metal Stud Framing?
Metal stud framing uses C-shaped steel studs seated in U-shaped track to form straight, noncombustible walls and ceilings. Assemblies commonly space studs 16 or 24 inches on center and use gauges from light (e.g., 25 ga) to heavy (e.g., 16 ga+) depending on load, height, and design intent.
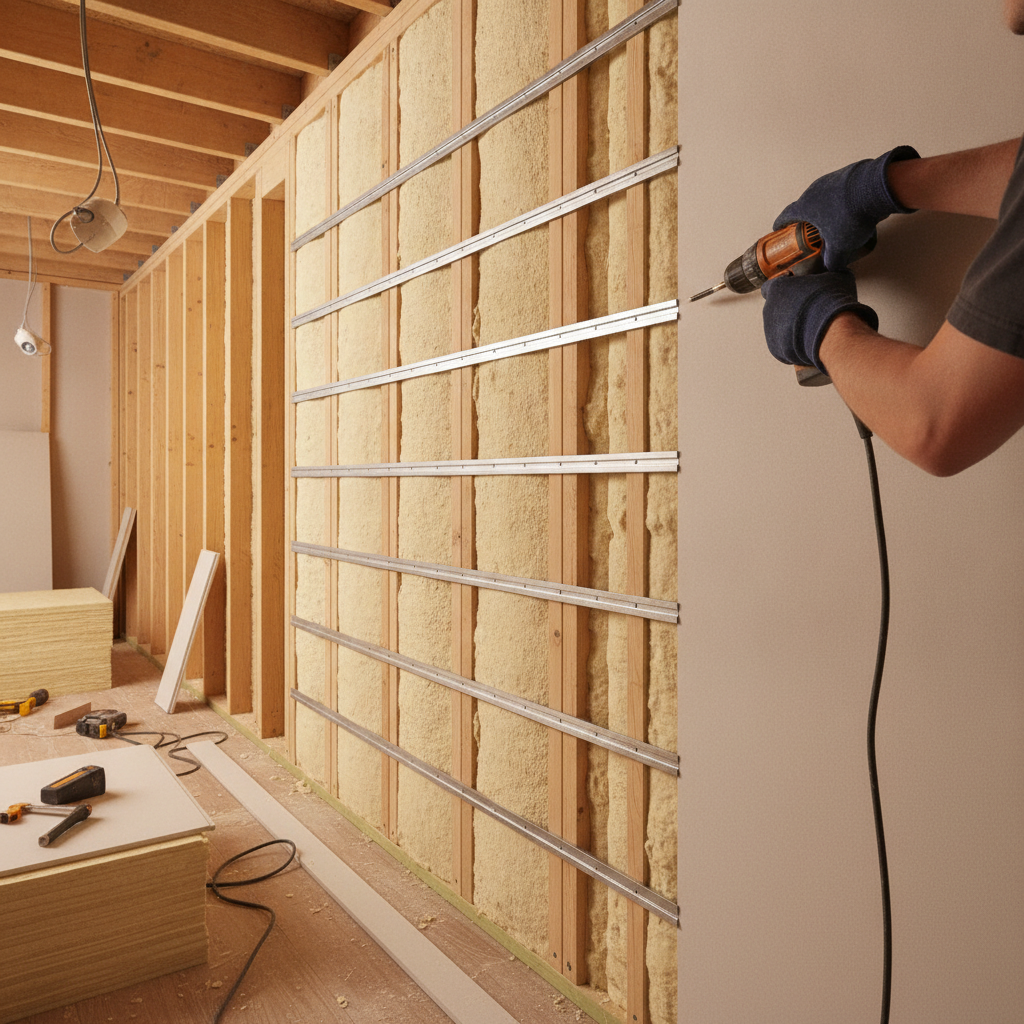
In practical terms, “metal studs” are cold-formed, galvanized sections engineered for predictable performance. Tracks capture stud ends and define layout. Accessories—like bridging channel, deflection clips, and resilient channel—complete the system.
- Common stud depths: 1-5/8 in, 2-1/2 in, 3-5/8 in, 6 in and beyond for tall walls.
- Typical spacing: 16 in o.c. for robust walls; 24 in o.c. for many partitions and ceilings.
- Fasteners: Self-drilling screws sized for flange/web thickness; #8 and #10 heads are common.
- Wall heights: Verified using manufacturer load tables and bracing/deflection details.
For a deeper look at wall planning and layouts, see our internal guide on steel stud wall framing principles, which covers layout, openings, and rough-in coordination.
Why Metal Stud Framing Matters
Steel studs deliver straightness, stability, and noncombustibility that help projects finish cleanly and pass inspections. They resist warping and rot, arrive dimensionally consistent, and integrate with head-of-wall deflection and acoustic systems to meet structural drift and STC targets.
Contractors choose metal for repeatable results and speed. Dimensional consistency simplifies drywall alignment and trim reveals. Noncombustibility supports rated assemblies, and corrosion protection extends service life in conditioned spaces.
- Straightness: Steel arrives true-to-size; less shimming means faster board install.
- Movement control: Slotted deflection track and clips accommodate vertical drift at the head.
- Acoustics: Resilient channel and mineral wool make STC 50+ multifamily partitions achievable.
- Coordination: Consistent knockout locations aid electrical/plumbing rough-ins.
- Fire and code: Noncombustible framing supports UL-listed, code-recognized assemblies.
Compared with wood, steel’s moisture neutrality reduces seasonal movement. Where tall walls or drift demands exist, engineered light or heavy gauge details typically produce cleaner finishes and fewer callbacks.
How Metal Stud Framing Works
Studs seat in track, fastened at the base, and often floated at the head using slotted deflection track to allow movement. Bridging restrains flanges, openings receive boxed jambs/headers, and services pass through knockouts with proper grommets and protective plates.
Below is a typical interior partition sequence you can adapt project-to-project. It’s the same workflow our customers use when they specify our Canadian steel studs for office build-outs, clinics, or tenant improvements.
- Snap lines and layout: Establish wall centerlines; confirm door and MEP rough-ins.
- Install track: Anchor standard, deep, or slotted deflection track to slab/structure.
- Cut and place studs: Cut to height minus designed head gap (e.g., 1/2–3/4 in).
- Fasten base: Secure stud-to-track per schedule; leave head unpinned for deflection when required.
- Brace: Add bridging/carrying channel at set intervals (e.g., every 4 ft for many walls).
- Frame openings: Box jambs; install headers sized by span and gauge.
- Services and board: Run wires/pipes through knockouts, add grommets, then hang gypsum.
Verify fastener length relative to flange thickness and sheathing layers. For example, 5/8 in gypsum on resilient channel often uses different screw types than direct-to-stud board.

| Step | Key Check | Typical Data Point |
|---|---|---|
| Layout | 16 or 24 in o.c. | Door centers verified |
| Track | Anchor spacing per spec | Deflection slot length set |
| Studs | Cut for 1/2–3/4 in head gap | Gauge matched to height |
| Bridging | Intervals every 4 ft (typ.) | Ends tied at ends/bays |
| Openings | Boxed jambs, sized header | Hinge/backing locations |
| Board | Screw type/length correct | Seams staggered 16 in |
Types, Products, and Approaches
Choose products by function: non-load-bearing studs for partitions, heavy gauge studs for structural spans, slotted deflection track for head movement, resilient channel for acoustics, and specialty profiles for curves, shafts, and trims. Match gauge, spacing, and bracing to height and design loads.
Dass Metal manufactures a comprehensive range engineered for precision and installation speed. The breadth lets you standardize across partitions, corridors, shafts, and exterior walls while keeping submittals simple.
- Non Load Bearing Steel Studs (Light Gauge): Interior partitions, 16/24 in o.c., multiple depths. See light gauge framing guide for planning tips.
- Load Bearing Stud Framing System (Heavy Gauge): Structural exterior walls, tall spans, multi-story framing with engineered headers and strapping.
- Standard, Deep, and Slotted Deflection Track: Control head movement where slabs deflect or drift.
- Bridging / Carrying Channel and Clips: Restrain flanges and tie bays; improve stiffness and feel.
- Resilient Channel: Decouple board to increase STC; common at 24 in o.c. perpendicular to studs.
- U-Flex Track: Form smooth curves for lobbies, corridors, and feature walls.
- Shaftwall / CH Stud: Vertical service shafts with fire-rated liner panels.
- Finishing and Accessories: 90°/130° cornerbead, L trim, J trim, J track, Z-Bar, flat strips, tie and hanger wire.
Explore framing dimensions and practical limits in our quick reference on metal stud framing sizes. If you’re building your spec library, keep our steel studs guide nearby for fast lookups.
Acoustics and Resilient Channel
Resilient channel decouples gypsum from studs, reducing sound transmission. Combined with mineral wool and sealed perimeters, many partitions reach STC 50 or higher—commonly targeted in multifamily and hospitality for privacy and comfort.
Acoustic performance results from decoupling, mass, and damping. Resilient channel contributes decoupling. Add a second gypsum layer for mass and use acoustic sealant at perimeters to block flanking paths. Verify screw patterns—RC must not be short-circuited by direct-to-stud fastening.
- Channel spacing: Commonly 24 in o.c. horizontally, perpendicular to studs.
- Insulation: Mineral wool density selected for cavity depth; fills without compression.
- Sealing: Perimeter acoustical sealant; outlet boxes gasketed or offset.
- Detailing: Keep RC continuous; stop short of adjoining walls to avoid bridging.
For more system context beyond walls—corridors, soffits, and ceilings—our steel framing systems overview ties choices together for a complete interior package.
Best Practices On Site
Document the design intent, then install to the letter: confirm spacing, head-of-wall deflection, bracing intervals, and fastener schedules. Protect edges, manage sequencing, and verify acoustic details so STC and finish quality match submittals.
In our experience supporting Ontario and U.S. projects, small setup steps prevent big punch-list issues later. Use the checklist below to align design, procurement, and field work.
- Layout discipline: Mark 16/24 in o.c., door centers, and MEP chases before anchoring track.
- Head-of-wall gap: Provide 1/2–3/4 in clearance when deflection is specified; don’t pin studs to the head track.
- Bridging rhythm: Install bridging/carrying channel at regular intervals (e.g., every 4 ft for many walls) and tie ends.
- Fastener control: Match screw type and length to gauge and layers; avoid overdriving to keep board faces intact.
- Openings and backing: Box jambs; set header sizes by span and load; place backing for hardware and accessories.
- Corrosion awareness: Use appropriate coatings for environment; interior conditioned spaces typically use standard G60/G90 galvanized.
- Acoustic discipline: Don’t short-circuit resilient channel; seal perimeters and penetrations.
Need a refresher on planning fundamentals? Our primer on steel studs basics highlights dimensioning, knockouts, and screw selection so your crew stays aligned.
Tools and Resources
Combine manufacturer resources with jobsite checklists. Use load tables for height and gauge, product brochures for part selection, and installation guides for spacing, fasteners, and movement joints. Keep a consistent submittal package from kickoff to closeout.
Dass Metal supports specifiers with brochures, load tables (metric and imperial), and standards alignment. Internally, we rely on detailed submittal packages and request-for-information (RFI) logs to keep decisions clear.
- Quick references: Metal stud framing sizes and light gauge steel studs for fast lookup.
- System overviews: Wall framing principles and framing systems overview.
- External context: See this practical basement framing guide for residential considerations and sequencing.
For reinforcement tie-ins on mixed-scope jobs, this primer on rebar basics helps coordinate concrete and framing interfaces at slabs and embeds.
Service and Supply in 370 New Enterprise Way and the Regional Municipality of York
We manufacture and stage orders at 370 New Enterprise Way in Vaughan, serving the Regional Municipality of York and projects across Ontario and the U.S. Tight timelines benefit from local pickup, consolidated deliveries, and coordinated cut lengths to reduce on-site waste.
Local crews appreciate predictable lead times and flexible scheduling. Our engineering team—backed by 40+ years in steel framing—helps match profiles and gauges to wall height, load, and acoustic intent. For curved corridors and lobbies, U-Flex track arrives ready to form smooth radiuses with consistent screw lands.
Local considerations for 370 New Enterprise Way
- Plan deliveries around commuter peaks near Queen St / Highway 50 to keep offloading efficient and safe.
- Seasonal note: winter staging should protect galvanized edges from de-icing salts; indoor storage keeps 12–20 ft members pristine.
- When coordinating pickups, confirm dock access and turning radiuses; the Highway 50 – Zum Queen Stop EB area can be busy during route changes.
Planning and Pricing Factors
Plan scope using quantities, gauges, and accessories. Wall height, stud depth, spacing, deflection details, acoustic layers, and logistics all influence scheduling and procurement. Detailed takeoffs with exact lengths reduce waste and speed install.
While we don’t list prices here, you can prepare better estimates by sharpening the variables that drive quotes. Accurate counts for studs, track, clips, and bridging—plus board layers and resilient channel—help align suppliers and schedules.
- Quantities by length: Ordering stud lengths to the inch reduces field cutting and scrap percentages.
- Gauge and spacing: Heavier gauges or tighter spacing increase stiffness for tall walls.
- Deflection design: Slotted head track and clip packages are scoped to expected drift.
- Acoustic package: Resilient channel, mineral wool, and double-layer board add mass and decoupling.
- Logistics: Consolidated drops, floor-by-floor staging, and early backing kits keep crews moving.
Building light interior partitions? Product selection starts with non-load-bearing studs sized to height and door/header needs. Our team helps translate plans into a clean, orderable list.
Case Studies and Examples
Across Ontario and the U.S., contractors use light and heavy gauge systems to hit finish, fire, and acoustic goals. These condensed examples show how product choices, spacing, and detailing combine to deliver predictable, inspectable results.
1) Tenant build-out, office floor
Objective: Fast, straight partitions and STC 50 conference rooms.
Approach: 3-5/8 in studs at 24 in o.c., resilient channel with 5/8 in gypsum, mineral wool. Boxed jambs and headers for glass fronts.
Outcome: Clean reveals; consistent sound privacy confirmed by post-completion walkthroughs.
2) Mid-rise exterior infill
Objective: Support façade and tall corridor walls.
Approach: Heavy gauge studs, engineered headers, slotted head track at slab edges, bridging per bay.
Outcome: Movement accommodated at head; cladding installed to straight, supported substrate.
3) Healthcare clinic
Objective: Durable partitions with high fixture loads.
Approach: 20 ga studs at 16 in o.c., continuous backing at casework and grab bars, added bridging near equipment.
Outcome: Rigidity under point loads; inspections approved without rework.
4) Curved lobby feature
Objective: Smooth radius without segmented flats.
Approach: U-Flex track, 3-5/8 in studs cut to length, gypsum in narrow strips to match curvature.
Outcome: Architectural curve achieved with uniform screw lands and clean finish.
Looking for practical dimensions before you start? Our internal stud size reference speeds early decision-making for both light and heavy gauge options.
Frequently Asked Questions
These quick answers cover spacing, deflection, acoustics, and when to pick steel over wood. Each response is field-tested and geared to help you pass inspections with fewer change orders and punch-list surprises.
What spacing should I use for interior partitions?
Most interior partitions use 16 or 24 inches on center. Heavier finishes, tall walls, or high-traffic areas often benefit from 16 inches. Always confirm against wall height, gauge, and the manufacturer’s load tables before finalizing layouts.
How do I handle head-of-wall movement?
Use slotted deflection track or appropriate clips and leave a designed head gap—commonly 1/2 to 3/4 inch—so studs aren’t pinned to structure. Don’t board tight to the deck; maintain the movement gap and seal per the detail.
When is resilient channel worth it?
Use resilient channel when you need better sound isolation, such as conference rooms, multifamily demising walls, or hotel rooms. Installed perpendicular to studs, it decouples gypsum and can help assemblies reach STC 50 or higher with proper insulation and sealing.
What’s the difference between light and heavy gauge studs?
Light gauge (e.g., 25–20 ga) is typically non-load-bearing for interior partitions. Heavy gauge (e.g., 18–14 ga and beyond) can be load-bearing for exterior walls and long spans. The right choice depends on height, loads, and required stiffness.
How do I pick the right stud depth?
Match depth to wall height and performance. Shallow members (1-5/8 or 2-1/2 inch) suit short partitions and tight chases. 3-5/8 inch is a versatile standard. Taller walls often need 6 inch or deeper members with defined bracing intervals.
Key Takeaways
Plan with clarity, install with discipline, and verify against load tables. With the right gauges, spacing, and acoustic details, metal stud framing delivers straight walls, reliable inspections, and quieter rooms—project after project.
- Use the correct gauge and spacing for height and finish loads.
- Provide head-of-wall deflection where required—don’t pin studs.
- Install bridging rhythmically to control lateral movement.
- Leverage resilient channel, insulation, and sealing to reach STC targets.
- Order exact lengths and stage materials to cut waste and speed work.
For wider context on the full interior package, review our steel framing systems overview, and keep this handy reference on light gauge framing best practices nearby while planning.
