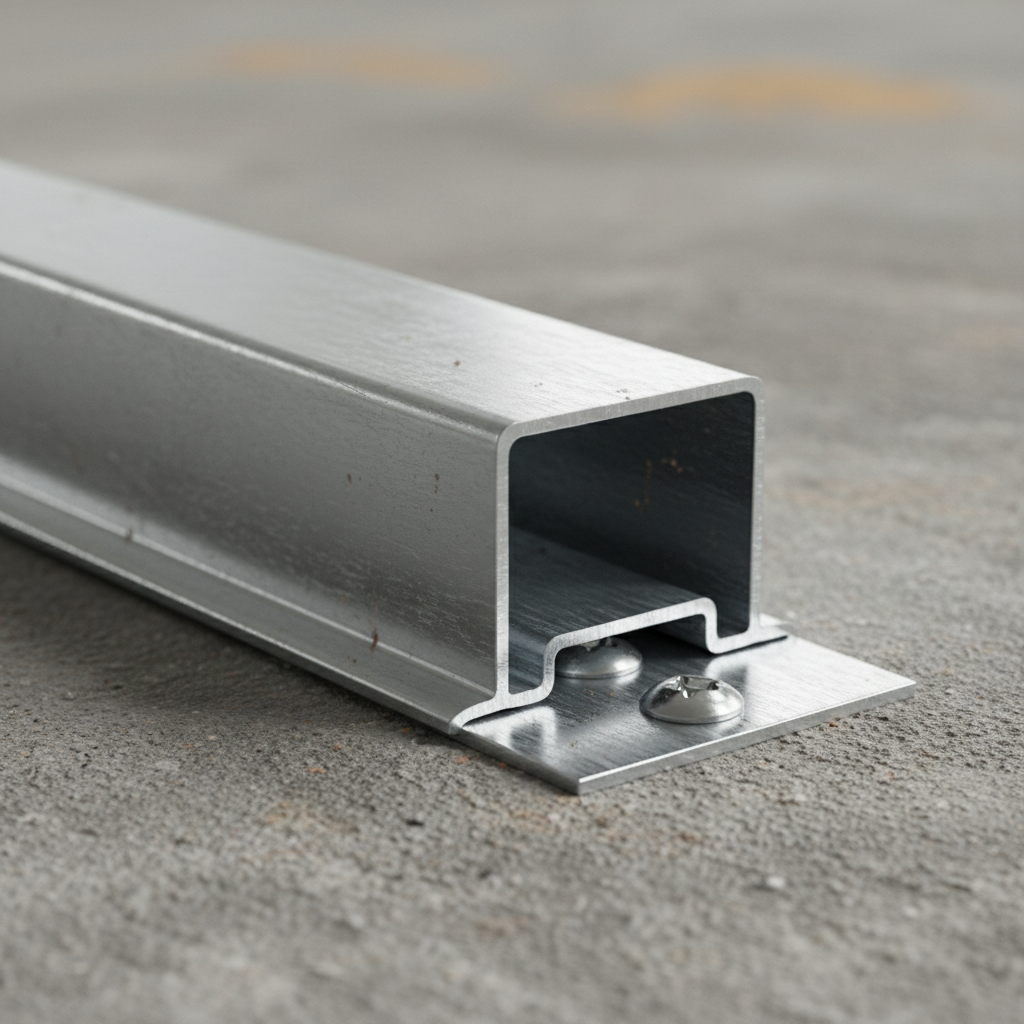
Metal stud track is the U-shaped steel channel that anchors wall studs to floors and ceilings. For projects in 370 New Enterprise Way and across North America, Dass Metal Products supplies standard, deep, and slotted deflection tracks engineered to fit studs precisely, manage movement, and speed drywall framing from layout to inspection.
By Navjot Dass · Last updated: 2026-05-20
At a Glance: What you’ll learn and why it matters
This complete guide explains what metal stud track is, how it works with steel studs, and when to use standard, deep, or slotted deflection profiles. You’ll get sizing rules of thumb, code-aligned details, step-by-step installation, and checklists to prevent misfits, wall cracks, and failed inspections.
- Understand the role of track in light gauge steel framing
- Choose between standard, deep, and slotted deflection track
- Apply deflection limits for head-of-wall movement
- Follow fastener spacing and layout best practices
- Use submittal-ready resources: load tables, standards, MSDS
- Avoid the top mistakes that slow inspections
Local considerations for 370 New Enterprise Way
- Weather swings mean movement joints matter. Prioritize slotted deflection track at head-of-wall near building perimeters and long corridors to accommodate thermal and structural drift.
- Busy schedules demand tight sequencing. Pre-mark track layout and pre-cut standard or deep track lengths to keep drywall crews moving without rework.
- Mixed-tenant interiors often need acoustic upgrades. Pair resilient channel with properly fastened track and sealed base-of-wall to reduce flank paths.
What is a metal stud track?
Metal stud track is a cold-formed, U-shaped steel channel that secures studs at the floor (bottom track) and ceiling (top track). The web sets wall width, while the flanges guide studs and accept fasteners. Track selection controls fit, movement, and inspection outcomes.
In light gauge steel framing, track forms the wall’s boundary. Bottom track follows the floor layout; top track interfaces with structure and ceilings. Dimensions match the stud web (for example, 2-1/2 in., 3-5/8 in., 6 in.) and are specified by thickness (gauge) and coating.
- Web width: matches stud size to maintain wall width and gypsum alignment.
- Flange height: standard vs. deep profiles affect lateral stability and slip detail geometry.
- Material thickness: lighter gauges suit non-load-bearing partitions; heavier sections suit higher walls and corridors.
- Coating: galvanized coatings resist corrosion; verify exposure class and local code requirements.
We engineer track to mate with our studs across light and heavy gauge systems so installers get consistent fit. That consistency reduces layout “fighting,” a frequent cause of punch-list delays.
For a primer on steel studs themselves, see our steel studs guide and our overview on using steel studs.
Why track selection matters for schedule and compliance
Choosing the right track prevents misaligned studs, sound leaks, and head-of-wall cracks. Standard track sets geometry; deep track adds stability; slotted deflection track lets structure move without damaging finishes—key for inspections and warranty confidence.
Here’s the thing: track choice defines how your wall interfaces with structure and finishes. A mismatch at the head or base can telegraph into visible cracks, door binding, and acoustical complaints. Those small errors ripple through schedules.
- Fit and speed: When studs seat cleanly, crews cut less and drive more. That’s measurable on long runs and repetitive rooms.
- Movement compliance: Building codes expect vertical and lateral drift. Head-of-wall slip is standard practice for non-load-bearing partitions.
- Acoustics: Track attachment and sealing affect sound isolation. Gaps at base or continuous hard contact at head create flanking paths.
- Inspection-ready: Inspectors look for fastener patterns, deflection details, and consistent stud seating—especially near rated or exterior walls.
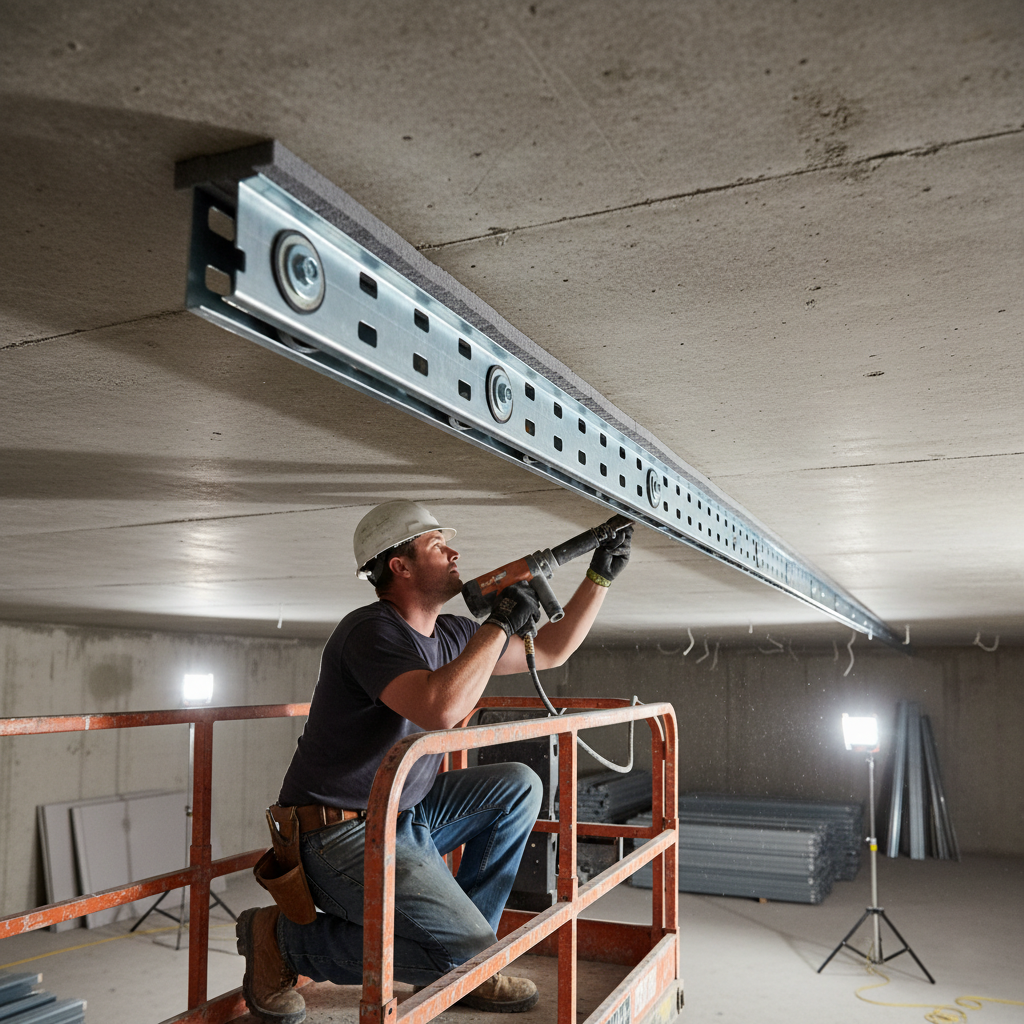
How metal stud track works in steel framing
Track defines wall alignment, captures studs, and transfers in-plane loads to structure. Bottom track anchors layout; top track either fixes or allows movement. Slotted deflection track decouples the stud from the structure while maintaining lateral support.
Track functions as the boundary and bearing surface for studs. Bottom track is fastened to the slab or subfloor; top track attaches to joists, beams, or deck. In non-load-bearing walls, the head detail must allow vertical movement from live loads and temperature.
- Bottom track: establishes layout and resists in-plane forces; sealant at the base supports acoustics and smoke control where specified.
- Fixed top track: used under braces or where movement is within acceptable limits for the finish assembly.
- Slotted deflection track: elongated slots accept fasteners that restrain laterally while allowing vertical slip.
For detailed head-of-wall practices and why slotted slots are oriented a certain way, explore our slotted deflection track guide and our deeper dive on slotted track movement details.
Types of metal track and where to use each
Use standard track for typical partitions, deep track for added lateral stability and tall walls, and slotted deflection track at the head where structural movement must be accommodated. Specialty profiles like U-Flex, L track, and J track solve curves and edge trims.
Core options from the Dass Metal system
- Standard track: the go-to U-channel that matches stud width; ideal for typical interior partitions and tenant demising walls.
- Deep track: taller flanges stabilize studs at the base or head, especially for higher walls or corridor runs subject to lateral loads.
- Slotted deflection track: pre-punched slots permit vertical slip at the head-of-wall; mandatory where drift is expected to exceed finish limits.
- U-Flex track: a bendable track for curves and radiused walls, enabling clean arcs without segmented faceting.
- L track / J track: edge and transition trims that terminate gypsum or create reveals; also used as auxiliary supports around openings.
Related components that complete the system
- Bridging / carrying channel: ties studs together to control buckling in tall partitions; pairs with bridging clips.
- Resilient channel: decouples gypsum for sound isolation; coordinate with track attachment and sealant lines.
- Windbrace: diagonal bracing element used where lateral resistance is required in certain non-structural walls.
| Track type | Primary use | When to choose | Notes |
|---|---|---|---|
| Standard track | Typical partitions | Standard room layouts; typical heights | Match stud width and gauge; seal base if acoustics matter |
| Deep track | Tall walls, corridors | Added lateral stability needed | Helps seat studs plumb; supports bridging placement |
| Slotted deflection track | Head-of-wall slip | Expected vertical drift/deflection | Slots allow movement; fasteners restrain laterally |
| U-Flex track | Curved walls | Arcs or radii required | Cleaner curves than segmented framing |
| L/J track | Edge trims | Gypsum terminations, reveals | Coordinate with accessories and finish reveals |
For a broader context on studs and accessory selection, see our walkthrough on drywall and metal studs and our note on light gauge steel studs.
Best practices: layout, fastening, and inspection
Pre-plan layout lines, match stud-to-track sizes, and confirm movement requirements before fastening. Use sealant at base where acoustics or smoke control apply, fasten per pattern, and verify slip details at the head. Document with photos to streamline inspections.
Preplanning and layout
- Snap chalk lines and mark door and intersecting wall locations before placing track.
- Dry-fit the first bay to confirm stud seating and flange clearance, then continue.
- Pre-cut standard or deep track segments for repetitive rooms to keep crews flowing.
Fastening patterns and sequencing
- Bottom track to concrete: use appropriate anchors; maintain consistent spacing along the web.
- Bottom track to wood or metal deck: use screws rated for substrate; avoid over-driving which distorts the web.
- Head-of-wall: if using slotted deflection track, fasten through slots per the slip detail; do not pin studs tight to the structure.
Movement and acoustics
- Allow vertical slip at the head equal to expected deflection; keep gypsum clear of the structure per finish specs.
- Seal the base track with acoustical sealant where STC ratings apply to limit sound flanking paths.
- Coordinate resilient channel orientation and spacing with track fastener lines to avoid hard connections.
Quality checks that speed inspections
- Photo-document first-of-kind head-of-wall details to align with the inspector early.
- Verify deep track flange orientation and stud plumb with a short level at every third bay.
- Confirm bridging channel and clips are installed per plan prior to board.
For a practical, field-focused perspective, our team compiled common pitfalls in drywall framing mistakes and the movement-specific checklist in our deflection track guide.
Tools, resources, and submittals
Use product data sheets, load tables, and standards references to speed approvals. Provide head-of-wall details, MSDS, and a brief method statement. Tie each submittal to specific track types—standard, deep, or slotted deflection—to avoid rework.
- Product data: standard track, deep track, and slotted deflection track with dimensions, gauges, and coatings.
- Load tables: for studs and related members; helps size bridging and verify tall-wall behavior.
- Standards and codes: reference applicable building code and cold-formed steel standards in the submittal cover sheet.
- MSDS/SDS: for coatings and accessories per jobsite requirements.
- Detail sheets: head-of-wall slip, base sealant lines, and intersections with corridors or shafts.
Cold-formed steel framing provisions are maintained by AISI; see AISI resources for CFS for standards context and design guides. For gypsum interfaces, Gypsum Association resources provide installation and finishing practices you can align with your submittals.
Need a quick review? Our engineering team (40+ years in steel framing) can sanity-check your head-of-wall details or recommend the right track profile for a tricky condition. Share layouts and movement assumptions, and we’ll respond with a concise markup.
Case examples: real-world scenarios we support
From tenant improvements to education and healthcare corridors, the right track profile eliminates rework. Here are field-tested scenarios showing when to choose standard, deep, or slotted deflection track—and how our team streamlines approvals and delivery.
1) School corridor with expected structural drift
- Challenge: Long corridors under composite deck with predictable live-load deflection.
- Approach: Slotted deflection track at head-of-wall; deep track at base for improved alignment while carts and traffic impact walls.
- Result: Clean inspections and stable gypsum joints during the first academic term.
2) Tenant build-out with radiused feature walls
- Challenge: Curved reception wall requiring smooth gypsum finish.
- Approach: U-Flex track to create a consistent radius; resilient channel behind finish to dampen sound from adjacent open office.
- Result: A true arc without segmented facets and a quieter lobby experience.
3) Healthcare suite with acoustical performance targets
- Challenge: Exam rooms calling for improved privacy.
- Approach: Standard track with continuous base sealant; resilient channel on one side; careful head-of-wall gaps maintained under fixed track where structure movement is within finish limits.
- Result: Predictable sound isolation and satisfied facility staff.
When schedules compress, our cross-border delivery network supports projects throughout Canada and the United States, coordinated from our hub in Vaughan. Submittals are synchronized with shipments to keep inspections timely.
How to install metal stud track: step-by-step
Snap lines, cut and place bottom track, then anchor per pattern. Plumb and install studs, add bridging, and set top track. At heads needing slip, use slotted deflection track and approved fasteners. Seal base where acoustics apply and photo-document first-of-kind details.
- Verify drawings: Confirm wall types, movement requirements, and fire/acoustic notes.
- Lay out: Snap chalk lines; mark doors, returns, and intersections.
- Cut track: Pre-cut standard or deep track for repetitive rooms; deburr ends.
- Set bottom track: Place on lines; apply sealant if specified; anchor to substrate at the required spacing.
- Place studs: Seat into bottom track; check plumb at the first bay.
- Install bridging: Add carrying channel and clips at the heights shown on plans.
- Top track: Use fixed top track where permitted; otherwise use slotted deflection track at head-of-wall.
- Head fasteners: Drive through slots into structure per detail, allowing vertical slip.
- Service coordination: Verify MEP penetrations before closing walls.
- Pre-board check: Confirm fastener patterns, base sealant, and slip clearances.
- Document: Photograph sample details; note any deviations and approvals.
For more framing context, our field team shares lessons learned in metal stud framing tips and our drywall + studs guide.
Codes, standards, and design assumptions
Design with recognized codes and standards: building codes define deflection expectations, and AISI standards govern cold-formed steel framing. Gypsum standards inform head-of-wall clearances and finish tolerances. Align submittals with these references to streamline approvals.
- Building code: The I-Codes framework defines structural movement expectations and fire/life-safety interfaces; see ICC resources.
- Cold-formed steel: AISI specifications guide design and detailing of studs and track; see AISI/Build Using Steel.
- Gypsum interfaces: For head-of-wall gaps and finishing, consult Gypsum Association practices.
These references help you justify slotted deflection track at specific walls, document slip clearances, and coordinate resilient channels and sealants. They also provide common vocabulary for RFIs and inspector discussions.
Troubleshooting: avoid these 9 common mistakes
Most track issues trace to sizing mismatches, missing slip details, or inconsistent fastener spacing. Confirm the movement strategy before framing, match studs to track precisely, and document first-of-kind details to avoid rework and inspection delays.
- Using narrow track that pinches studs or wide track that allows racking.
- Skipping slotted deflection track where structure drift is expected.
- Over-driving anchors that distort the track web and misalign studs.
- Failing to seal the base where acoustics or smoke control apply.
- Hard-connecting resilient channel to track, short-circuiting acoustics.
- Ignoring deep track where tall walls need added stability.
- Uneven fastener spacing that triggers inspection notes.
- Not coordinating penetrations before board, leading to patching.
- Skipping photos and as-built notes that speed approvals.
Downloadable checklists you can copy to your spec
A short pre-pour and pre-board checklist catches most framing issues. Copy these bullets into your spec or jobsite plan to align crews, inspectors, and subs around movement, fastening, and acoustics.
Pre-pour / early layout
- Confirm wall locations and movement strategy per wall type.
- Order standard, deep, or slotted deflection track to match stud sizes and gauges.
- Plan base sealant lines and acoustic treatments where required.
Pre-board verification
- Bottom track anchored at specified spacing and substrate-compatible fasteners.
- Studs seated cleanly; bridging installed at correct elevations.
- Head-of-wall slip detail installed where specified; photos taken.
- Base sealant continuous; resilient channels clear of hard connections.
Frequently Asked Questions
These answers address the most common field and submittal questions about metal stud track, from when to use slotted deflection track to how deep track helps tall corridor walls stay true.
When should I use slotted deflection track?
Use slotted deflection track at the head-of-wall when the structure above is expected to move enough to crack finishes or bind door frames. The slots let the wall slip vertically while maintaining lateral restraint, keeping gypsum and trims intact.
What’s the difference between standard and deep track?
Standard track has typical flange height for everyday partitions. Deep track has taller flanges that provide added lateral support and help seat studs plumb—especially useful for taller walls, corridors, or areas with higher traffic and potential impact.
How do I reduce sound flanking at the base of the wall?
Apply continuous acoustical sealant under the bottom track and along the base of gypsum where specified. Keep resilient channels clear of hard connections to track, and seal service penetrations. These steps prevent sound paths that bypass the wall assembly.
Can I hard-fasten studs to a slotted head track?
No. The purpose of slotted deflection track is to allow vertical movement. Fasten through the slots into structure per the approved detail, but do not pin studs tight to the structure. Otherwise, movement will transfer into the finishes.
Where can I find design standards for steel track and studs?
Refer to building code guidance from ICC, cold-formed steel standards from AISI, and gypsum installation practices from the Gypsum Association. Aligning submittals to these references simplifies reviews and inspector conversations.
Key takeaways
Match track type to the wall’s job: standard for typical partitions, deep for stability, slotted for movement. Plan fastening and acoustics details early, photo-document first-of-kind work, and align submittals with recognized standards to keep inspections smooth.
- Track choice sets the wall’s performance and finish quality.
- Movement at the head-of-wall is routine—detail it, don’t fight it.
- Seal bases where acoustics apply and avoid hard connections.
- Use checklists and photos to accelerate approvals.
- Lean on our engineering team for edge cases and reviews.
Conclusion: build faster, pass inspections, and protect finishes
Right-sizing metal stud track prevents misfits, reduces rework, and protects finishes from movement-related cracks. Pair standard, deep, and slotted deflection profiles with disciplined layout and fastening, and you’ll frame quicker—with fewer RFIs and smoother inspections.
Metal stud track may look simple, but it carries your wall’s geometry, movement strategy, and inspection outcomes. When you’re planning interiors in 370 New Enterprise Way or anywhere across Canada and the United States, we’re ready to help you select the right track, prepare submittals, and ship on your schedule.
Let’s solve your head-of-wall details. Share your drawings and target timelines, and our team will respond with a recommended track combination and annotated details tailored to your project.
