

What a webslide clip is and the core purpose it serves
A webslide clip is a small metal connector that fastens to the web of a cold formed steel stud and engages a track, channel, or secondary member in a sliding or captive arrangement. Its core purpose is to allow controlled longitudinal movement between the stud web and the receiving member while still providing a shear or locating function. Contractors and specifiers use webslide clips to manage thermal expansion, slab or drift movement, and differential deflection without concentrating stress at flanges or on finish materials.
Dass Metal Products includes the webslide clip among its framing components and provides product information for specification and procurement on the product listing. For company background, manufacturing claims, and broader technical resources, see the Dass Metal website.
Decision checklist: when to choose a webslide clip
Use this rapid yes or no checklist to decide whether a webslide clip suits your project. Answer each line and apply the outcome rules below.
- Does the assembly require controlled axial movement between stud and track because of temperature, creep, or slab movement? Yes / No
- Is the stud web accessible and suitable for clipped or bolted connections instead of flange-only attachments? Yes / No
- Must the connection carry shear or limited axial load while permitting sliding along the stud length? Yes / No
- Will a sliding connection reduce the transfer of moment into adjacent partitions or finishes? Yes / No
- Are acoustic or vibration requirements moderate, not explicitly prohibiting a small clip and fastener detail? Yes / No
- Is there a specified clip type or slot geometry called out in the shop drawing or engineer’s notes? Yes / No
- Can installers access the clip zone to verify engagement and movement after installation? Yes / No
Outcome rules
- Recommend: If you answered Yes to 1, 2 and 3, and either 4 or 7, a webslide clip is likely appropriate, pending confirmation with project engineering and manufacturer details.
- Consider with caution: If you answered Yes to 2 and 5 only, review acoustic and constructability trade-offs and consider alternatives such as resilient channel or isolation clips.
- Avoid or hold for engineer review: If you answered No to 2 or 6, or the project is explicitly load bearing or seismic critical without a specified clip detail, stop and obtain engineering approval before proceeding.
This checklist is a decision tool and must be used together with manufacturer data and project engineering. For guidance on how to place verification steps and stop points into a technical procedure, see checklist design and QA references that explain structure and review points.
Compatibility checks: studs, tracks and common assemblies
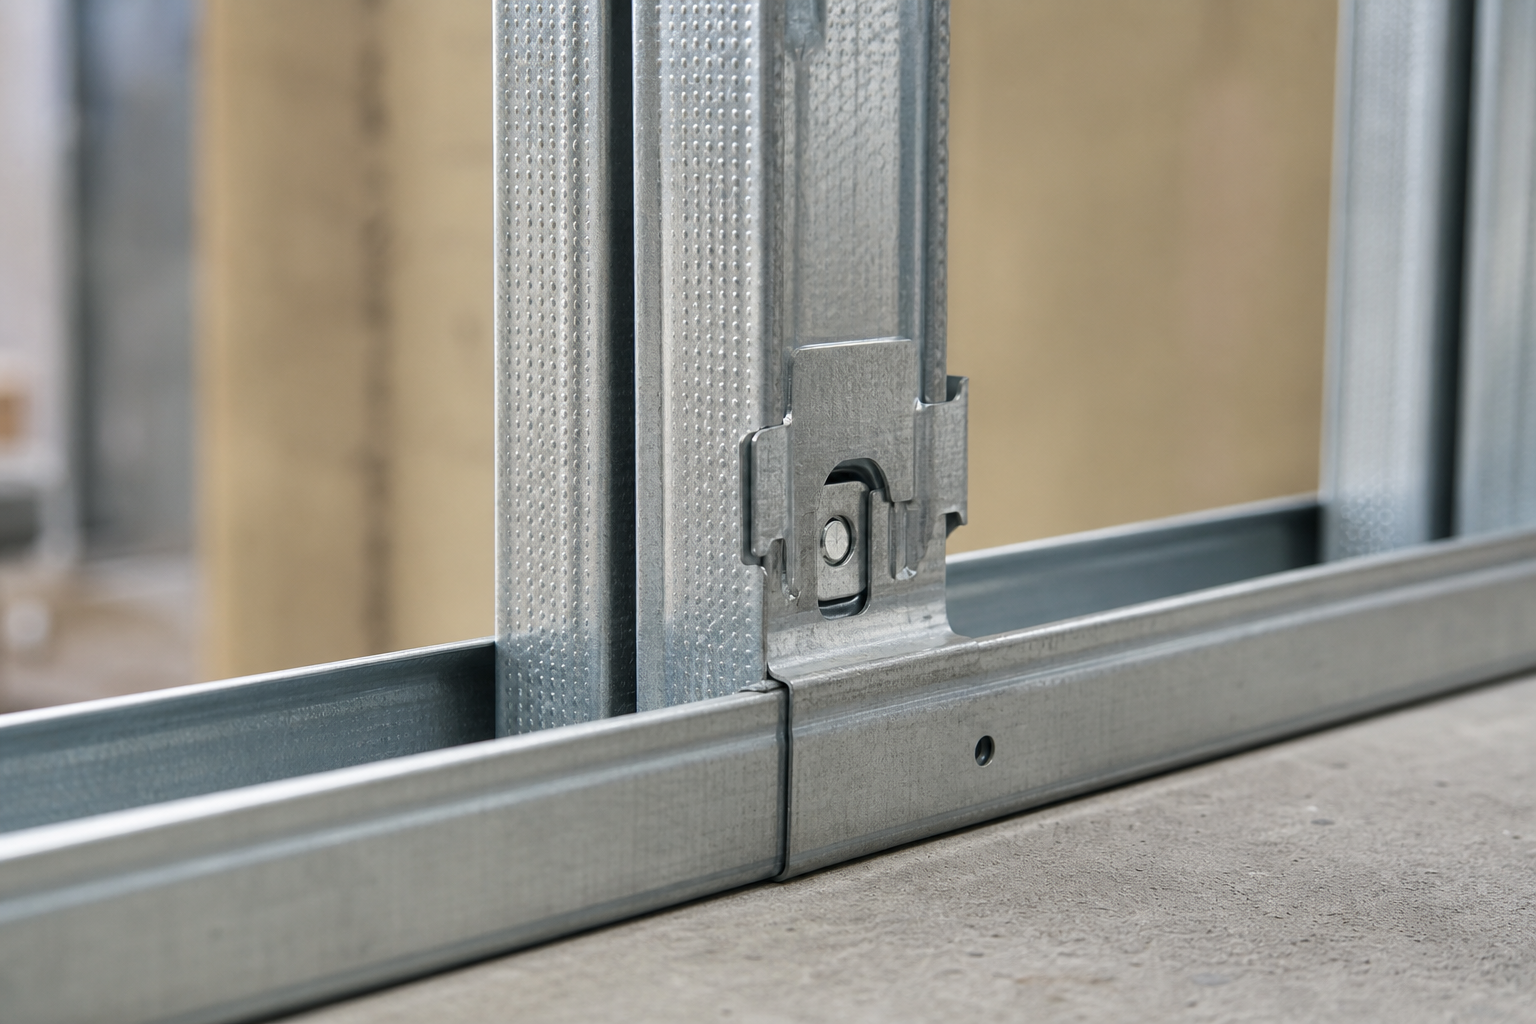
Confirm compatibility with the exact stud and track profiles before specifying or ordering. Typical pre-checks include stud web thickness, slot geometry, track depth, and access for fasteners.
- Verify stud web and gauge. Confirm the clip dimension fits the web thickness and is not dependent on flange engagement only. When in doubt, measure the actual web on site.
- Check track profile. Ensure the track interior and return geometry permit the clip to locate and slide without interference. Deep tracks, lips, or non-standard returns can obstruct movement.
- Confirm slot and fastener pattern. Some webslide clips use elongated slots to allow travel. Compare the clip slot length and slot orientation to the expected movement range specified by the engineer.
- Assess adjacent members. If the clip interfaces with a bridging channel, furring member, or other secondary component, confirm the receiving element will accept the clip and fasteners without distortion or restriction.
- Field-fit check. On initial delivery, fit one clip to a sample stud and track section to verify fitment, movement range, and required fasteners before full procurement.
Start technical verification at the Dass Metal webslide clip product page to request nominal dimensions and recommended fasteners. Always compare physical on-site dimensions to the published product geometry before placing large orders.
Step-by-step installation checklist with stop points and safety limits
The sequence below is installer-focused and includes measured stop points where work must pause for verification. Do not substitute these steps for project-specific shop drawings or an engineer’s instructions.
- Prepare materials and tools. Confirm you have the specified webslide clips, correct fasteners, a torque-limited driver, tape measure, and sample stud and track sections for mock-up. STOP POINT: verify clip part number and quantity against the submittal and product label.
- Create a mock-up. Assemble one stud and track with the clip in a non-critical area. Verify the clip slides freely for the expected travel distance without binding. STOP POINT: if sliding range is less than specified, stop and measure to identify interference.
- Layout and mark. Transfer clip locations from the shop drawing to the studs, marking centerlines and slot extents. Confirm clearance to finishes and services behind the web.
- Attach clip to stud web. Fasten the clip using the specified fastener and driver torque. Use consistent torque to avoid overdriving thin gauges. STOP POINT: after attaching the first row, perform a representative pull test to confirm holding strength and that the clip does not deform the web.
- Engage clip with track. Slide the stud into the track and confirm the clip seats into the track slot or edge as intended. For captive conditions, confirm the clip is fully seated but still free to travel the design range.
- Verify alignment and movement. Move the stud through the expected movement envelope, including any design deflection or thermal travel. STOP POINT: if movement stops at any point, isolate that location and measure interference dimensions before continuing.
- Install adjacent connectors. Install bridging clips, secondary channels, or other connectors that interface with the webslide clip following the sequence in the project drawing. Confirm these do not inadvertently restrict movement.
- Final inspection and documentation. Use a punch list to confirm clip count, torque, travel range, and that no fasteners back out. Document any deviations and forward them to the project engineer for disposition if required.
Safety limits and engineer review triggers
- Hold for engineer review when the assembly is load bearing and the webslide clip affects gravity load paths or seismic transfer.
- Stop and consult if the sliding range is less than the engineered movement, or if repeated binding occurs after adjustment.
- Consult the project engineer when acoustic performance is contractually critical and the clip detail might reduce an assembly’s rated performance.
The placement of stop points follows checklist best practices that recommend pausing at critical, irreversible steps and recording verification evidence. For checklist QA structure and design, see presentation and checklist references that illustrate verification placement and quality checks.
Common objections and mistakes: comparing webslide clips to alternatives

Contractors and specifiers often raise objections about cost, constructability, and acoustic consequences. Below are direct comparisons and mitigation steps.
- Deflection side clip versus webslide clip. A deflection side clip is usually designed to allow vertical or perpendicular deflection at a bearing connection. A webslide clip is intended for longitudinal sliding along the stud web. If the project primarily needs vertical deflection at a bearing, specify a deflection detail. If longitudinal movement along the stud is the issue, a webslide clip is often the correct choice.
- Bridging clip versus webslide clip. Bridging clips connect webs for lateral bracing and improve stiffness. They are not designed primarily to allow sliding. Where both bracing and sliding movement are required, combine bridging and sliding clips in the sequence specified by the engineer, ensuring bridging clips do not lock the sliding detail.
- Acoustic impact. Metal clips and fasteners can introduce flanking paths. When acoustic performance is critical, assess the assembly with an acoustic engineer and consider resilient channels, isolation clips, or acoustic seals at the clip location.
- Typical installation errors. Overdriving fasteners and deforming the stud web, failing to verify sliding range on a mock-up, and installing bridging or secondary connectors before confirming sliding clearance are common mistakes. Following the stop points in the installation sequence prevents these errors when applied correctly.
Standards, technical data and where to get verified documents
Always request the product brochure, load tables in metric and imperial, and MSDS for the exact webslide clip model you plan to use. Dass Metal publishes product information and technical resources to support specification and purchasing on its product listing. Use those documents to confirm allowable movement, recommended fasteners and coatings, and corrosion data that affect material selection.
When structural or acoustic performance depends on the clip detail, obtain an engineer’s stamp or written confirmation that references the manufacturer documentation. Do not assume a clip is acceptable for load bearing, gravity transfer, or seismic service without explicit engineering sign-off. To request technical documents and submittal packages, start at the Dass Metal webslide clip product page.
Sourcing, procurement and Canadian project notes
For Canadian projects, confirm whether Canadian-made manufacture or CSSBI certification is a contract requirement. Dass Metal is a Canadian manufacturer with engineering support and technical resources listed on the company website. For lead times, cross-border delivery, or pick-up logistics, confirm shipping and receiving hours and facility address directly with the supplier using the company contact pages.
Practical procurement steps
- Request a product data sheet and certified drawing for the webslide clip model you intend to use and include those documents in the submittal package.
- Confirm fastener type and length for the specific stud gauge and thickness on your project before issuing purchase orders.
- Ask the supplier to review any custom or non-standard track geometry and to provide a mock-up where fitment risk is present.
- When working across the Canada US border, confirm cross-border delivery capability and lead times with the supplier as part of procurement.
Frequently asked questions
What is the primary webslide clip purpose in steel stud framing?
The primary purpose is to allow controlled longitudinal movement between the stud web and the receiving track or secondary member while maintaining a shear or locating function. This prevents binding and stress transfer to finishes when movement is expected.
How is a webslide clip different from a deflection side clip or bridging clip?
A webslide clip is designed mainly for sliding along the stud web. A deflection side clip typically accommodates vertical or perpendicular movement at a bearing. Bridging clips provide lateral bracing and stiffness and are not intended to allow sliding. Choose the detail that matches the movement direction and magnitude, and confirm with the project engineer.
Can I use a webslide clip with load bearing studs or must an engineer approve it?
Any application that affects load paths or involves load bearing members requires project engineer approval. Do not assume suitability for gravity, seismic, or load bearing service without written engineering confirmation that references manufacturer data.
Where do I get Dass Metal webslide clip brochures, load tables and MSDS documents?
Request product brochures, load tables, and MSDS from the Dass Metal webslide clip product page and consult the Dass Metal website for additional technical resources and engineering contacts.
What on-site stop points should trigger an installation hold and engineer review?
Hold for review if the mock-up sliding range is inadequate, if clips bind after initial installation, if fasteners deform the stud web, or if the assembly interacts with load bearing or acoustic-critical systems. Document deviations and escalate them to the project engineer before continuing.
For product details and to request technical data or a submittal package, visit the Dass Metal webslide clip product page and the Dass Metal website. For checklist structure and QA guidance that informed the placement of stop points in this article, see checklist design resources such as the presentation checklist and video learning hub guidance.
Dass Metal webslide clip product page | Dass Metal Products
Checklist and QA references used for structure: Presentation checklist and Checklist – Video Learning Hub.
