A stud wall is a framed wall assembly built from repeating vertical studs and horizontal tracks to create straight, strong surfaces for drywall and services. In commercial projects, steel stud walls provide consistent dimensions and predictable performance. Based near 370 New Enterprise Way in Vaughan, Dass Metal Products supports builders with engineered steel studs and tracks for fast, code-ready results.
By Navjot Dass • Last updated: May 27, 2026
Above the Fold: Hook + Table of Contents
Use this guide to plan, frame, and finish a stud wall with confidence. You’ll learn what a stud wall is, why steel framing saves time, how load paths and deflection work, and the exact steps, tools, and checks professionals use to deliver straight, quiet, code-compliant walls.
Here’s what you’ll find in this complete guide, written for general contractors, framing crews, and specifiers who want predictable, professional outcomes:
- What is a stud wall?
- Why stud walls matter
- How stud walls work
- Types, methods, and approaches
- Best practices that prevent rework
- Tools and resources
- Case studies and examples
- Frequently asked questions
- Key takeaways and next steps
Quick Summary
A stud wall uses studs, tracks, and bracing to carry loads, hold drywall, and route MEP services. Steel studs deliver straighter walls, faster layout, and cleaner fire/acoustic detailing. Success relies on correct gauge selection, proper head-of-wall deflection, and disciplined layout—especially at openings and intersections.
- Primary materials: steel studs and tracks, screws, anchors, gypsum panels, firestopping, acoustic sealant.
- Standard spacing: 16 inches on center (or 24 inches where permitted).
- Critical details: head-of-wall deflection, bridging/carrying channel, door/window jamb reinforcement, MEP coordination.
- Performance goals: straightness, stiffness, sound control, fire rating, and durable finishes.
What Is a Stud Wall?
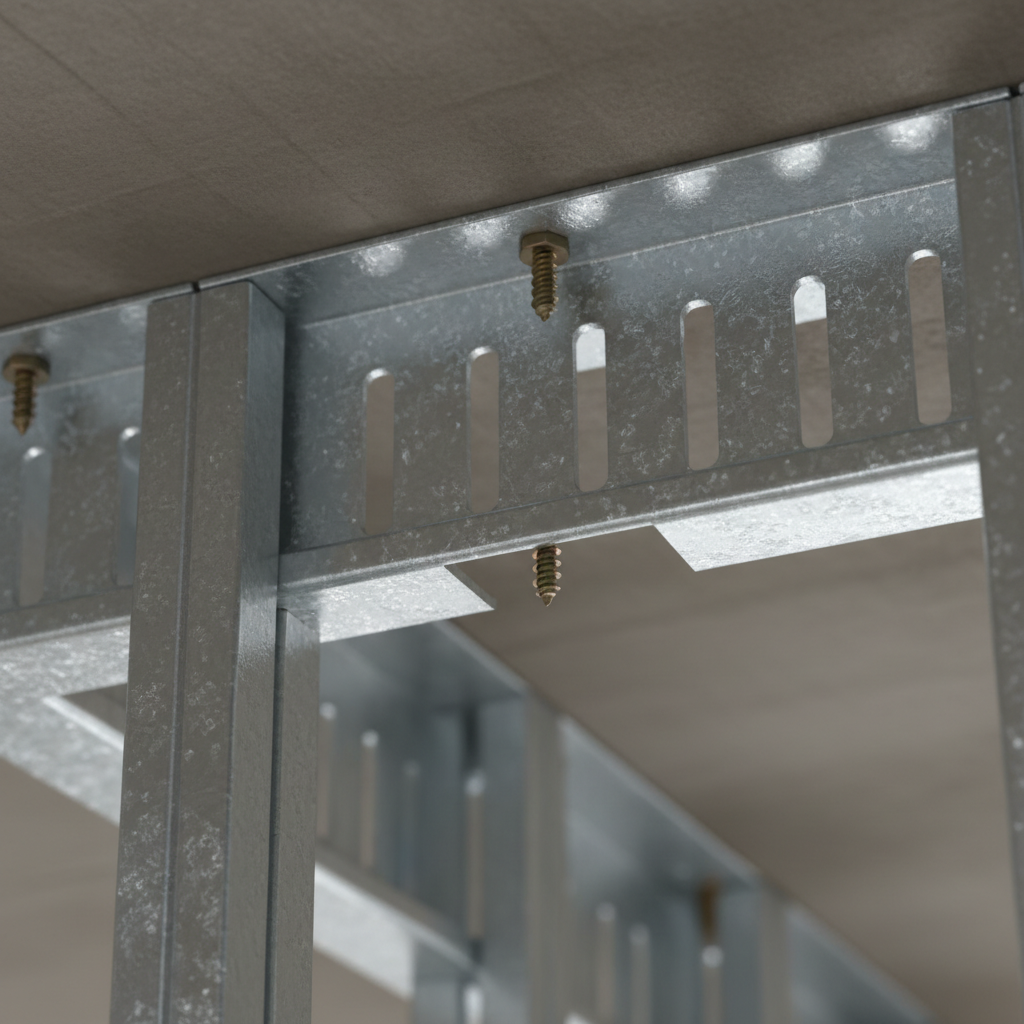
A stud wall is a repetitive framing system made from vertical members (studs) captured by horizontal tracks to form a plane for drywall, doors, and services. In commercial interiors, cold-formed steel studs provide uniform dimensions, reliable strength, and fast installation with standard screws and anchors.
Think of a stud wall as a modular grid. Studs stand vertical at set spacing. Tracks hold studs at the floor and ceiling. Drywall fastens to this grid to create finished partitions that can be fire-rated, sound-rated, or load-bearing.
- Steel advantages: straight members, tight tolerances, no warping, and simple screw fastening.
- Design intent: meet planned heights, loads, and ratings while allowing for movement at the structure.
- Coordination: electrical boxes, plumbing, and HVAC routes must be planned before board-up.
For a deeper primer on terminology and components, our field teams often reference this internal training note alongside the steel studs guide and the broader metal studs overview during kickoff huddles.
Why Stud Walls Matter
Stud walls shape space, control sound, and protect people. They hide services, deliver fire- and acoustic-rated separations, and provide fastening surfaces for finishes and fixtures. With steel framing, crews get straighter walls, repeatable detailing, and shorter punch lists—which lowers risk and speeds handover.
Well-built partitions influence safety, comfort, and durability. They define rooms, meet code ratings, and support casework and doors that see daily use. They also keep schedules on track: framing is the backbone for every trade that follows.
- Safety and code: Proper fire and head-of-wall detailing, plus correctly installed bracing, protect occupants and first responders.
- Acoustics: Resilient channel and sealants reduce transfer, critical in offices, healthcare, and education.
- Speed: Consistent steel gauging and straightness cut layout time and reduce drywall waves.
- Lifecycle: Corrosion-protected framing resists movement that leads to cracked joints and callbacks.
In our experience supporting Ontario and U.S. projects, most punch-list issues trace back to missing bracing, tight fastener patterns near edges, or overlooked deflection details. Eliminating those early pays dividends at closeout.
How Stud Walls Work
Stud walls distribute vertical load to the floor through studs and tracks, resist lateral forces with bracing, and accommodate building movement with head-of-wall deflection. Correct gauge selection, bridging, and screw patterns ensure stiffness, straightness, and long-term performance under real-world use.
At a high level, the wall is a system. The bottom track anchors to the slab. Studs seat inside the track and run plumb to the head. The head condition may be fixed or slotted for vertical movement from live load or thermal effects. Bridging/carrying channel restrains stud twist and keeps spacing true.
- Load path: gravity loads transfer through studs into the floor; lateral loads transfer through bracing and anchors.
- Deflection head: slotted deflection track permits the structure above to move without crushing the wall.
- Bridging: bridging/carrying channel and clips maintain alignment at mid-height and control buckling.
- Acoustic isolation: resilient channel decouples drywall from studs to cut airborne sound.
Door and window openings interrupt the grid and must be reinforced with jamb studs and headers. For shafts and elevators, specialized CH studs create a robust cavity wall that accepts shaftliner panels and maintains rating continuity. For finishes, fastener patterns and board staggering influence both strength and appearance.
When you need movement capability at the head, our drywall-and-studs guide shows how a slotted head-of-wall track prevents screw binding while preserving ratings with tested sealants.
Types, Methods, and Approaches
Choose light-gauge studs for non-load-bearing partitions and heavy-gauge studs where loads, heights, or impact demand it. Track options include standard, deep, and slotted deflection. Use resilient channel for acoustics, carrying channel for bracing, and CH studs for shaftwall assemblies with rated shaftliner panels.
Core framing options
- Light gauge (non-load-bearing): fast interior partitions for offices, retail, and TI work.
- Heavy gauge (load-bearing framing system): tall walls, stair/elevator surrounds, or exterior backup—engineer of record required.
- Standard track: baseline floor/ceiling track for most partitions.
- Deep track: added engagement for taller studs and straighter lines at height.
- Slotted deflection track: head-of-wall movement without crushing finishes or compromising ratings.
Accessories and channels
- Bridging/carrying channel: lateral restraint at one or more elevations.
- Resilient channel: decoupling layer that improves STC in multi-tenant and healthcare spaces.
- Furring channel and Z-Bar: plane adjustments and cladding support.
- Clips: deflection side clips, webslide clips, and bridging clips for reliable connections.
- Curves with U-Flex track: clean arcs for brand elements without kerfs or segmented flats.
If you’re planning elevators or shafts, review our shaftwall CH stud section for details on CH studs, jambs, and installing shaftliner board safely from one side.
Where to use each approach
- Class A offices: light gauge with resilient channel and sealant at perimeters for STC targets.
- Healthcare: heavy gauge at equipment walls; abuse-resistant drywall; added blocking for rails.
- Education: deep track with multiple bridging rows on tall corridor walls to reduce flutter.
- Retail: light gauge at demising walls; Z-Bar or furring channel behind feature cladding.
To decide between steel and wood on your next TI, compare flame spread, straightness, and movement tolerance in this practical discussion of steel vs. wood studs.
Best Practices That Prevent Rework
Lay out from control lines, confirm heights and deflection needs, and install bracing before board-up. Use correct gauge and screw patterns, leave head-of-wall clearances where required, and seal perimeters for acoustics. Inspect intersections, openings, and services early to avoid costly punch-list items.
Layout and fastening
- Snap clear control lines: layout doors first; confirm stud spacing at 16 inches on center unless plans specify otherwise.
- Anchors and fasteners: follow manufacturer recommendations for screw sizes, edge distances, and patterns.
- Bridging first: install carrying channel and clips before MEP to maintain spacing and limit stud roll.
Head-of-wall and movement
- Deflection gap: use slotted deflection track where required; never hard-fastened studs at the head in movement conditions.
- Sealants and firestopping: maintain tested assemblies at perimeters and penetrations.
- Jamb reinforcement: double or triple jamb studs at doors; add headers per drawings.
Quality checks
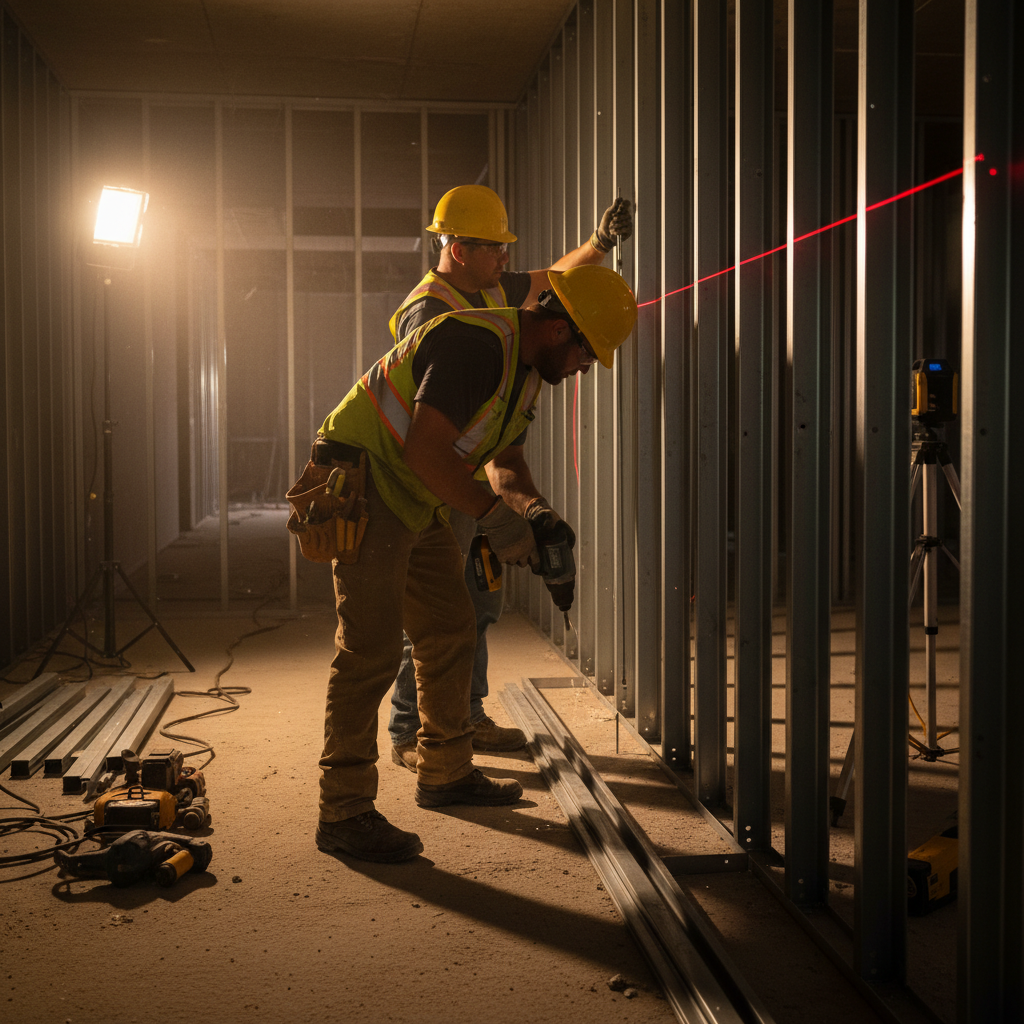
- Plumb and line: laser-check mid-height and top-of-wall after bracing is in.
- Service coordination: box locations, backing, and pathways approved before sheetrock.
- Acoustic continuity: resilient channel orientation correct; perimeter sealant continuous and unbroken.
For a field-tested checklist that crews can follow, see our practical notes in handy tips while installing steel studs, which our superintendents use during daily walk-throughs.
Local considerations for 370 New Enterprise Way
- Plan indoor material staging to avoid weather delays typical of Ontario shoulder seasons; steel studs store well but keep bundles dry.
- Coordinate deliveries around morning traffic peaks in Vaughan to keep floor cores clear for trades that follow.
- In colder months, confirm interior temperatures before taping; consistent heat reduces joint cracking at stud intersections.
Tools and Resources
Successful framing blends the right tools with clear technical references. Crews depend on lasers, snips, and drivers; leads rely on shop drawings, load tables, and tested head-of-wall details to make the right on-site calls and pass inspections the first time.
Essential tools for steel stud work
- Rotary laser and targets for layout and verification
- Metal snips, chop saw with metal blade, or track cutter
- Impact drivers and screw guns with depth control
- Powder-actuated or mechanical anchors for bottom track
- Crimpers, vice grips, and levels for quick holds and checks
Technical references you’ll use
- Project drawings and shop drawings with specified gauges and spacing
- Manufacturer literature for deflection heads and resilient channel
- Guidance on bridging/carrying channel selection and clip spacing
- Height-to-gauge rules of thumb discussed in steel stud framing sizes
If your stud wall interfaces with foundations or shear elements, our sister team’s primer on foundation wall rebar details helps coordinate embeds and backing plates for clean transitions.
Case Studies and Examples
These brief examples show how gauge selection, head-of-wall details, and bracing choices translate into schedule, quality, and inspection outcomes. Each scenario highlights a practical lesson you can apply on your next stud wall installation.
Office tenant improvement (TI)
- Challenge: tight schedule with multiple demising walls and glass fronts.
- Approach: non-load-bearing studs at 16 inches on center, resilient channel on conference rooms, slotted head-of-wall at perimeter beams.
- Result: straight walls minimized glass shim packs; acoustic targets met without rework.
Healthcare corridor upgrade
- Challenge: long, tall runs prone to flutter and cart impacts.
- Approach: deep track with two rows of bridging/carrying channel; heavy gauge at equipment walls; abuse-resistant board.
- Result: stiffer partitions reduced visible joint cracking through seasonal cycles.
Retail build-out with curves
- Challenge: brand requires smooth, continuous arcs.
- Approach: U-Flex track to radius; furring channel for cladding plane; careful fastener spacing to prevent oil-canning.
- Result: consistent curves without segmented facets; rapid inspection sign-off.
Shaftwall installation
- Challenge: one-sided access at elevator core.
- Approach: CH studs and shaftliner panels from the corridor side as outlined in our shaftwall CH stud documentation.
- Result: safe one-side installation met the required fire rating and kept trades moving.
Comparison and Specs at a Glance
Steel stud walls outperform wood in straightness, fire resistance, and movement detailing. For non-load-bearing partitions, light-gauge steel with correct bracing yields faster installation and fewer callbacks, while heavy-gauge steel is reserved for tall, rated, or impact-prone assemblies.
| Category | Steel Stud Wall | Wood Stud Wall |
|---|---|---|
| Straightness | Highly uniform; minimal shimming | Prone to warp/cup; more shimming |
| Fire behavior | Noncombustible framing | Combustible framing |
| Head-of-wall deflection | Slotted track simplifies detailing | Movement joints more complex |
| Acoustic control | Resilient channel and sealants common | Similar options; variable results |
| Typical spacing | 16″ o.c. (24″ where permitted) | 16″ o.c. (24″ where permitted) |
For a practical perspective on when steel is the smarter choice for interiors, see our discussion of steel vs. wood performance.
Step-by-Step Installation (Pro Workflow)
Accurate stud walls follow a disciplined sequence: verify drawings, snap lines, set tracks, place studs, brace early, coordinate services, and then board. Inspect head-of-wall clearances and jamb reinforcement before closing. This order reduces rework and prevents common inspection failures.
- Verify drawings and conditions: confirm heights, gauges, and movement requirements.
- Snap control lines: establish wall centerlines and door locations.
- Anchor bottom track: fasten per schedule and substrate; maintain straightness.
- Set head track: standard, deep, or slotted deflection track as specified.
- Place studs: start at openings; maintain 16 inches on center unless otherwise noted.
- Install bridging: carrying channel and clips at one or more elevations.
- Reinforce openings: jamb doubles/triples and headers per details.
- Coordinate MEP: confirm penetrations and backing before board-up.
- Hang drywall: follow fastener patterns; stagger seams; maintain perimeter gaps for sealant.
- Seal and inspect: acoustical caulk, firestopping at perimeters and penetrations, and final QA checks.
Quick refresher for channel selection is outlined in our channel studs guide, often referenced during morning stand-ups.
Frequently Asked Questions
Contractors ask about spacing, gauge selection, deflection heads, and acoustic upgrades. The short answers: follow drawings, keep 16 inches on center unless noted, use slotted head track where movement is expected, and add resilient channel and perimeter sealant to lift STC without major redesign.
What is the standard spacing for a steel stud wall?
Most commercial partitions use 16 inches on center. Some designs allow 24 inches on center depending on board thickness, height, and bracing. Always follow project drawings and manufacturer literature for gauge and spacing at your wall height.
When should I use slotted deflection track?
Use slotted deflection track wherever vertical building movement is expected at the head—commonly at structural beams or decks with live load. It preserves clearance so the structure can move without crushing drywall, trim, or firestopping at the head-of-wall.
How do I improve sound control in a stud wall?
Combine resilient channel with mineral wool and continuous perimeter sealant. Ensure the channel orientation is correct and avoid short-circuiting it with mislocated fasteners. Sealing the perimeter is as important as the wall’s internal layers for achieving the target STC.
Do I need heavy gauge studs for tall interior walls?
Often yes. Taller walls or those with impact loads may require heavier gauges and deeper tracks, plus multiple rows of bridging. The engineer of record will specify gauge, spacing, and bracing based on height and design loads.
Conclusion: Key Takeaways and Next Steps
Successful stud walls start on paper and finish with disciplined field execution. Select the right gauge and track, brace early, detail for movement, and coordinate services before board-up. Do that, and walls go up straighter, faster, and with fewer punch-list surprises.
Key takeaways
- Stud wall systems rely on correct gauge, spacing, bracing, and head-of-wall details.
- Steel framing delivers straighter partitions, simpler fire and acoustic detailing, and predictable inspections.
- Most issues stem from missing bridging, misfastening, or ignored deflection requirements—inspect early.
Action steps
- Confirm heights, gauges, and head-of-wall requirements on your next layout.
- Stage bridging and clips before MEP to lock spacing and line.
- Use resilient channel and continuous perimeter sealant where acoustics matter.
Need a quick consult on gauge selection, channel spacing, or head-of-wall details? Our engineering team in Vaughan supports projects across Ontario, Canada, and the U.S. Reach out and we’ll help you frame straighter, faster, and safer.
Related Guides and Next Steps
Explore adjacent framing topics to round out your plan: bridging and channels, shaftwall specifics, and drywall finishing. These concepts connect directly to stud wall performance and inspection outcomes.
- Channel selection and spacing for tall partitions
- Shaftwall components and one-sided installation
- Drywall finishing sequences that protect joints
Soft CTA: Want a second set of eyes on drawings or a quick takeoff? Book a no-pressure walkthrough with Dass Metal’s engineering support—ideal for fast-moving TI or healthcare work.
Final CTA: Schedule a project huddle with our team in 370 New Enterprise Way to de-risk your next interior framing package and keep your schedule on track.
