Exterior framing is the cold-formed steel wall skeleton that supports cladding and resists wind loads at a building’s perimeter. It defines envelope alignment, movement control, and enclosure speed. At Dass Metal Products (370 New Enterprise Way, Vaughan), we manufacture studs, track, channels, and clips so exterior framing stays fast, accurate, and code-aligned across Canada and the U.S.
By Navjot Dass • Dass Metal Products
Last updated: June 7, 2026
Above the Fold: Hook + Table of Contents
Prevent rework by getting exterior framing right from day one. This guide shows schedule-driven crews how to set deflection, spans, and corrosion protection correctly—then install studs, tracks, and channels with fewer RFIs. Use it to standardize quality checks and shorten enclosure time on your next facade.
If you lead a framing crew or run a project, you’ve seen how a small head-of-wall miss can ripple into weeks of delays. Here’s a quick roadmap and why it matters for 2026 builds.
- What exterior framing is—plus where movement and loads actually go
- Step-by-step layout, fastening, and inspection workflow
- The most common mistakes to avoid this year
- Best practices for deflection, bridging, corrosion, and WRB ties
- Tools, submittals, and checklists that cut RFIs
- Mini case studies pulled from Ontario and U.S. jobs
- What Is Exterior Framing?
- Why Exterior Framing Matters in 2026
- How Exterior Framing Works (Step-by-Step)
- Types/Methods/Approaches
- Best Practices that Prevent Rework
- Tools, Submittals, and Resources
- Case Studies and Examples
- FAQ
- Key Takeaways and Next Steps
Overview
Exterior steel stud systems combine light and heavy gauge studs, standard or slotted deflection track, deep track, bridging channel, and clips to create plumb, resilient exterior walls. Choosing gauges, spacing, and slip details correctly speeds enclosure, keeps facades true, and avoids cracked finishes as the structure moves.
Think of the exterior wall as a spring-frame that must resist wind, align cladding, and allow the primary structure to breathe. Your details—L/240 vs L/360, 16 vs 24 inches on center, G60 vs G90—decide whether the envelope stays clean when winter hits.
Local considerations for 370 New Enterprise Way
- Stage deliveries to avoid congestion near Highway 50 – Zum Queen Stop EB and the Queen St / Highway 50 corridor; plan off-peak windows when possible.
- Freeze–thaw cycles in the Regional Municipality of York warrant G90 on exposed edges and storing bundles off grade under breathable covers.
- For cross-border projects, align submittals to the specified code set and include sealed load tables in both imperial and metric units.
What Is Exterior Framing?
Exterior framing is a cold-formed steel (CFS) wall assembly that transfers wind pressure to the structure, supports cladding, and interfaces with the air/water barrier. It uses studs, track (standard, deep, or slotted for movement), bridging channel, clips, and bracing to keep exterior walls plumb and resilient.
Exterior framing sets the plane for everything outside—sheathing, WRB, insulation, and facade. When specs call for slip at the head-of-wall, slotted deflection track protects finishes by allowing vertical movement without binding studs to the structure.
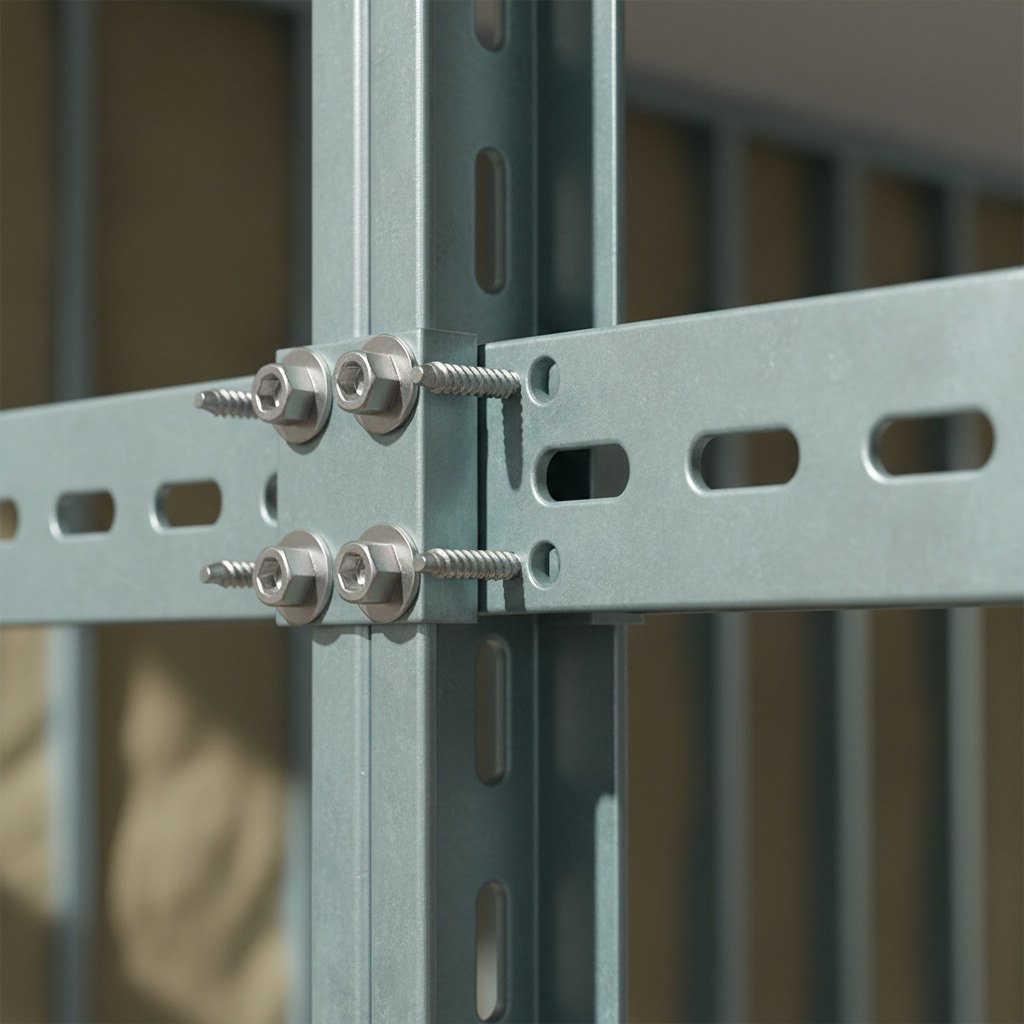
- Core components: steel studs (20–12 gauge), standard or slotted deflection track, deep track, bridging/carrying channel, bracing/windbrace, furring, and connection clips.
- Roles: transfer wind to structure, align cladding, create insulated cavities, and maintain a continuous WRB/CI plane.
- Typical spacing: 16 or 24 inches o.c., tightened for heavier cladding or higher design pressures.
- Related reading: our exterior metal stud framing explainer deepens the basics with field visuals.
In our experience, the right head-of-wall choice (standard vs slotted) prevents 80% of finish cracks around slab edges. For more fundamentals on members and dimensions, see our steel studs guide and this metal framing systems overview.
Why Exterior Framing Matters in 2026
Exterior framing controls enclosure speed, energy performance, and facade alignment. In 2026, tighter air/water targets and busier schedules demand calibrated deflection, reliable corrosion protection, and repeatable quality checks—especially for crews building around 370 New Enterprise Way in the Regional Municipality of York.
Here’s why getting it right is non‑negotiable this year.
- Schedules: Faster enclosure reduces weather exposure days, shortens critical-path durations, and protects interior trades.
- Performance: True studs and consistent bridging produce flat planes for high-performance cladding and continuous insulation.
- Compliance: Deflection criteria (e.g., L/240 for many facades, L/360 for brittle finishes) and slip details prevent finish cracking.
- Risk control: Squared openings, specified fastener patterns, and proper galvanization reduce callbacks and punch-list churn.
We frequently tailor gauges and lengths for repetitive bays. Pre-cut, labeled bundles shave hours per elevation—simple logistics that compound across a multi-story envelope.
How Exterior Framing Works (Step-by-Step)
Exterior framing follows a six-step path: engineer and submit, lay out and anchor track, install studs, add bridging/bracing, coordinate interfaces and sheathing, then verify and document. Treat each step as a checkpoint to eliminate RFIs and maintain plumb, level, and true walls.
Use this field-tested workflow to set pace and prevent surprises.
- Engineering and submittals
- Confirm design pressures, stud depth and gauge, and track type (standard, deep, or slotted deflection).
- Set deflection criteria (L/240 vs L/360) and head-of-wall slip allowances.
- Select corrosion coating (G60 vs G90) and plan the CI/furring interface.
- Cross-check with our steel studwork guide for layout fundamentals.
- Layout and anchorage
- Snap control lines; verify slab-edge tolerances and shim where needed.
- Install bottom/top track with specified anchor spacing and edge distances.
- Use deep track where engagement length is critical; use slotted track at non-load-bearing heads.
- Stud installation
- Cut and seat studs square; check plumb every lift.
- Set 16 or 24 inches o.c. per design; two screws per leg unless otherwise detailed.
- Frame openings with jamb/king, headers, and cripples per engineered sheets.
- Bridging and bracing
- Install bridging/carrying channel at the prescribed vertical coursing (often 4–6 feet).
- Fasten with the specified bridging clip; add windbrace where noted.
- Keep coursing consistent to flatten the sheathing plane.
- Interfaces and sheathing
- Coordinate air/water barrier sequence and continuity with trades.
- Sheath with approved boards; stagger joints; hold edge clearances.
- Maintain a continuous furring plane for CI; use Z-Bar shims if required.
- QC and documentation
- Verify deflection clearances, clip placements, and fastener embedment.
- Photograph concealed conditions before WRB; sign off by elevation.
- File marked-up drawings for turnover.
For more on layout logic and system choices, our structural framing guide connects member selection to real-world spans and deflection.
Types/Methods/Approaches
Exterior steel stud systems vary by structural role: non-load-bearing curtain walls that carry wind only, load-bearing walls that stack gravity and wind, and rainscreen subframing that aligns cladding and insulation. Select gauges, spacing, and slip details to match loads, finishes, and movement.
Here’s how to classify what you’re building and choose details that last.
- Non-load-bearing curtain walls: carry wind only; typically use slotted deflection track at head and standard track at sill.
- Load-bearing exterior walls: heavier gauges (18–12 ga), deep track engagement, and tighter spacing for stacked gravity paths.
- Rainscreen subframing: Z-Bar and furring channel to align CI with drainage/ventilation gaps.
- Parapets/soffits: additional bracing, corrosion protection, and attention to cap/edge details.
- Shaft perimeters: shaftwall/CH studs with head-of-wall slip details for movement.
| Head Detail | When to Use | Key Benefit | Watch Out For |
|---|---|---|---|
| Standard track | Load-bearing heads without required slip | Rigid engagement | Finish cracking if movement occurs |
| Slotted deflection track | Non-load-bearing heads with live-load/thermal movement | Allows vertical slip | Maintain specified clearance at top of studs |
| Deep track | Tall walls and heavy gauges | Improved stud engagement | Verify fastener reach and edge distances |
If your project mixes conditions, document transitions clearly on elevations. Our team often fabricates special profiles to simplify those intersections and reduce field cutting.
Best Practices that Prevent Rework
Focus on three big wins: correct deflection strategy, consistent bridging coursing, and durable corrosion protection. Combine those with squared openings, verified fastener patterns, and clean WRB sequencing to keep facades flat and finishes crack-free under movement.
These habits keep schedules tight and inspections smooth.
- Dial in deflection: Use slotted head-of-wall where slip is required; hold the manufacturer’s vertical clearance above studs.
- Standardize bridging: Run bridging channel every 4–6 feet vertically (per design) with specified clips; keep coursing uninterrupted.
- Protect against corrosion: Choose G90 near exposure, seal cut edges, and store bundles off grade under breathable covers.
- Prefabricate repeats: Build jamb/header kits for repetitive windows; it flattens learning curves across crews.
- Sequence WRB: Lap shingle-style; avoid reverse laps and over-driven fasteners that puncture barriers.
- Document QC: Photograph concealed work and track fastener counts and clip locations by elevation.
For a refresher on interior-to-exterior transitions and spacing norms, review our interior stud wall framing primer. For system-level thinking, see the steel framing system guide.
Tools, Submittals, and Resources
A strong exterior framing package includes sealed load tables, product data for clips and tracks, safety and QC checklists, and labeled bundles that match elevations. Organize these before mobilization to compress RFIs and speed approvals on each elevation.
Set your team up with the right gear and documents.
- Engineering resources: imperial/metric load tables for studs and deep track; deflection criteria; clip capacities.
- Product sheets: slotted deflection track, deflection clips, webslide clips, bridging clips, windbrace, furring channel, Z-Bar, trims (J/L), and cornerbeads (90°/130°).
- Safety: lift plans, edge protection, torque-controlled drivers, and bit sets matched to self-drilling fasteners.
- Field checklists: stud spacing, fastener counts, clip positions, head-of-wall clearance, and sheathing fastening patterns.
For a broader primer on light-gauge fundamentals, see this light-gauge framing review. For residential crossover context, an industry guidance article discusses sequencing and inspection habits that translate well to commercial crews.
Need a second set of eyes on spans or slip details? Our engineering-backed team in Vaughan helps contractors align gauges, spacing, and head-of-wall details before materials hit site.
- Send elevations and design pressures
- Get calibrated gauges, spacing, and clip types
- Schedule deliveries that match your install rhythm
Start with our steel studs guide, then get project-specific with our team.
Case Studies and Examples
Most delays trace back to three patterns: wrong head-of-wall choice, inconsistent bridging, and underspecified corrosion details. These short scenarios show how minor adjustments—heavier gauges, added coursing, or true slip—restore alignment and protect finishes.
Scenario 1: High-wind retail facade
- Issue: 6-inch, 20-ga studs at 24 inches o.c. showed excessive mid-span deflection.
- Action: Shifted to 18-ga and tightened spacing; added mid-height bridging channel.
- Result: Plumb plane, reduced joint cracking, and cleaner panel reveals.
Scenario 2: Head-of-wall movement
- Issue: Hairline gypsum cracks at slab edges on non-load-bearing walls.
- Action: Installed slotted deflection track with correct slip allowance; used deflection clips at steel-to-steel interfaces.
- Result: Movement absorbed; cracks eliminated on subsequent lifts.
Scenario 3: Rainscreen alignment
- Issue: Continuous insulation (CI) and furring plane stepped across bays.
- Action: Added Z-Bar shims, confirmed coursing, and checked fastener embedment depth.
- Result: Flat plane for cladding installers and fewer change orders.
For additional context on sequencing and inspection priorities, this brief on code considerations highlights documentation habits that help during exterior inspections too.
Frequently Asked Questions
These quick answers address the exterior framing questions we hear most from site supers and framing leads. Each response is direct, code-conscious, and ready for toolbox talks or pre-task planning meetings.
What’s the difference between standard and slotted deflection track?
Standard track locks studs to the structure and is common in load-bearing heads. Slotted deflection track includes vertical slots so studs can slip as the structure moves. Use slotted heads for non-load-bearing walls with live-load or thermal movement to prevent finish cracking.
How often should I run bridging channel on exterior walls?
Many designs specify bridging every 4–6 feet vertically, but always follow engineered submittals that reflect wind pressure, stud depth, and gauge. Keep coursing consistent across bays to flatten the sheathing plane and improve cladding alignment.
Do I need deep track, or will standard track work?
Deep track improves stud engagement and is frequently used on tall or load-bearing walls. Standard track is common on typical heights. Follow the detail for track depth, fastener reach, and edge distances to maintain capacity.
What stud spacing is typical for exterior walls?
Sixteen or 24 inches on center are common baselines. Heavier cladding or higher design pressures often call for tighter spacing or heavier gauges. Confirm with sealed load tables and the specified deflection criterion for your finish materials.
Key Takeaways and Next Steps
Exterior framing success hinges on calibrated movement control, consistent bridging, and durable corrosion strategy. Combine those with squared openings, verified fasteners, and organized submittals to shorten enclosure cycles and keep facades flat.
- Exterior framing sets enclosure speed and facade quality—treat it like the critical path it is.
- Deflection details, bridging layout, and corrosion protection are the big three.
- Use sealed load tables and clip data to lock decisions before mobilizing.
- Leverage our engineered components and custom profiles to reduce cutting and waste.
Want help calibrating gauges, spans, and delivery windows? Our Vaughan-based team supports Ontario and cross-border projects with engineering-backed components and timely logistics. Explore our system-level guide, then loop us in early to keep installation moving.
