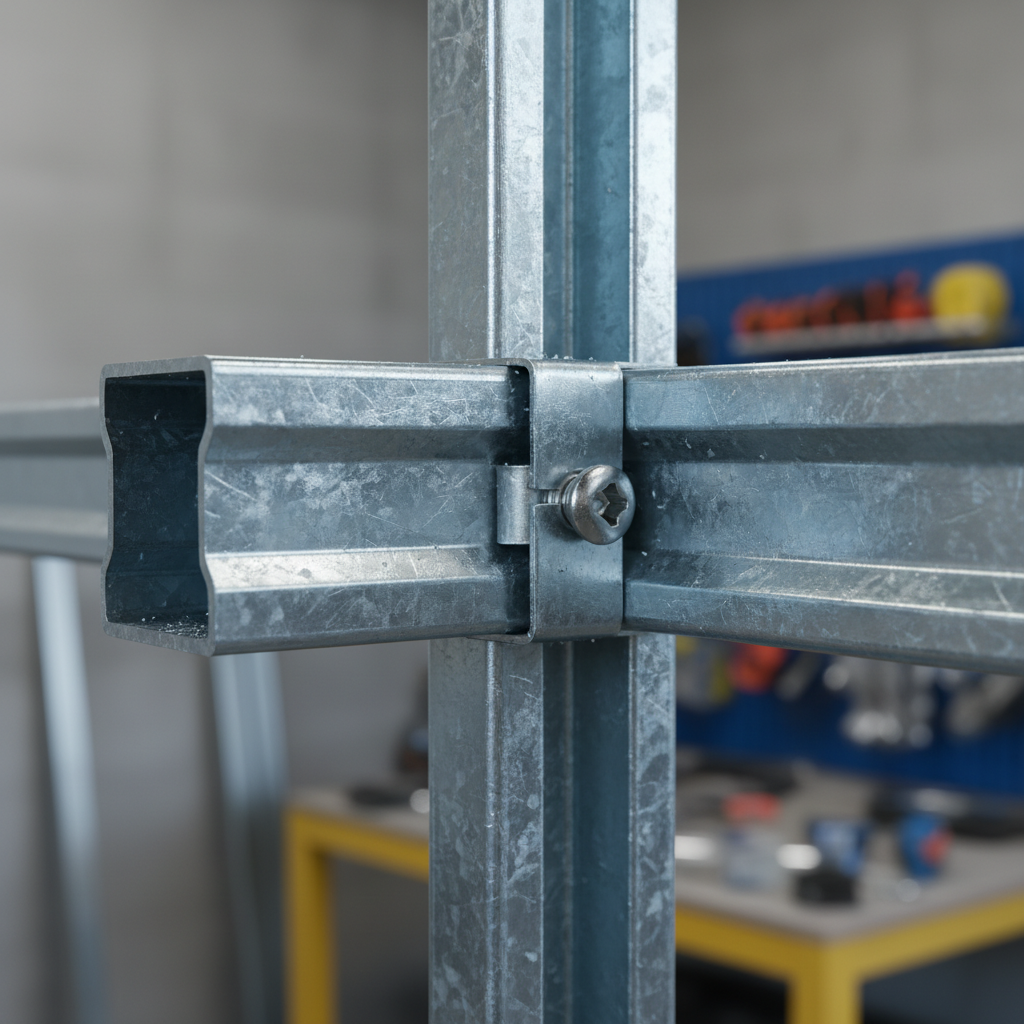
Bridging channel is the horizontal steel member that braces metal studs to prevent twist, bow, and vibration. It ties stud flanges together so walls stay straight, doors align, and finishes don’t crack. At 370 New Enterprise Way in Vaughan, Ontario, Dass Metal Products manufactures bridging/carrying channel engineered for fast installs and code-ready performance.
By Navjot Dass — Dass Metal Products
Last updated: June 4, 2026
Above-Fold Overview
This guide explains what bridging channel is, why lateral bracing matters, and how to select, space, and install it. You’ll see best practices, coordination tips for deflection and acoustics, tool checklists, and real project examples using Dass Metal Products components.
Here’s what you’ll get from this complete guide:
- Clear definitions of bridging/carrying channel, CRC/U-channel, straps, and proprietary systems
- Actionable steps for layout, fastening, and inspection
- Spacing guidance commonly used for interior partitions
- Coordination with slotted deflection track, openings, MEP, and resilient systems
- On-site examples drawn from Dass Metal’s framing workflow
At a Glance
- Stud spacing usually 16 or 24 inches on center; bridging lines often set at 48 inches maximum between rows for non-load-bearing interiors.
- Typical carrying channel arrives in 10- or 12-foot lengths for quick stringing across bays.
- Self-drilling fasteners (No. 8) and bridging clips speed consistent installation and inspection.
Table of Contents
- What Is a Bridging Channel?
- Why Bridging Matters
- How Bridging Channels Work
- Types of Bridging and Alternatives
- Installation Process: Step-by-Step
- Spacing, Clips, and Deflection Coordination
- Acoustic and MEP Considerations
- Best Practices and Common Mistakes
- Tools, Resources, and Submittals
- Case Studies and Examples
- Local Specs and Logistics
- FAQ
- Key Takeaways & Next Steps
What Is a Bridging Channel?
A bridging channel is a horizontal steel member—also called carrying channel or CRC/U-channel—installed between studs to restrain twist, stiffen the wall, and control vibration. It connects through slots or clips to form a rigid bracing line, improving straightness, door operation, and finish quality.
In steel stud framing, studs act like slender columns. Without lateral restraint, they can rotate or bow under handling, gypsum load, or door impacts. Bridging channel provides that restraint, linking studs into a stable plane. For product specifics, see our bridging/carrying channel page.
You’ll also hear related terms on drawings: CRC (cold-rolled channel), U-channel, and strap bracing. They serve the same purpose—lateral bracing—with different geometries and connectors. The right choice depends on stud gauge, wall height, layout, and coordination with deflection and services.
Why Bridging Matters
Bridging increases lateral stiffness, keeps studs plumb, and reduces cracking and call-backs. It supports door and frame alignment, improves wall feel, and helps meet design bracing requirements. The result is straighter walls, quieter rooms, and fewer punch-list surprises.
Bracing isn’t optional in quality framing—it’s how you translate material specs into finished performance. Consider a 12-foot non-load-bearing corridor framed at 25-gauge with studs at 24 inches on center. One mid-height bracing line can cut perceived wall “drum” significantly and reduce rework on reveals and trim.
- Straightness and flatness: Bridging reduces stud roll at mid-height where deflection is greatest.
- Door/frame reliability: Latch strikes and hinges stay aligned because jamb studs don’t twist under traffic.
- Finish durability: Joint compound and reveals crack less when the substrate stays rigid and in-plane.
- Inspection clarity: A continuous bracing line at common heights (often 4 feet on center vertically) makes fast visual checks possible.
For a deeper structural context, our steel frame bracing guide outlines how bracing interacts with framing loads, door cycles, and service openings across typical commercial interiors.
How Bridging Channels Work
Bridging channels restrain stud flanges from rotating by tying adjacent studs together along a straight line. This creates a lateral bracing “rail” that limits twist and bow, distributes incidental loads, and gives gypsum a more uniform, quieter substrate.
Mechanically, a stud is most vulnerable to torsional-bending near mid-height. Installing a continuous channel at or near that zone changes the system’s effective slenderness and reduces local rotation. When multiple lines are used (for taller walls), the effect compounds—each rail trims movement between rails, keeping the assembly flatter.
- Load sharing: Impacts to one stud dissipate through clips and the channel to neighbors.
- Torsional restraint: The channel checks flange roll, increasing the torsional constant of the assembly.
- Gypsum support: A quieter, more uniform field reduces “oil canning” and hollow sound.
| Wall height | Common bracing pattern | Notes |
|---|---|---|
| 8–10 ft | 1 line at mid-height | Good for light-gauge partitions with doors. |
| 10–14 ft | 2 lines (~4 ft spacing) | Controls mid-span roll in corridors and lobbies. |
| 14–20 ft | 3+ lines (≤4 ft apart) | Coordinate with MEP and openings before layout. |
We recommend confirming exact bracing requirements with the project’s engineer of record. For system design considerations, see our steel framing system overview.
Types of Bridging and Alternatives
Four approaches dominate interiors: carrying/bridging channel, CRC/U-channel, strap bracing, and proprietary bars with dedicated clips. Each balances speed, stiffness, cost, and coordination. Carrying channel with clips is the most common for fast, consistent installs.
Common options
- Carrying/bridging channel: Roll-formed member that threads through or clips onto studs. Fast, repeatable, great for straight walls. Pairs with purpose-built bridging clips.
- CRC/U-channel: Cold-rolled, placed through pre-punched stud knockouts, pinned or screwed. Excellent stiffness; plan knockout alignment.
- Strap bracing: Flat strapping screwed to flanges at an angle or horizontal. Simple and light; relies on screw patterns for stiffness.
- Proprietary systems: Engineered bars or bridge members with tested clips for high-speed installation and predictable performance.
| Method | Speed | Stiffness | Coordination | Typical use |
|---|---|---|---|---|
| Carrying channel + clip | High | High | Easy around MEP | Most interior partitions |
| CRC/U-channel | Medium | Very high | Needs aligned knockouts | Taller walls, straight runs |
| Strap bracing | Medium | Medium | Good in tight spaces | Short walls, infill |
| Proprietary bar | Very high | High | Clip-specific | Schedule-driven jobs |
For terminology and component context, our metal framing channel guide clarifies where furring, resilient, and bridging channels differ in geometry and purpose.
Installation Process: Step-by-Step
Lay out heights, pre-cut channel, then clip and fasten from one end to the other, keeping a taut line. Stagger joints and verify screw engagement at every stud. Finish with an inspection pass before gypsum.
- Confirm layout: Mark bracing lines on studs—commonly one at mid-height for 8–10 ft walls, then at ~4 ft intervals on taller walls.
- Pre-cut and stage: Cut channel to length allowing for staggered joints. Pre-sort bridging clips and No. 8 self-drilling screws.
- Start plumb: Anchor the first clip and channel segment at a corner or control point. Pull a string line if needed.
- Run the line: Progress bay by bay. Keep the channel level; avoid pushing studs out of plumb while fastening.
- Stagger joints: Offset end joints between adjacent lines to avoid a weak plane.
- Secure ends: At terminations and jamb studs, add a dedicated clip to keep the rail tight under traffic.
- Inspect: Check every bay for screw engagement and clip seating before closing the wall.
Teams that stage channel in 10- or 12-foot pieces and pre-assemble clips per bundle typically maintain consistent pace and quality. For heavy-gauge and tall runs, review our heavy gauge framing guide before mobilizing.
Spacing, Clips, and Deflection Coordination
Use consistent vertical spacing—often 48 inches or less between lines—and purpose-built clips. Coordinate with slotted deflection track at the head so bridging never bypasses the slip condition or restricts allowable movement.
- Vertical spacing: For interiors, many specs cap bracing line spacing at ≤4 feet. Taller walls need more lines.
- Clip selection: Use tested bridging clips that fit your stud gauge and channel profile.
- Deflection track: Where a slotted deflection track is specified, do not tie bridging into fixed structure at the head. Maintain the designed gap.
- Openings: Add short returns of channel near door jambs and borrowed lites to keep studs from racking under use.
Coordinating early avoids rework. If you’re new to sizing and gauge choices for mixed-height areas, our steel framing dimensions guide is a practical starting point.
Acoustic and MEP Considerations
Bridging should stiffen the stud field without short-circuiting acoustic systems. Keep resilient and furring channels independent, and route MEP to avoid bearing on bracing lines that could transmit noise.
- Resilient layouts: Don’t fasten gypsum through resilient channel into bridging. Maintain decoupling so STC targets hold.
- Furring channel alignment: Where veneer or cladding uses furring, keep a consistent plane; avoid stacking fastener lines.
- MEP routing: Coordinate conduit and plumbing so they don’t bear on the bridging rail—contact points can create buzz or telegraph through finishes.
For foundational differences between cladding supports and lateral bracing, revisit our light gauge framing guide which distinguishes structural restraint from finish attachment elements.
Best Practices and Common Mistakes
Stage materials, pull a control line, use matching clips and screws, and inspect before close-in. Avoid misaligned knockouts, over-tightened screws that crush webs, and any attachment that defeats head-of-wall deflection.
Best practices
- String a chalk or laser line to keep rails dead level over long corridors.
- Stagger end joints and avoid creating a continuous weak seam.
- Use manufacturer-matched clips and screws for your stud gauge.
- Add short returns of channel at high-traffic openings.
- Inspect every bay for screw engagement before gypsum goes up.
Common mistakes
- Forgetting to account for head-of-wall slotted deflection track, effectively locking the top of the wall.
- Threading CRC through knockouts that don’t align, twisting studs in the process.
- Over-driving fasteners, dimpling the web and inviting finish issues.
- Letting MEP rest on the rail, which can introduce noise and vibration.
For a broader framing quality checklist, see our orientation article why steel framing matters for safer builds.
Tools, Resources, and Submittals
Prepare a simple kit: snips, screw guns, laser/chalk, clips, screws, and pre-cut channel. Add submittals—product data, load notes, and movement details—so GC and inspectors can verify bracing and head-of-wall conditions quickly.
- Field tools: Tape, laser/chalk line, aviation snips, screw guns with depth control, PPE, and a square for door zones.
- Hardware: No. 8 self-drilling screws matched to gauge; manufacturer-specified bridging clips.
- Docs: Product sheets, typical spacing guidance, and deflection details packaged with shop drawings.
Cross-trade planning pays off. For example, coordinating with reinforcing and slab teams on anchor sequencing reduces conflicts at door thresholds; see this steel rebar guide for related structural sequencing concepts. When basement partitions are part of the scope, contractor playbooks like this basement framing guide can help align expectations about substrate flatness and moisture checks.
When your assemblies include welded wire mesh or rebar zones nearby, scheduling with our JDass affiliates can streamline delivery and staging; background concepts for stirrup placement are summarized in this rebar stirrups guide.
Need a quick submittal pack? Our team assembles product data, typical details, and a takeoff of bridging/carrying channel so your bracing plan is clear before crews mobilize.
Start with our bridging/carrying channel and we’ll help align clips, spacing, and deflection details.
Case Studies and Examples
These brief scenarios show how proper bridging boosts quality and speed. They highlight layout choices, clip selection, and coordination wins our customers achieved with Dass Metal Products.
1) Medical office corridor, 12 feet high
- Challenge: Long corridor (120 LF) framed at 25-gauge, 24 inches o.c., with multiple door frames.
- Approach: One mid-height line of carrying channel with returns at jambs; laser-controlled layout.
- Result: Noticeably tighter door operation and fewer drywall touch-ups at reveals post-paint.
2) Retail back-of-house, 14 feet high
- Challenge: Mixed-height partitions with heavy shelving impacts.
- Approach: Two bracing lines at ~4 feet spacing; CRC used across straight runs with aligned knockouts.
- Result: Reduced wall “drum,” better anchorage for accessories, clean inspection sign-off.
3) School renovation, varied MEP
- Challenge: Dense conduit crossing suspected bracing lines.
- Approach: Switched to clip-on carrying channel to weave between services; added door returns.
- Result: No rework for MEP conflicts; continuous bracing achieved without cutting knockouts.
4) Multi-family amenity space, acoustic goals
- Challenge: STC targets with resilient channel on one side.
- Approach: Maintained decoupling; ensured gypsum fasteners never bridged through resilient to the bracing rail.
- Result: Acoustic consultant verified performance within design tolerance after finishes.
5) Industrial office, door traffic
- Challenge: Heavy traffic at double doors near corners.
- Approach: Added short bridging returns both sides of jamb studs; confirmed plumb with laser.
- Result: Frames stayed aligned during move-in; no hinge shim changes after two weeks of use.

For more context on channel profiles across applications, scan our channel stud guide and broader steel framing systems guide.
Local Specs and Logistics for Vaughan Projects
For projects near 370 New Enterprise Way in Vaughan, within the Regional Municipality of York, plan bracing lines early, coordinate deliveries to tight sites, and confirm head-of-wall movement expectations with your GC before close-in.
Our facility’s proximity to key routes helps staging and quick-turn resupply. We work with crews across Ontario and support Canada–US delivery schedules, aligning bracing materials with stud shipments so your field teams can keep moving without gaps between framing and close-in.
Local considerations for 370 New Enterprise Way
- Stage deliveries to avoid peak activity near the Highway 50 – Zum Queen Stop EB area; short windows keep corridors clear for crews.
- Winter work? Keep channel and clips conditioned indoors before install; cold metal can affect fastener bite and pace.
- For downtown-style logistics in the Regional Municipality of York, request bundled bracing-by-zone so foremen can release areas as inspections finish.
Frequently Asked Questions
These answers address the most common jobsite questions about bridging channel—spacing, clip choice, CRC vs. carrying channel, and coordination with deflection and acoustics.
How far apart should bridging lines be?
For many interior partitions, crews set lines at or below 48 inches apart vertically, with a single mid-height line on 8–10 ft walls. Taller walls typically need additional lines. Always follow the project drawings and the engineer’s requirements.
Is carrying channel better than CRC?
It depends on the wall. Carrying channel with clips installs quickly and works well when knockouts or services don’t line up. CRC can deliver excellent stiffness on straight runs with aligned knockouts. Both are proven; choose based on layout, height, and schedule.
Do I need special clips for bridging?
Use manufacturer-matched bridging clips and self-drilling screws suited to your stud gauge and channel profile. Purpose-built clips speed installation, improve consistency, and simplify inspection across long runs.
How does bridging interact with slotted deflection track?
Bridging must not bypass the slip at the head-of-wall. Keep bracing lines independent of fixed structure at the top track so the wall can move within the designed deflection gap without transferring load.
Key Takeaways & Next Steps
Use bridging channel to lock in wall straightness, door reliability, and quieter finishes. Plan lines early, match clips to gauge, coordinate with deflection and acoustics, and inspect before gypsum for a clean handoff.
- Bridging channel restrains twist and bow—vital for straight, quiet walls.
- Common interior spacing is one line mid-height up to 10 ft, then ≤4 ft between lines above that.
- Coordinate with slotted deflection track, openings, and MEP to avoid rework.
- Use matched bridging clips and check every bay before close-in.
Ready to spec or stage materials? Explore our bridging/carrying channel, then connect with our engineering support for submittals and takeoffs.
