Steel wall studs are cold-formed, C-shaped metal members used to frame interior and exterior walls. They deliver straight, fire-resistant, and dimensionally stable support for drywall and sheathing. At Dass Metal Products in Vaughan (370 New Enterprise Way), contractors use engineered studs and tracks to speed installs, meet code, and achieve durable results.
By Navjot Dass • Dass Metal Products
Last updated: 2026-06-18
Quick Summary
Steel wall studs are precision-formed metal framing members for non-load-bearing and structural walls. They resist fire, moisture, and warping while supporting drywall and sheathing. Choose gauge by height and load, select the right track (standard, deep, slotted), and stiffen with channels and clips to control deflection and vibration.
This complete guide is built for site leads, estimators, and specifiers. You’ll learn how to select gauges, lay out tracks, brace tall walls, and finish edges so inspections move fast and rooms finish clean. We also include local supply tips for Vaughan and the Regional Municipality of York.
- Clear definitions and why steel studs matter
- Step-by-step framing workflow with QA checkpoints
- Gauges, spacing, and head-of-wall movement details
- Channels, clips, trims, and acoustic elements you’ll use
- Local supply, real-world examples, and quick FAQs
At a glance: table of contents
- What are steel wall studs?
- Why steel studs matter
- How steel stud framing works
- Types, tracks, channels, clips
- Best practices that cut rework
- Tools and resources
- Local supply and logistics
- Case studies and examples
- Frequently Asked Questions
- Conclusion and next steps
What Are Steel Wall Studs?
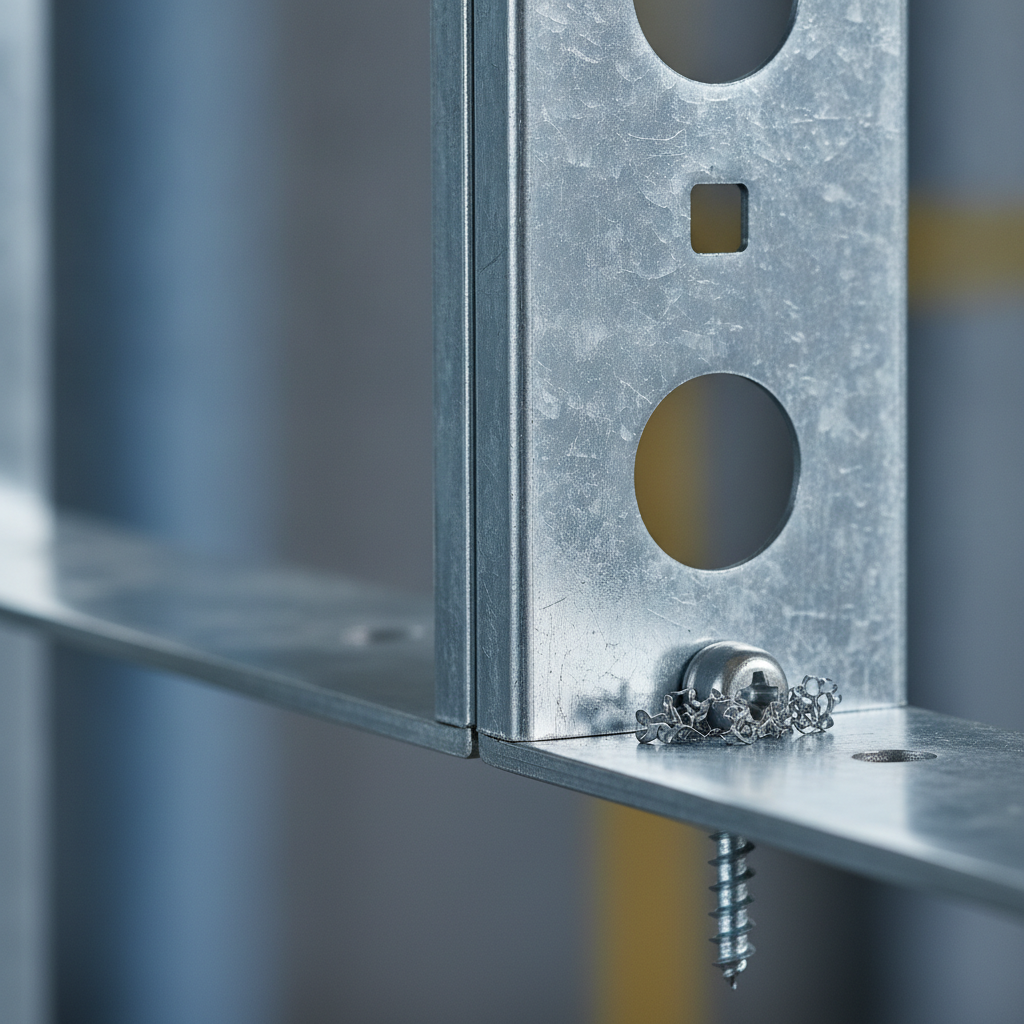
Steel wall studs are cold-formed, galvanized C-shaped members that create the vertical framework of walls. Used with steel tracks, they support gypsum board and sheathing without shrinking, twisting, or feeding mold. Web sizes commonly range from 1-5/8 in. to 8 in., and gauges span 25 to 12 for non-structural and structural applications.
In practice, studs slide into a floor and ceiling track, fasten with self-drilling screws, and form the wall’s skeleton. Light gauge profiles (25–20 gauge) frame most interior partitions, while heavier gauges (18–12 gauge) handle tall walls, shaftwall systems, and engineered load-bearing assemblies.
- Common widths: 1-5/8, 2-1/2, 3-5/8, 6, and 8 inches cover most partitions and tall walls.
- Typical lengths: 8–14 ft off the shelf; custom cut-to-length supports higher floors and special geometry.
- Coatings: Galvanized steel resists corrosion in humid spaces; select per exposure and code.
- Compatibility: Works with gypsum, cement board, exterior sheathing, and specialty boards.
As a Canadian manufacturer, Dass Metal produces light and heavy gauge studs, tracks, channels, and finishing trims to published standards, backed by engineering support and submittal documentation. For deeper background on when to prefer steel over wood for straightness and fire performance, see our guide on using steel studs.
Why Steel Wall Studs Matter: Safety, Codes, and Longevity
Steel wall studs deliver predictable strength, fire resistance, and moisture tolerance with consistent dimensions. That reliability streamlines inspections and reduces rework. With the right channels, tracks, and clips, they meet deflection, bracing, and acoustic needs in commercial, institutional, and multifamily projects.
Performance and compliance drive material choices. Steel framing stays straight, doesn’t host mold, and helps assemblies achieve tested fire and acoustic ratings. Dimensional consistency speeds layout and reduces shim work. Where codes require head-of-wall movement, slotted deflection track and deflection clips manage building drift without cracking finishes.
- Fire and smoke: Noncombustible studs support rated wall designs across occupancies.
- Acoustics: Resilient channel and insulation improve STC; decouple where privacy matters.
- Deflection: Slotted track, deflection side clips, and webslide clips accommodate movement.
- Bracing: Bridging/carrying channel and clips stiffen studs against buckling.
- Sustainability: Steel is recyclable and supports circular construction approaches.
On large interiors, layout productivity rises after the first few bays as crews standardize spacing (16 or 24 in. o.c.) and repeat screw patterns. Consistency equals speed—especially on multi-floor fit-outs with repeating room types. For a broader framing overview, our steel stud wall framing guide covers system-level planning.
How Steel Stud Framing Works (Step-by-Step)
Steel stud framing sets level tracks, places studs at designed spacing, and secures with screws while managing deflection and bracing. Crews add services, sheathing, and finishes in sequence. Quality hinges on accurate layout, correct gauge selection, and channels, clips, and fasteners matched to the assembly.
Field-proven workflow
- Review documents: Confirm wall types, gauges, heights, and head-of-wall requirements. Flag tall walls needing bridging.
- Layout: Snap lines, set door/control points, and mark spacing (16 or 24 in. o.c.). Verify plumb with a laser.
- Tracks: Install standard track for typical walls, deep track for tolerance at slab edges, and slotted deflection track where vertical movement is specified.
- Set studs: Insert studs into tracks; plumb and screw flanges per pattern. Check crown orientation on repeats.
- Brace: Add bridging/carrying channel and bridging clips per height and load schedule.
- Openings: Frame jambs, headers, and sills with appropriate gauge and connectors. Confirm rough openings with door frames.
- MEP rough-in: Route through punch-outs; add grommets as required by spec. Protect edges at high-traffic locations.
- Insulation & acoustics: Place batts; add resilient channel where specified. Keep screws out of studs.
- Sheathing/drywall: Hang boards per fastener spacing. Stagger joints and leave control joints as designed.
- Finishing: Use trims (J/L trim, cornerbead) for clean, durable edges and faster mudding.
| Task | Primary Component | Key Check |
|---|---|---|
| Head-of-wall | Slotted deflection track | Slot length matches required movement; correct fastener pattern |
| Mid-height bracing | Bridging channel + clips | Spacing meets stud height/load; secure clip engagement |
| Acoustic decoupling | Resilient channel | Correct orientation and spacing; screws only to channel |
Crews save hours by staging tracks and pre-cut studs by zone. For curved walls, U-Flex track speeds layout. For shafts, shaftwall CH studs support liner panel systems and rated designs. For a light-gauge primer with common pitfalls, read our light gauge studs starter.

Soft CTA: Need stamped submittals or load tables? Our engineering team at Dass Metal will package gauges, spacing, channels, and clips that match your wall heights and movement requirements. Start here: talk to our team.
Types, Tracks, Channels, and Clips You’ll Actually Use
Use light gauge studs for interior partitions and heavy gauge for tall or load-bearing walls. Pair studs with the right track (standard, deep, or slotted), then add bridging channel, resilient channel, and purpose-made clips. Finishing trims and accessories protect edges and speed taping.
Studs and tracks
- Non-load-bearing studs (light gauge): Ideal for 8–14 ft interior partitions where axial loads are negligible.
- Load-bearing stud framing (heavy gauge): Engineered profiles for axial/lateral loads and tall walls.
- Standard track: Everyday partitions, corridors, and demising walls.
- Deep track: Extra tolerance at slab edges and where movement joints intersect partitions.
- Slotted deflection track: Manages building drift at head-of-wall without cracking finishes.
- U-Flex track: Forms curves cleanly without segment cutting.
To compare system layouts and spacing options, see the framing overview in our studs explained guide.
Channels and acoustic elements
- Bridging/carrying channel: Ties studs to resist buckling; spacing increases with height.
- Resilient channel: Decouples gypsum board to raise STC on demising walls.
- Furring channel: Levels uneven substrates and creates service cavities.
Clips, bracing, and finishing
- Deflection side clip: Lateral restraint with vertical slip at the head for drift.
- Webslide clip: Adjustable connection allowing movement and tolerance.
- Windbrace: Lateral resistance on exterior or tall interior partitions.
- Trims: J trim, L trim, and 90°/130° cornerbead protect edges and speed taping.
For a wall-by-wall playbook—when to specify resilient channel vs. double-stud, or where bridging is mandatory—bookmark our steel studs guide and share it with your QA team.
Best Practices That Cut Rework
Winning practices are straightforward: choose the correct gauge for height and load, use slotted head-of-wall details where required, brace with bridging per schedule, and follow tested acoustic/fire details. Pre-stage materials, verify layout, and document QA checkpoints to prevent callbacks.
Design and submittal discipline
- Gauge selection: Use engineering tables for stud height vs. load to prevent mid-height bowing.
- Spacing: 16 in. o.c. improves stiffness; 24 in. o.c. works with the right board and bracing.
- Head-of-wall movement: Match slotted track slot length and clip pattern to deflection requirements.
- Acoustics: Keep resilient channel screws out of studs to preserve decoupling.
- Corrosion: Select galvanized coatings per exposure; protect cut edges in aggressive environments.
- Fasteners: Use listed self-drilling screws; maintain consistent edge distances at flanges.
Field productivity
- Zone staging: Pre-bundle studs and tracks by room stack; cut repetitive lengths upfront.
- Laser control: Keep a continuous reference line; add a temporary ledger at board height.
- Service coordination: Align punch-outs; reserve MEP chases to avoid late rework.
- Protection: Use trims early near door frames and corners to reduce patching.
Here’s the thing: the most common cause of cracked joints isn’t “bad mud”—it’s missing head-of-wall movement. Build those details into submittals and pre-installs, and inspection walks get much shorter. For wall framing fundamentals, our drywall metal studs guide is a quick refresher.
Tools and Resources for Specifiers and Site Leads
Specifiers and site leads should use product brochures, engineering load tables, and MSDS to build accurate submittals. Dass Metal supplies imperial and metric data, profile diagrams, and detailing guidance, reducing RFIs and accelerating approvals from design through inspection.
What to keep in your packet
- Load tables: Select stud gauge and spacing by wall height and design load.
- Standards: Align submittals to recognized framing standards for nonstructural and structural members.
- Brochures + diagrams: Confirm dimensions, lips, and punch-out geometry per profile.
- MSDS: Provide coating/handling documentation and safety notes.
- Submittal pack: Combine datasheets, test references, and shop details in CSI order.
We routinely package profiles and tables to match your project numbering so reviewers can cross-check quickly. For system-level insights at bid time, our framing studs explainer highlights where tighter spacing or heavier gauges reduce finish risk.
Local Supply in Vaughan and the Regional Municipality of York
Contractors near 370 New Enterprise Way in Vaughan benefit from quick-turn pickup and regional delivery across the Regional Municipality of York. Dass Metal’s Canadian-made studs, tracks, and channels shorten lead times and keep schedules on track for interiors and exterior framing.
Our manufacturing presence in Vaughan supports fast turns on common stud sizes and custom profiles. Crews working across the GTA appreciate same-day coordination for will-call and scheduled runs to job sites. Cross-border shipping supports projects throughout Canada and the United States.
Local considerations for 370 New Enterprise Way
- Plan pickups outside peak traffic near Queen St / Highway 50 to streamline loading and dispatch.
- Winter installs: account for salt and moisture—stage galvanized components indoors before boarding.
- For site crews using transit connections, note proximity to Highway 50 – Zum Queen Stop EB for last-mile coordination.
If your scope includes slab-on-grade or foundation tie-ins for interior build-outs, coordinate early with reinforcing teams; this foundation wall rebar detail overview offers helpful context when wall alignment depends on embeds.
Case Studies and Real-World Examples
Real projects show how steel wall studs speed schedules, control deflection, and raise acoustic ratings. Using the right gauges, tracks, and channels prevents callbacks and aligns with tested assemblies. The following scenarios mirror common interiors and envelope challenges.
Healthcare clinic fit-out
- 3-5/8 in. light gauge studs at 16 in. o.c.; resilient channel at exam rooms; slotted head-of-wall under concrete slabs.
- Result: Faster inspection sign-off, less joint cracking, quieter rooms for patient privacy.
School corridor retrofit
- Deep track at slab edges; bridging channel at prescribed intervals; abuse-resistant board near lockers.
- Result: Straighter runs, fewer surface repairs through the school year, clean reveals at doors.
Multifamily demising walls
- Staggered stud or double-stud options with resilient channel and insulation per STC targets.
- Result: Higher acoustic performance with predictable, repeatable installation steps.
Retail box exterior infill
- Heavy gauge studs with windbrace and exterior sheathing; slotted track at roof deck.
- Result: Controlled deflection and clean cladding lines that reduce service calls.
For basement and tenant-improvement framing checklists (layout, moisture, and sequencing), this practical basement framing contractor’s guide outlines field steps that dovetail with commercial interior workflows.
Frequently Asked Questions
These quick answers address common questions about steel wall studs—covering gauges, spacing, acoustics, corrosion resistance, and when to use special tracks and clips. Each response is practical and grounded in field use and specification work.
What gauge steel stud should I use for a 10-foot interior wall?
For a typical 10-foot non-load-bearing partition, light gauge studs commonly used are in the 25–20 gauge range, spaced 16 or 24 inches on center depending on board type and acoustic goals. Always confirm with engineering tables that account for height, spacing, and any lateral loads.
When do I need slotted deflection track at the head-of-wall?
Use slotted deflection track whenever the design calls for vertical building movement at the head-of-wall—common under concrete slabs or roof structures. The slot length and fastener pattern must match the required movement so finishes don’t crack during seasonal or live-load deflection.
How do resilient channels improve wall acoustics?
Resilient channels decouple gypsum board from the stud, reducing sound transmission by interrupting rigid connections. Installed horizontally on the stud face, they’re fastened properly to the channel—not the stud—so the isolating effect remains intact and STC performance increases.
What’s the difference between bridging channel and furring channel?
Bridging (or carrying) channel ties studs together to resist buckling and meet height/load requirements. Furring channel, by contrast, creates a level surface or a service cavity for finishes and MEP—often used to true up uneven substrates or to support acoustic designs.
Are steel studs good for basements or humid areas?
Yes. Galvanized studs and tracks don’t warp or encourage mold the way wet wood can. Still, control bulk water and use appropriate insulation and vapor strategies. For sequencing reminders tied to moisture, review this practical basement framing codes checklist.
Conclusion and Next Steps
Successful steel wall stud projects start with correct gauge selection, appropriate tracks for movement, and proper bracing and acoustics. With engineered components, clear submittals, and staged materials, teams frame faster, pass inspections smoothly, and protect finishes throughout the building’s life.
Key takeaways
- Pick gauge by height and load; don’t guess—use tables.
- Match head-of-wall details to required movement to prevent cracks.
- Use bridging channel and clips to keep tall walls straight.
- Resilient channel boosts STC when installed and fastened correctly.
- Stage materials by zone and standardize screw patterns to save hours.
Action steps
- Share this guide with your project engineer and superintendent.
- Assemble a submittal pack with load tables, details, and trims.
- Schedule a quick call with our engineering team for wall-by-wall guidance.
Ready to translate wall types, heights, and acoustic targets into a buildable plan? We’ll help you specify gauges, spacing, channels, and clips that pass inspection the first time—backed by Canadian manufacturing in Vaughan and dependable delivery across Canada and the United States. Start here: Dass Metal Products.
